Samstag, 28. November 2015

Jolly Waves Cowl

With an eye-catching design and beautiful colors this cowl will keep your spirits up this winter. The gorgeous graphical effect is achieved by the combination of short rows with a feather and fan pattern.


Creative Commons License
This work by Knitting and so on is licensed under a Creative Commons Attribution-NonCommercial-ShareAlike 4.0 International License.


Materials
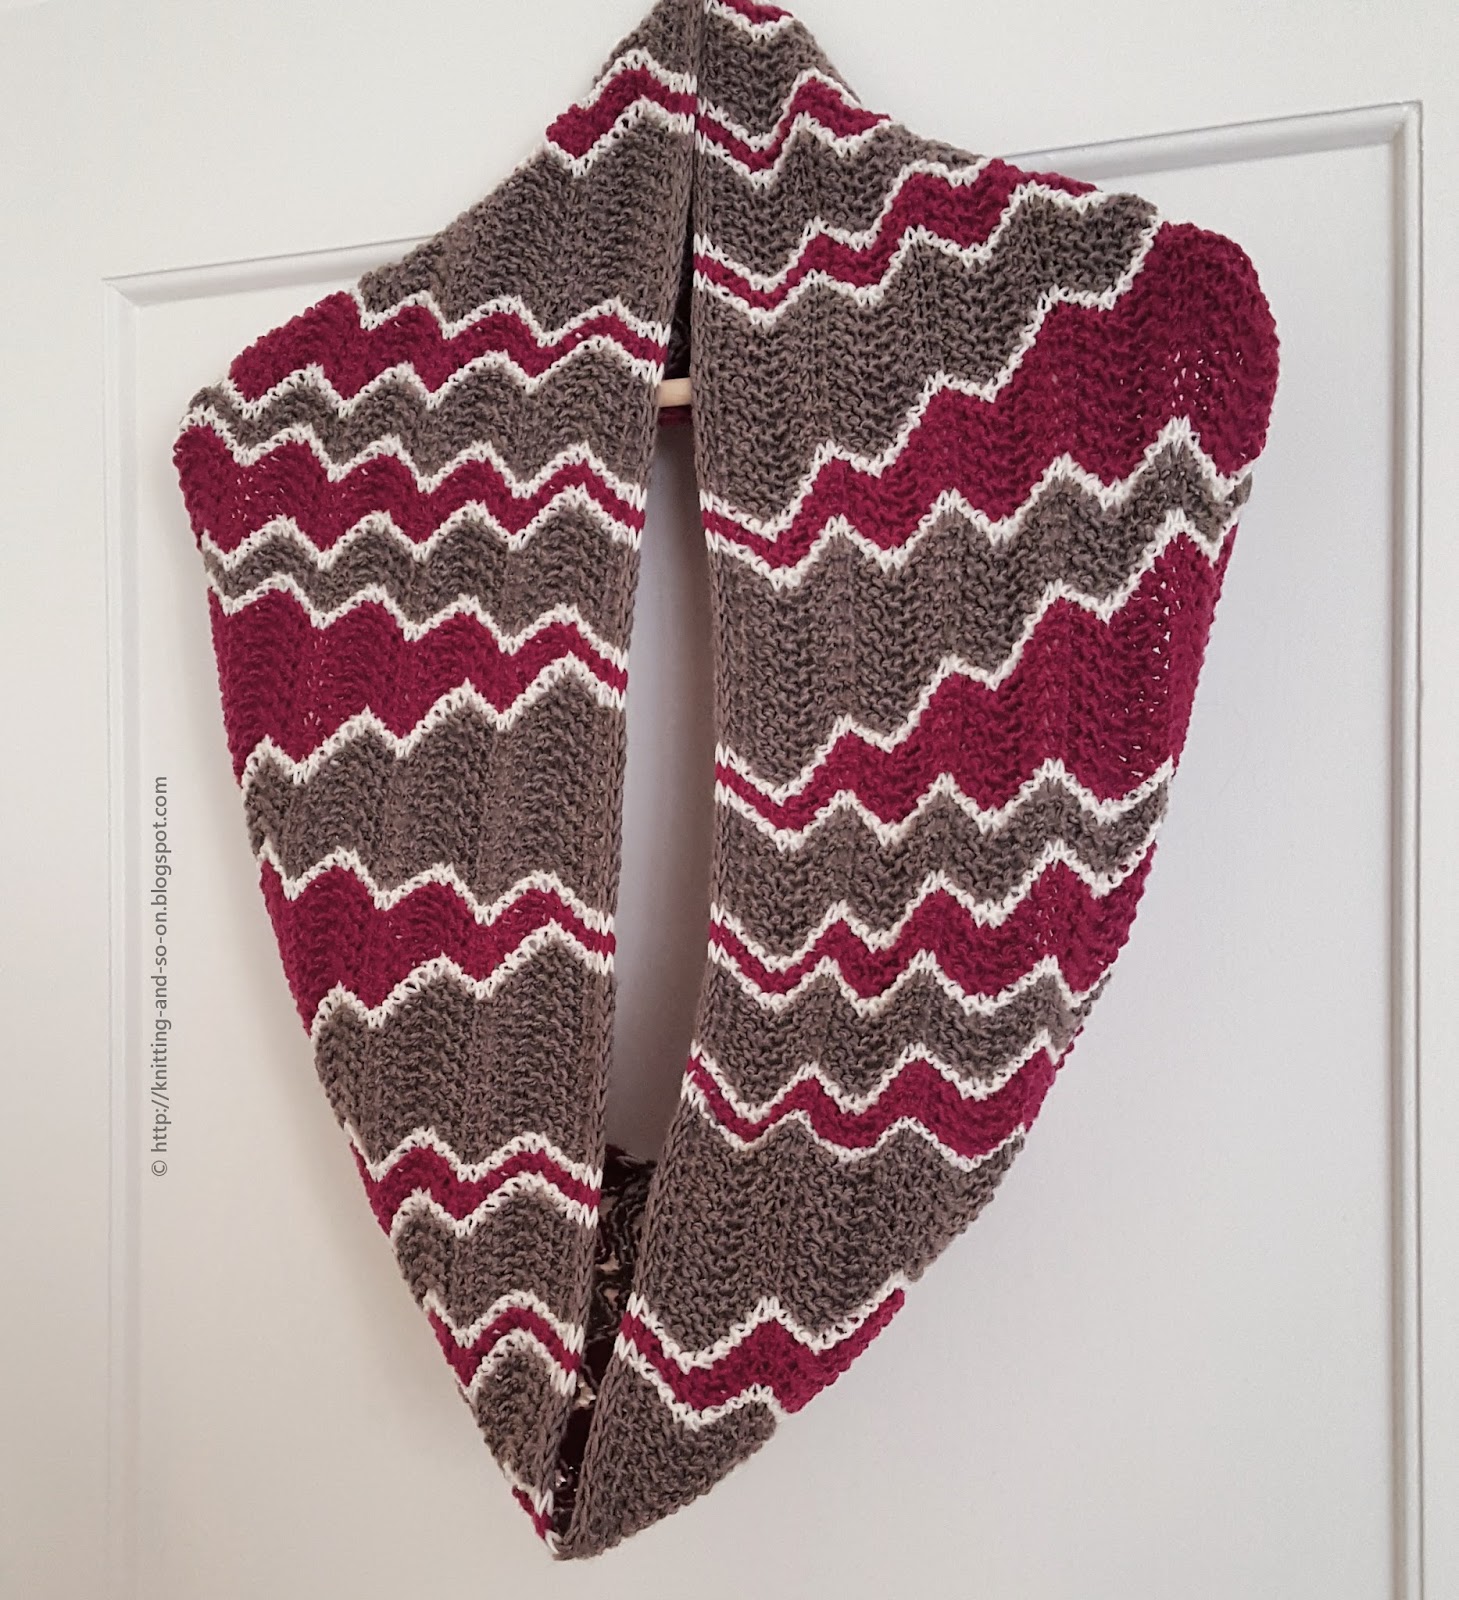
  • about 220 grams of DK weight yarn in 3 colors, 100 grams of the main colors each (beige and maroon in the photos - called MC1 and MC2) and 20 grams of the contrast color (off-white in the photos - called CC) - this will yield a double length cowl, i.e. about 125 cm in circumference.
  • 3.75 mm knitting needles (straight or circular)
  • 6 stitch markers (2 stitch markers to mark the edges and 4 markers to mark the ends of the short rows - these 4 markers will be called M1 to M4)


Techniques

Short Row Sections

The pattern consists of different short row sections that are divided by a garter stitch ridge in the neutral color.


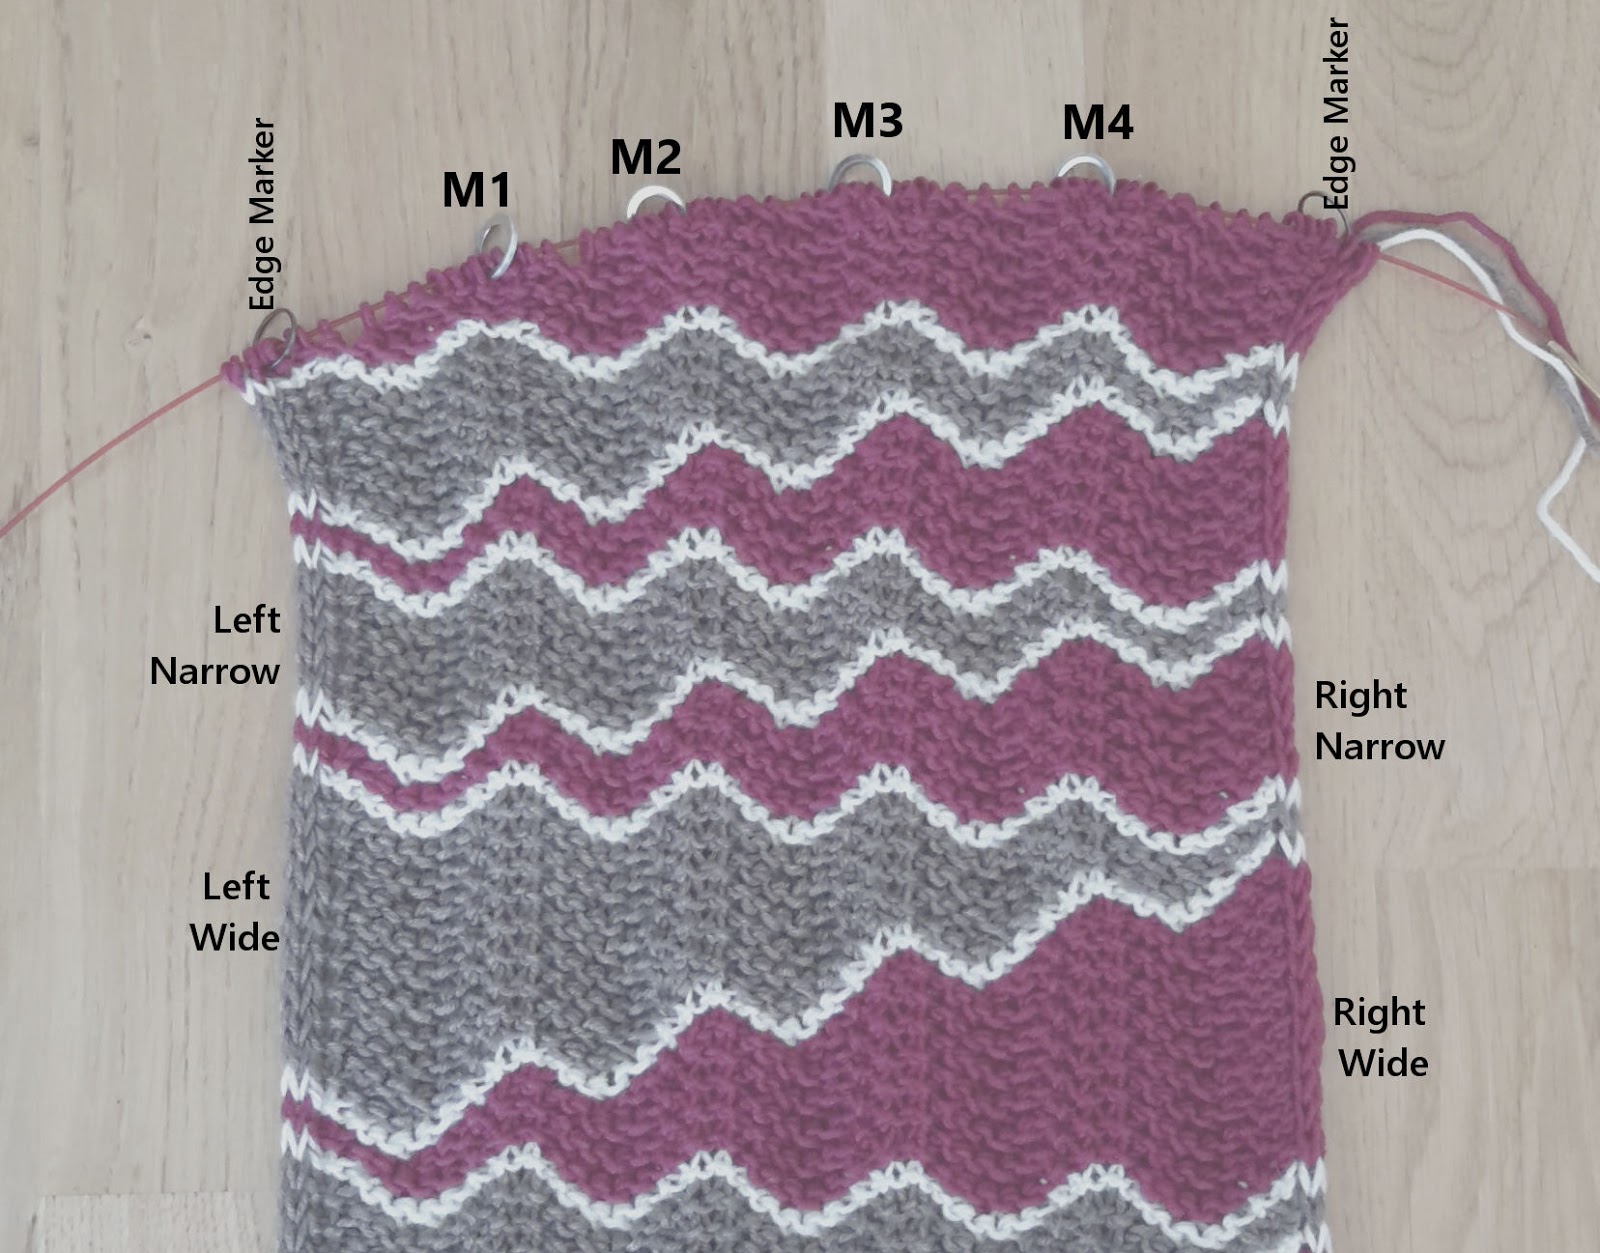
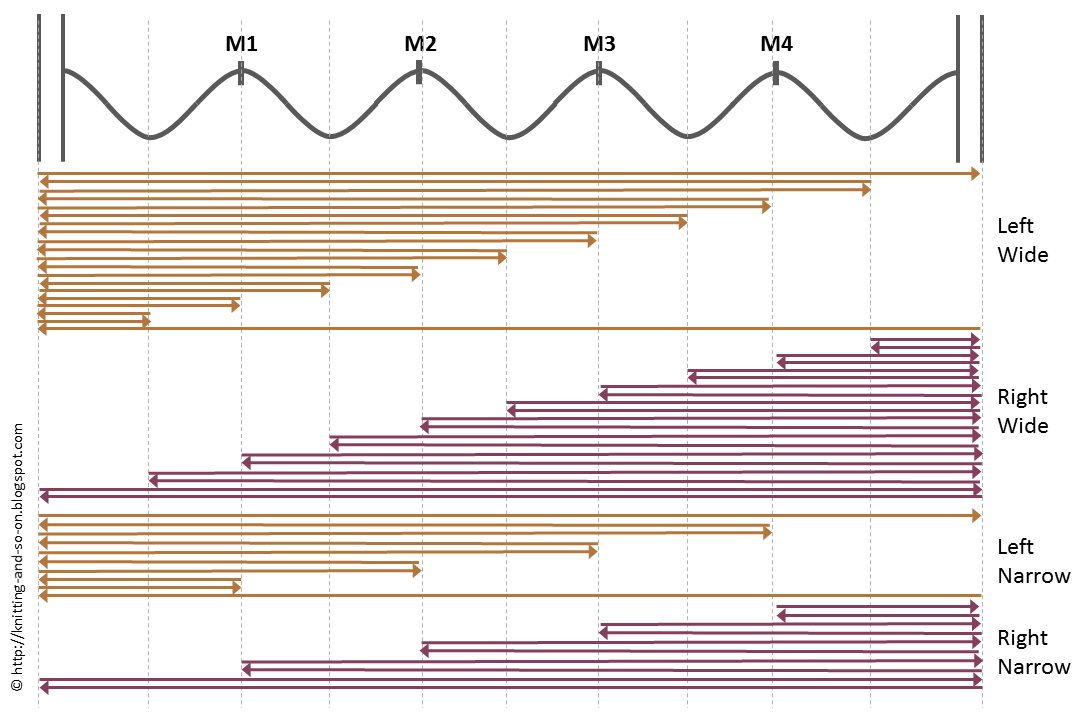
There are four types of section - as shown in the picture above.
  • Right Narrow Section
  • Left Narrow Section
  • Right Wide Section and
  • Left Wide Section.
The diagram below shows how the short rows stack up for each section type. Both the photo and the diagram show the RS of the cowl.


Basically, you knit 4 narrow sections (right-left-right-left) and 4 wide sections (also right-left-right-left) with a rigde in a neutral color inbetween. All "right"-sections (i.e. right narrow and right wide section) are knitted in color 1 (MC1), all "left"-sections (i.e. left narrow and left wide section) are knitted in color 2 (MC2) - and all contrast ridges are knitted with the contrast color CC.


Instructions

Provisionally CO 66 stitches and knit one row with CC - leaving a tail long enough to graft these 66 stitches in the end and placing the markers as follows: k3 pm (edge marker) k12 pm (=M1) k12 pm (=M2) k12 pm (=M3) k12 pm (=M4) k12 pm (edge marker) k3

Knit a right narrow section as follows:
With MC1
R1 (RS): k all stitches
R2 (WS): sl3wyif, * kfb kfb ssk ssk ssk ssk kfb kfb repeat from * until there are only 3 sts left, sl3wyif
R3, R4 (RS, WS): k up to M1, w+t, * kfb kfb ssk ssk ssk ssk kfb kfb repeat from * until there are only 3 sts left, sl3wyif
R5, R6 (RS, WS): k up to M2, w+t, * kfb kfb ssk ssk ssk ssk kfb kfb repeat from * until there are only 3 sts left, sl3wyif
R7, R8 (RS, WS): k up to M3, w+t, * kfb kfb ssk ssk ssk ssk kfb kfb repeat from * until there are only 3 sts left, sl3wyif
R9, R10 (RS, WS): k up to M4, w+t, * kfb kfb ssk ssk ssk ssk kfb kfb repeat from * until there are only 3 sts left, sl3wyif

Knit a contrast ridge as follows
With CC
R1 (RS): k all stitches
R2 (WS): sl3wyif, * kfb kfb ssk ssk ssk ssk kfb kfb repeat from * until there are only 3 sts left, sl3wyif

Knit a left narow section as follows
With MC2
R1 (RS): k all stitches
R2, R3 (WS, RS): sl3wyif, kfb kfb ssk ssk ssk ssk kfb kfb (you're now at M1), w+t, k all stitches
R4, R5 (WS, RS): sl3wyif, * kfb kfb ssk ssk ssk ssk kfb kfb repeat from * until you are at M2, w+t, k all stitches
R6, R7 (WS, RS): sl3wyif, * kfb kfb ssk ssk ssk ssk kfb kfb repeat from * until you are at M3, w+t, k all stitches
R8, R9 (WS, RS): sl3wyif, * kfb kfb ssk ssk ssk ssk kfb kfb repeat from * until you are at M4, w+t, k all stitches
R10 (WS): sl3wyif, * kfb kfb ssk ssk ssk ssk kfb kfb repeat from * until there are only 3 sts left, sl3wyif

Knit a contrast ridge.
Knit a right narrow section.
Knit a contrast ridge.
Knit a left narrow section.
Knit a contrast ridge.

Knit a right wide section as follows
With MC1
R1 (RS): k all stitches
R2 (WS): sl3wyif, * kfb kfb ssk ssk ssk ssk kfb kfb repeat from * until there are only 3 sts left, sl3wyif
R3, R4 (RS, WS): k up to M1, k6, w+t, ssk ssk kfb kfb, * kfb kfb ssk ssk ssk ssk kfb kfb repeat from * until there are only 3 sts left, sl3wyif
R5, R6 (RS, WS): k up to M1, w+t, * kfb kfb ssk ssk ssk ssk kfb kfb repeat from * until there are only 3 sts left, sl3wyif
R7, R8 (RS, WS): k up to M2, k6, w+t,  ssk ssk kfb kfb, * kfb kfb ssk ssk ssk ssk kfb kfb repeat from * until there are only 3 sts left, sl3wyif
R9, R10 (RS, WS): k up to M2, w+t, * kfb kfb ssk ssk ssk ssk kfb kfb repeat from * until there are only 3 sts left, sl3wyif
R11, R12 (RS, WS): k up to M3, k6, w+t, ssk ssk kfb kfb,* kfb kfb ssk ssk ssk ssk kfb kfb repeat from * until there are only 3 sts left, sl3wyif
R13, R14 (RS, WS): k up to M3, w+t, * kfb kfb ssk ssk ssk ssk kfb kfb repeat from * until there are only 3 sts left, sl3wyif
R15, R16 (RS, WS): k up to M4, k6, w+t, ssk ssk kfb kfb, * kfb kfb ssk ssk ssk ssk kfb kfb repeat from * until there are only 3 sts left, sl3wyif
R17, R18 (RS, WS): k up to M4, w+t, * kfb kfb ssk ssk ssk ssk kfb kfb repeat from * until there are only 3 sts left, sl3wyif
R19, R20 (RS, WS), k3, k6, w+t, ssk ssk kfb kfb, sl3wyif

Knit a contrast ridge.

Knit a left wide section as follows
With MC2
R1 (RS): k all stitches
R2, R3 (WS, RS): sl3wyif, kfb kfb ssk ssk, w+t, k all stitches
R4, R5 (WS, RS): sl3wyif, kfb kfb ssk ssk ssk ssk kfb kfb (you're now at M1), w+t, k all stitches
R6, R7 (WS, RS): sl3wyif, kfb kfb ssk ssk ssk ssk kfb kfb (you're now at M1), kfb kfb ssk ssk, w+t, k all stitches
R8, R9 (WS, RS): sl3wyif, * kfb kfb ssk ssk ssk ssk kfb kfb repeat from * until you are at M2, w+t, k all stitches
R10, R11 (WS, RS): sl3wyif, * kfb kfb ssk ssk ssk ssk kfb kfb repeat from * until you are at M2, kfb kfb ssk ssk.  w+t, k all stitches
R12, R13 (WS, RS): sl3wyif, * kfb kfb ssk ssk ssk ssk kfb kfb repeat from * until you are at M3, w+t, k all stitches
R14, R15 (WS, RS): sl3wyif, * kfb kfb ssk ssk ssk ssk kfb kfb repeat from * until you are at M3, kfb kfb ssk ssk. w+t, k all stitches
R16, R17 (WS, RS): sl3wyif, * kfb kfb ssk ssk ssk ssk kfb kfb repeat from * until you are at M4, w+t, k all stitches
R18, R19 (WS, RS): sl3wyif, * kfb kfb ssk ssk ssk ssk kfb kfb repeat from * until you are at M4, kfb kfb ssk ssk.  w+t, k all stitches
R20 (WS): sl3wyif, * kfb kfb ssk ssk ssk ssk kfb kfb repeat from * until there are only 3 sts left, sl3wyif

Knit a contrast ridge.
Knit a right wide section.
Knit a contrast ridge
Knit a left wide section.

Repeat this series of sections (right narrow, left narrow, right narrow, left narrow and right wide, left wide, right wide, left wide) - always divided by a ridge in the neutral color - until the cowl is long enough for you. End with a left wide section.

Put the stitches from your provisional cast-on on a needle and graft both ends together - 3 sts in stockinette, then 60 sts in garter stitch and the last 3 again in stockinette stitch. (If you need more detailed instructions for the grafting part, it's the same that has been used for the Mixed Wave Cowl on this blog. Follow the link and you'll find detailed instructions written by Joni Coniglio.

Weave in ends and block.


Oombawka Design

Montag, 9. November 2015

Octavo Fingerless Gloves

These stylish fingerless gloves will help help to keep your hands warm this fall. With their swirly design they are the perfect eye-catcher and great to show off your variegated yarn.

These mitts are called Octavo because of the eight-shape (octavo meaning one eighth in Spanish), because they are the crochet version of my Pieces of Eight mitts that I published nearly two years ago (both Pieces of Eight and  referring to coins) and - last but not least, because I like the name since the Octavo as a grimoire also plays a role in the library of Unseen University on Terry Pratchett's Discworld.


Creative Commons License
This work by Knitting and so on is licensed under a Creative Commons Attribution-NonCommercial-ShareAlike 4.0 International License.


An Italian version of this pattern is available here.


Materials
  • about 40 to 45 grams of fingering weight yarn
  • a 3mm crochet hook
  • 4 removable stitch markers
  • a tapestry needle to weave in ends


Stitches and Techniques

Size and Possible Adjustments

The finished mitts are about 18 cm high and between 19 cm (at the widest point) and 16 cm in circumference.

  • The width of the circumference is easily changed by crocheting a few rows more or less in part 3.
  • If the thumb is too small for you, you can
    a) crochet it with a bigger crochet hook and change back to a 3mm hook when starting part 2,
    b) make it a few stitches wider but then adjust the number of increases in row 1 on part 2 that you end up with 31 stitches or
    c) do a thumb construction as explained in the Kreisel Fingerless Gloves and pick up 24 sts around it (or adjust the number of increases in row 1 on part 2 that you end up with 31 stitches).


General Construction

These fingerless gloves are worked in three parts as shown in the picture on the right hand side.

Part 1 (the thumb) is crocheted in the round. Then a longer chain is added to prepare for the eight-shape crocheted in part 2 - during this part increases are made around the thumb and decreases are made with the newly chained stitches. This part is crocheted back and forth.
During part 3 the part that covers the back of your hands is done - also back and forth. In the end, the upper edge of this part is connected to the other side of the glove.


Instructions

The pattern starts with a foundation chain because it’s stretchier than a normal crochet chain – alternatively you can start with a normal chain and a bigger hook just for the chain row.

Part 1: Thumb

Do 14 foundation chain sts and join in round with slip stitch
Round 1: sc all stitches - then go on (as in amigurumi – no connections with slip stitch etc.)
Repeat this round  5 more times
R6: sc 4, inc, sc 4, inc, sc4
R7 : sc all stitches
R8 : sc 2, inc, sc 10, inc, sc 2
R9 : sc all stitches
R10 : [sc, inc, sc] 6 times
Close with slip stitch and place a marker in this slip stitch (this marker will be called Middle Marker or MM for short - and it should always be put in the current row)

Part 2: Eight-Shape

Chain 70 + 1 turning chain and place markers in the 30th and 52nd chain. (These markers can stay there until the end of part 2, i.e. don’t move them up your rows, but just leave them where they are – they will not be used in part 2) - your piece should now look similar to the one in picture 1.

NOTE 1: all increase and decrease stitches in this part are crocheted through the back loop of the underlying stitch only.

NOTE 2: Please note that the sequences in brackets don't always match the number of stitches left (e.g. it might say [dec, sctbl 5], but there are only 4 stitches left) - that's OK. Just continue with the sequence and stop when you run out of stitches (in case of the example above, just make one decrease and sctbl the 3 stitches to the end)

R1: [sc5, dec, sc 5] until you reach MM. For the 1st mitt go on crocheting while looking at the inside of the thumb, for the second mitt go on looking at the outside of the thumb - that way you set up one mitt mirror-inverted to the other). [sc2, inc]*7 times, sc to the end. Now make a slip stitch into the underside of the first stitch of the chain of the last row, and then another slip stitch in the underside of the next chain (see picture 3). Start the next row into the last sc.
R2: [sctbl 1, inc, sctbl 3] to MM, [sctbl 8, dec, sctbl 1] to end, 1 turning-chain
R3: [sctbl 3, dec, sctbl 5] to MM, [sctbl 3, inc, sctbl 2] to the end, connect with 2 sl st into the underside of the 2 next chains stitches and start the next row into the last sc (this is how you'll end all odd-numbered rows in this part - it will be referred to as "connect with 2 sl st")
R4: [sctbl 2, inc, sctbl 4] to MM, [dec, sctbl 7] to end, sctbl to end, 1 turning-chain
Now your piece should look similar to the one in picture 2.
R5: [sctbl 1, dec, sctbl 5] to MM, sctbl 2, [sctbl 3, inc, sctbl 4] to end, connect with 2 sl st
R6: [sctbl 8, inc] to 2 sts before to MM, sctbl 4, [dec, sctbl 5] to end, 1 turning-chain
R7: [sctbl 3, dec, sctbl 1] to 2 sts before MM, sctbl 4, [sctbl 9, inc] to end, connect with 2 sl st
R8: [sctbl 10, inc] to 3 sts before MM. sctbl 6, [sctbl 3, dec] to end, 1 turning-chain
R9: [sctbl 2, dec] to 3 sts before MM, sctbl 6, [sctbl 6, inc, sctbl 5] to end, connect with 2 sl st
R10: [sctbl 7, inc, sctbl 5] to 3 sts before MM, sctbl 6, [dec, sctbl 1] to end, 1 turning-chain
R11: [dec] to 3 sts before MM, sctbl 6,  [sctbl 9, inc, sctbl 4] to end, connect with 2 sl st
R12: [sctbl 7, inc, sctbl 7] to 4 sts before MM, sctbl 8, [dec] to end
R13: turn your piece to the wrong side and connect the edge below the current stitch to the curve above (see picture 4) - you should use about 12 to 14 stitches to do this.

When you look at your piece from the front, you see an 8 shape with the upper curve bigger than the
lower one. For the first mitt your current stitch will be on the left-hand side, for the second mitt it will be on the right hand side.
Count your stitches on the upper curve (i.e. from your current stitch to the end of the row, see black curve on the picture to the right). Your stitch count should be somewhere about 76 to 78 (a few stitches really don't matter here).

To calculate where to put your stitch markers, substract 22 from your stitch count, and devide the resulting number by 2.

I had 76 sts (76 - 22 = 54; 54 / 2 = 27). You can see that your current stitch is a bit lower than the end stitch of the curve on the other side. Therefore the part on the side of your current stitch should be a bit longer than the part on the other side, i.e. add 2 to the number for the longer part and substract 2 for the number on the shorter part. (In my example 27 - 2 = 25 (shorter part), 27 + 2 = 29 (longer part). Place your stitch markers according to the picture.

Part 3: Widening the Wrists
Now go on crocheting upwards (towards the marker you just put in)
R1: sctbl 29 (you should have reached the new marker), 1 turning-chain
R2: sctbl 29, sctbl 18 (now you should have reached a marker you put in when beginning part 2), 1 turning-chain
R3: sctbl to end, 1 turning-chain
R4: sctbl to end, 1 turning-chain
R5: sctbl18, sl st and turn, sctbl to end, 1 turning-chain, turn, sctbl to end (don't forget to stitch into the sl st from the short row below), 1 turning-chain
R6, sctbl to end, 1 turning-chain

Repeat rows 3 to 6 until the mitt fits around your hand. For me this was the case after working rows 3 to 6 a total of 3 times. Now your piece should look like picture 6.

Fold the mitt (right sides together) and connect the last row to the stitches between the stitch markers on the other side (see picture 6). Turn your mitts back right sides out and remove your stitch markers.

Weave in ends. Make two.


This pattern was featured at the Link and Share Wednesday Link Party hosted by Oombawka Design and on the Fiber Tuesdays Link Party hosted by Oui Crochet. It was also  feaured at Crafting Along #119 at Be a Crafter.

Oombawka Design

Sonntag, 8. November 2015

Pieces of Eight Mitts in Crochet

I never thought that it'd be fun to "rewrite" some of my knitting patterns to a crochet version - but it was. After publishing a crochet version for my Circle Mitts - called Kreisel Fingerless Gloves, I thought I might as well try the same thing with my Pieces of Eight Mitts. It worked better than I had thought and I really like the colors.