
The finished scarf is about 2 meters long (measured on the shorter side).


This work by Knitting and so son is licensed under a Creative Commons Attribution-NonCommercial-ShareAlike 4.0 International License.

A danish translation of this pattern was written by Marianne Holmen of strikkeglad.dk - details can be found in this blogpost.
Materials
- 3.5 mm needles (straight or circular)
- 110 grams of fingering weight yarn
- a tapestry needle to weave in ends
Techniques
- Double yarn over (yo yo): https://www.youtube.com/watch?v=YRwWNIPGNQU - if the next row is a knitting row (without any lace pattern), you knit a double yarn over as follows: knit into the first yo and purl into the second yo (as shown in the video).
- German short rows: when you turn, bring yarn to the front and pull it back so that a sort of double-stitch is created, then knit back as usual - when you have to knit the double-stitch, be careful to knit it as one stitch (see also https://www.youtube.com/watch?v=P6n561SMZXQ); this method has the advantage the no picking up of stitches is necessary. In the pattern, this stitch will be called t+p (turn and pull).(Up until recently, my preferred way of short rows was knitting wrap and turns - you can of course do that as well at the same place as the t+p ... I just wanted to learn a new technique :)
Lace Pattern
The lace pattern used here is very easy to remember - it's made for a stitch count divisible by 4 plus 2 edge stitches.

Row 1 (RS): sl1 (purlwise), *k2tog yo yo k2tog repeat from * until the last stitch, k1
Row 2 (WS): sl1 (purlwise), *yo k2tog k2tog yo repeat from * until the last stitch, k1
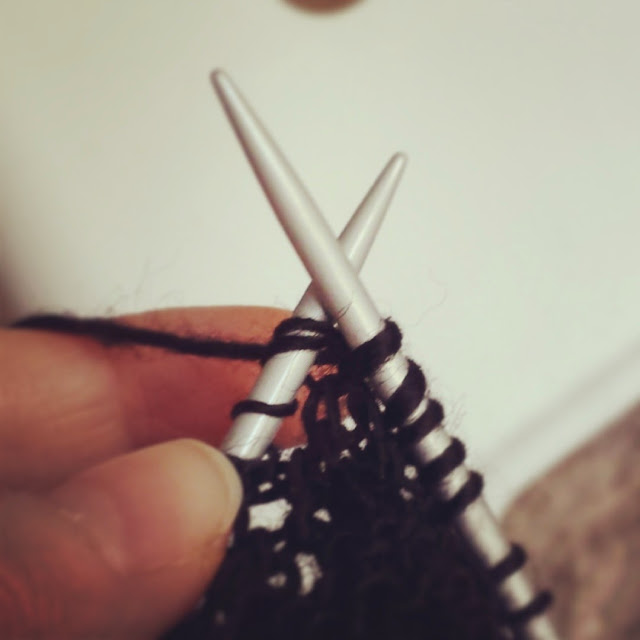 After the first row of a lace section, a k2tog is always made from a yo and a k2tog from the row below (see photo on right hand side, where I'm knitting together a k2tog and the first of two yarn overs.
Each lace section consist of 10 rows of lace pattern, all odd rows knitted like row 1 and all even rows knitted like row 2.
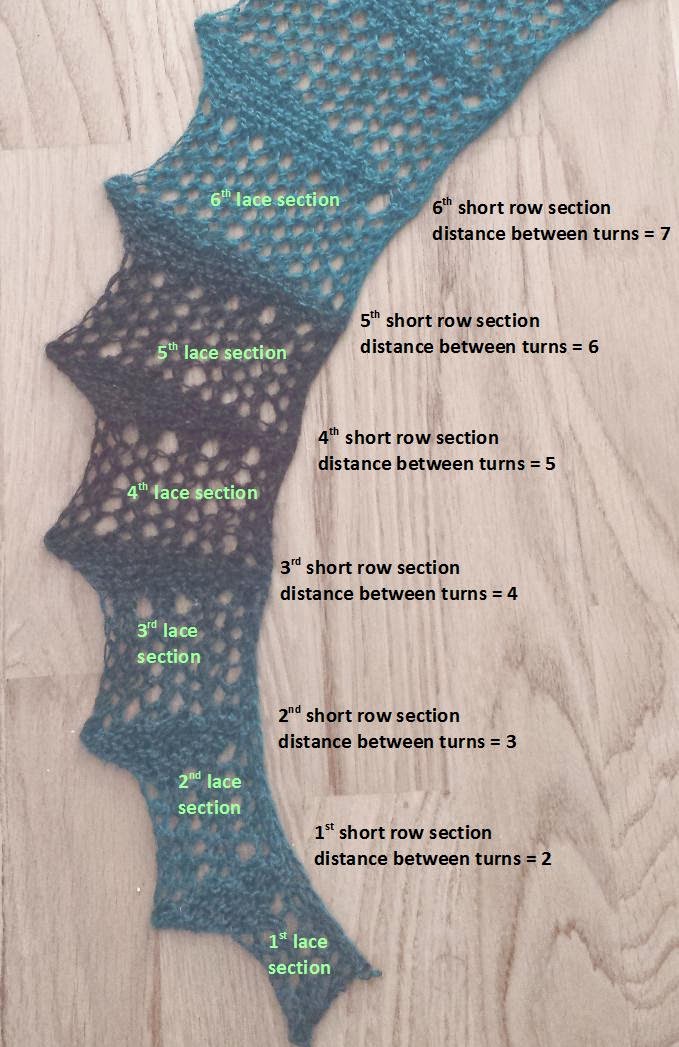
Short Row Sections
All short row sections consist of 10 rows in garter stitch, i.e. 5 garter stitch ridges. The first and the last ridge are knitted over the complete row (i.e. no short rows). Only the ridges inbetween are turned earlier, i.e. are short rows as such. Since the piece varies in width, the places where to stop and turn vary also.
Increasing Short Row Sections
With each short row section in the increasing part the stitch count is increased by 4. Since the turning points should be evenly distributed along the width of the piece, the distance between the turns must increase as well.
That means in general the increasing short row sections are knitted as follows:
Row 1 (RS): k to end (when you encounter a double yarn over, knit it as k1 p1)
Row 2 (WS): k to last stitch, kfb
Row 3 (RS): k to X+1 sts before end, t+p
Row 4 (WS): k to last stitch, kfb
Row 5 (RS): k to (X+1)*2 sts before end, t+p
Row 6 (WS): k to last stitch, kfb
Row 7 (RS): k to (X+1)*3 sts before end, t+p
Row 8 (WS): k to last stitch, kfb
Row 9 (RS): k to end (be careful to knit the double stitches as one stitch)
Row 10 (WS): k to end
Because of the 4 kfb's the stitch count has increased by 4.
So the trick of knowing when to turn is keeping track how many short row sections you've knit before, and adding 1.
For the 1st short row section the stitches at which to turn would be 2 before end (in row 3), 4 before end (in row 5) and 6 before end (in row 7), for the 2nd short section the turns would be 3 before end (row 3), 6 before end (row 5) and 9 before end, in the 3rd short row section the numbers would be 4 sts, 8 sts and 12 sts before end respectively, for the 4th section 5 sts, 10 sts and 15 sts. And so on ...
Short Row Section Neutral
Row 1 (RS): k to end (when you encounter a double yarn over, knit it as k1 p1)
Row 2 (WS): k to end
Row 3 (RS): k to 17 sts before end, t+p
Row 4 (WS): k to end
Row 5 (RS): k to 34 sts before end, t+p
Row 6 (WS): k to end
Row 7 (RS): k to 51 sts before end, t+p
Row 8 (WS): k to end
Row 9 (RS): k to end (be careful to knit the double stitches as one stitch)
Row 10 (WS): k to end
Short Row Sections Decreasing
The same calculations have to be made backwards when decreasing by 4 stitches. You start with the stitch distance that was used in the last increasing short row section and work your way down. So if Y is the number of increasing short row sections, you knitted during the first half of the scarf , X is Y minus the number of decreasing sections you just knitted. (E.g. you knitted 16 increasing short row sections in the first half, and have now knitted 5 decreasing short row sections, X = 16 - 5 = 11.)
That means in general the decreasing short row sections are knitted as follows:
Row 1 (RS): k to end (when you encounter a double yarn over, knit it as k1 p1)
Row 2 (WS): k to last 2 stitches, k2tog
Row 3 (RS): k to X+1 sts before end, t+p
Row 4 (WS): k to last 2 stitches, k2tog
Row 5 (RS): k to (X+1)*2 sts before end, t+p
Row 6 (WS): k to last 2 stitches, k2tog
Row 7 (RS): k to (X+1)*3 sts before end, t+p
Row 8 (WS): k to last 2 stitches, k2tog
Row 9 (RS): k to end (be careful to knit the double stitches as one stitch)
Row 10 (WS): k to end
Because of the 4 k2tog's the stitch count has descreased by 4.
Row 1 (RS): k to end (when you encounter a double yarn over, knit it as k1 p1)
Row 2 (WS): k to last 2 stitches, k2tog
Row 3 (RS): k to 17 sts before end, t+p
Row 4 (WS): k to last 2 stitches, k2tog
Row 5 (RS): k to 34 sts [17*2] before end, t+p
Row 6 (WS): k to last 2 stitches, k2tog
Row 7 (RS): k to 51 sts [17*3] before end, t+p
Row 8 (WS): k to last 2 stitches, k2tog
Row 9 (RS): k to end (be careful to knit the double stitches as one stitch)
Row 10 (WS): k to end
Because of the 4 k2tog's the stitch count has descreased by 4.
Pattern Instructions - Short Version
Basically the pattern consists in alternating lace sections (i.e. 10 rows of lace pattern) with a short row (garter stitch) sections.
- Cast on 10 and start with a lace section, the knit the first increasing short row section (with the distance of 2 stitches between the turning points), then you knit another lace section and the next short row section (this time with a distance of 3 stitches between the turning points).
- Continue - increasing the stitch distances until you have knitted a total of 16 lace sections, then you knit a neutal short row section, i.e. a short rows section with the same stitch distance than the last one (i.e. 17) but without any increases or decreases.
- Then knit a lace section and the first decreasing short row section, i.e. with a stitch distance of 17, too. You continue with a lace section and a short row section with a distance of 16 stitches between the turning points, then another lace section and a short row section with a stitch distance of 15 and so on. Until you have knitted a short row section with a stitch distance of 2. You should now have 10 stitches on your needles. Finish with a lace section and bind off after the 10th row.
- Weave in ends and block.
Instructions - Longer Version
 CO10
CO10Knit a lace section (i.e. 10 rows of lace pattern)
Knit a the first short row section:
Row 1 (RS): k to end (when you encounter a double yarn over, knit it as k1 p1)
Row 2 (WS): k to last stitch, kfb
Row 3 (RS): k to 2 sts before end, t+p
Row 4 (WS): k to last stitch, kfb
Row 5 (RS): k to 4 sts before end, t+p
Row 6 (WS): k to last stitch, kfb
Row 7 (RS): k to 6 sts before end, t+p
Row 8 (WS): k to last stitch, kfb
Row 9 (RS): k to end (be careful to knit the double stitches as one stitch)
Row 10 (WS): k to end
Alternate lace sections and short row sections until you have knitted 16 lace sections and 16 short row sections. The pattern below shows how to knit the short row sections for the 2nd (3rd, 4th, 5th, 6th, 7th, 8th, 9th, 10th, 11th, 12th, 13th, 14th, 15th, 16th) increasing lace section
Row 1 (RS): k to end (when you encounter a double yarn over, knit it as k1 p1)
Row 2 (WS): k to last stitch, kfb
Row 3 (RS): k to 3 (4, 5, 6, 7, 8, 9, 10, 11, 12, 13, 14, 15, 16, 17) sts before end, t+p
Row 4 (WS): k to last stitch, kfb
Row 5 (RS): k to 6 (8, 10, 12, 14, 16, 18, 20, 22, 24, 26, 28, 30, 32, 34) sts before end, t+p
Row 6 (WS): k to last stitch, kfb
Row 7 (RS): k to 9 (12, 15, 18, 21, 24, 27, 30, 33, 36, 39, 42, 45, 48, 51) sts before end, t+p
Row 8 (WS): k to last stitch, kfb
Row 9 (RS): k to end (be careful to knit the double stitches as one stitch)
Row 10 (WS): k to end
Knit a lace section
Knit the neutral short row section
Row 1 (RS): k to end (when you encounter a double yarn over, knit it as k1 p1)
Row 2 (WS): k to end
Row 3 (RS): k to 17 sts before end, t+p
Row 4 (WS): k to end
Row 5 (RS): k to 34 sts before end, t+p
Row 6 (WS): k to end
Row 7 (RS): k to 51 sts before end, t+p
Row 8 (WS): k to end
Row 9 (RS): k to end (be careful to knit the double stitches as one stitch)
Row 10 (WS): k to end
Knit a lace section
Alternate decreasing short row section and lace sections a total of 16 times, where the decreasing short row sections are knitted as follows for the 1st (2nd, 3rd, 4th, 5th, 6th, 7th, 8th, 9th, 10th, 11th, 12th, 13th, 14th, 15th, 16th) section.
Row 1 (RS): k to end (when you encounter a double yarn over, knit it as k1 p1)
Row 2 (WS): k to last 2 stitches, k2tog
Row 3 (RS): k to 17 (16, 15, 14, 13, 12, 11, 10, 9, 8, 7, 6, 5, 4, 3, 2) sts before end, t+p
Row 4 (WS): k to last 2 stitches, k2tog
Row 5 (RS): k to 34 (32, 30, 28, 26, 24, 22, 20, 18, 16, 14, 12, 10, 8, 6, 4) sts before end, t+p
Row 6 (WS): k to last 2 stitches, k2tog
Row 7 (RS): k to 51 (48, 45, 42, 39, 36, 33, 30, 27, 24, 21, 18, 15, 12, 9, 6) sts before end, t+p
Row 8 (WS): k to last 2 stitches, k2tog
Row 9 (RS): k to end (be careful to knit the double stitches as one stitch)
Row 10 (WS): k to end
Your stitch count should be ten.
Knit a final lace section and bind off in knit stitch after the 10the row.
Weave in ends and block.

I love this - very pretty. Put in my favs on Ravelry.
AntwortenLöschenThanks :) Glad you like it.
Löschenlinda peça, muito bonita uma cor linda,parabens,sandra hiwatashi 3.6 as l8;47 ,um abraço e obrigada, curtir.
AntwortenLöschenThank yuo . Silvia
AntwortenLöschenBeautiful. Thank you for the patern instructions :)
AntwortenLöschenThank you - dziękuję!
LöschenOne more gorgeous interesting pattern from you.... thanks for your generosity. I love the beauty created by using math and logic... makes me think of fractals.... inspiring me to maybe finally write and share my own...
AntwortenLöschenThank you very much for your nice comment. Glad you like my patterns ... and thanks also for getting me to think about fractals ... there might be some knitting potential there :)
LöschenPlease let me know when you publish your own pattern(s) - it's great to see all the creativity here on the internet!
Molto bello!! Ed Originale!!
AntwortenLöschenMille grazie!
LöschenBeautiful lace scarf!
AntwortenLöschenIs there any instruction in German?
Many blessings Monika
Nein. Die Anleitung gibt es leider nur auf Englisch.
LöschenViele Grüsse!