
random surface crochet. Serpentina is the spanish word for a paper streamer :).
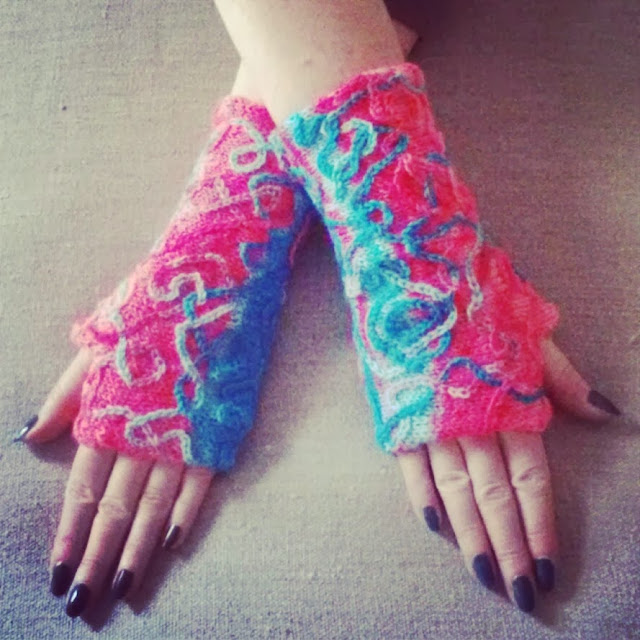
They are knitted sideways in simple stockinette stitch, with some shaping added using short rows.
Adding surface crochet is a good way to mix colours, especially with variegated yarn that has a dramatic colour change – as with the mitts in the picture where the colour changes from a very light pink to a dark turquoise.


This work by Knitting and so on is licensed under a Creative Commons Attribution-NonCommercial-ShareAlike 4.0 International License.

Important: the surface crochet is applied completely at random, i.e. the pattern below will NOT give a detailed descriptions where to put the surface crochet stitches. There are, however, tips of how to achieve a similar look.
Materials
- ca. 30 grams of variegated fingering weight yarn
- a long 3.5mm circular needles
- a 2.5mm or 3mm crochet hook
- scrap yarn (for provisional cast on)
- tapestry needle (to weave in ends)
Techiques
- Provisional Cast-On: I prefer to do a crocheted provisional cast on with scap yarn - here's a video that shows how to do it.
- Surface Crochet: Using a crochet hook, you make slip stitches through your knitted fabric. The photo on the right shows how it looks when adding surface slip stitches to a knitted fabric. Here's a video and here's a tutorial that both show surface crochet.
- Short Rows: A tutorial on short rows can be found here (http://www.oddknit.com/patterns/notes/techniques/shortrows.html), however in this pattern, there will be short rows with wraps (the usual wrap and turn (w+t)), but also short rows without wraps, to create the thumb opening.
- Kitchener Stitch: A video that shows the kitchener Stitch (or grafting) on stockinette can be found here on knittinghelp.com. Or - if you prefer text to video - here's a vogueknitting tutorial on the subject.
Instructions
Provisionally cast on 45 stitches (if you use the crochet on method, this means crochet on your stitches with scrap yarn and knit the first row with the yarn you'll use for the mitts)
R1 (RS): sl1 k to end
R2 (WS): sl1 p to end
Repeat until there are 11 rows of stockinette stitch
R12: apply random loops and curves of surface crochet on RS - while doing so, cross the complete width of the mitt, end near the last stitch of this row (i.e. where you would have ended, had you knitted the row). Now the tip of your knitting needle is on the opposite side as your yarn, therefore, slip all stitches to correct this. Put the last crochet loop on your knitting needle.
R13 (RS): sl2, pass first slipped stitch over second slipped stitch, k9, place marker, k to end
R14 (WS, thumb row):
- sl1 p to last st before marker, k1, TURN but DO NOT WRAP the yarn around the next stitch (you want to create the opening for your thumb!)
- k12, w+t, p11, k1 turn (DO NOT WRAP)
- k11 w+t, p10, k1 turn (DO NOT WRAP)
- k9 w+t, p8, k1 turn (DO NOT WRAP)
- k7 w+t, p6, k1 turn (DO NOT WRAP)
- k6 w+t, p5, k1 turn (DO NOT WRAP)
- k4 w+t, p3, k1 turn (DO NOT WRAP)
- k5 w+t, p4, k1 turn (DO NOT WRAP)
- k9 w+t, p8, k1 turn (DO NOT WRAP)
- p to end
R15 (RS): sl1, k to end
R16 (WS): sl1, p to end
continue 4 more rows of stockinette stitch
R20 (WS, shaping row to widen the upper part): sl1, p39, w+t, k20, w+t, p to end
knit 2 more rows of stockinette stitch
 R24: appy surface crochet on RS (as in R12)
The photo on the right shows the mitt after row 25, i.e. the thumb has been knitted and surface crochet has been applied twice.
R25 (RS): sl1, k to end
R26 (WS): sl1, p to end
continue in stockinette 7 more rows
R30 (WS, shaping row to widen the upper part): sl1, p39, w+t, k20, w+t, p to end
R31 (RS): sl1, k to end
R32: appy surface crochet on RS (as in R12)
Repeat rows R25 to R32 two more times (or until the mitts are wide enough for your hands continue 5 more rows in in stockinette stitch.
Undo your provisional cast on and put the stitches on a second needle. Break yarn and thread yarn into a tapestry needle. Hold both needles together and start grafting in stockinette stitch.
You can knit the second mitt exactly as the first one, however, if you want them to be more symmetrical (i.e. with the graft line mirror-inverted at the same place), you have to use a slightly different set of instructions for the second mitt:
- start "thumb row" one row later (row 14 is just a normal purl-row) and knit it as follows:
- sl1 k to last st before marker, p1, TURN but DO NOT WRAP - p12, w+t, k11, p1 turn (DO NOT WRAP)
- p11 w+t, k10, p1 turn (DO NOT WRAP)
- p9 w+t, k8, p1 turn (DO NOT WRAP)
- p7 w+t, k6, p1 turn (DO NOT WRAP)
- p6 w+t, k5, p1 turn (DO NOT WRAP)
- p4 w+t, k3, p1 turn (DO NOT WRAP)
- p5 w+t, k4, p1 turn (DO NOT WRAP)
- p9 w+t, k8, p1 turn (DO NOT WRAP)
- k to end
- start "shaping rows" one row later (i.e. the row before is just a normal purl row) and knit them as follows:R21 (RS, shaping row to widen the upper part): sl1, k39, w+t, p20, w+t, k to end
How to apply the surface crochet to get a similar look to the mitts in the photo
 4) After grafting the application of surface crochet gets more difficult (it gets cumbersome to hold the yarn within the newly formed tube and reach it with your crochet hook from the outside), therefore it’s easier to apply it before grafting. However, to get a consistent look, some surface crochet should be applied crossing the grafted row. The photo on the right shows how some surface crochet crosses the "graft line" (where turquois meets pink).
Wonderful thank you!
AntwortenLöschenYou're welcome. Glad you like it :)
LöschenVery very cute, i really like it!!! :)
AntwortenLöschenThank you very much. Grazie tante!
Löschenso beautiful! thank you for the pattern!
AntwortenLöschenThank you very much!
Löschensuch fun and love the crochet deco
AntwortenLöschenThank you!
LöschenThey look beautiful and very appropriate for carnival time
AntwortenLöschenThanks a lot. And thanks for hosting your lovely link party :)
LöschenSo pretty. love the colours and the pattern.
AntwortenLöschenThank you :)
LöschenThese are so jazzy, I love the way the surface crochet snakes around. :)
AntwortenLöschenThanks. I like this effect as well :)
LöschenNice!
AntwortenLöschenoh waw ! These are great !
AntwortenLöschenThank you!
Löschen