Dienstag, 19. Dezember 2017

La Chocolatière Mitts

Shortly after finishing my knitted Helgoland Mitts, I thought that it might be a good idea to pursue the same concept in crochet ... and it actually worked better than I had hoped. As with the Helgoland Mitts, it took me quite a while to write up the pattern, given that I finished them in March. But - finally - here it is.

These mitts are crocheted flat and each in one piece. They are started at the thumb, which is worked flat and joined into a tube. Afterwards, the main part starts with an additional chain, and then is worked back and forth around the thumb. Working through the back loop only gives them an interesting texture.

As to the name, the finished pieces reminded me of creamy, wavy layers of a rich chocolate cake.


Creative Commons License
This work by Knitting and so on is licensed under a Creative Commons Attribution-NonCommercial-ShareAlike 4.0 International License.


Materials
  • a total of about 40 to 45 grams of fingering weight yarn in two colors (called C1 and C2) - I used beige and dark (chocolate) brown
  • 3mm crochet hook
  • 2 removable stitch markers (e.g. safety pins)
  • tapestry needle to weave in ends 

Size
The finished mitts - as knitted by me - are about 19 cm long. The width is adjustable - in part 3 of the pattern.


Stitches and Abbreviations

General Construction
  • Part 1 is the thumb - worked flat and ends with joining the sides to get a little tube. 
  • Part 2 starts with a chain of 36 sts and is worked flat (back and forth) around the thumb - the rows consist of the wave sequences (at the beginning and end of a row) and the increases in round sequences (in the middle of the row, around the thumb). The increases around the thumb are calculated to form a part of a flat circle. (The general idea how to crochet a flat circle is explained in this blogpost, i.e. the Kreisel Mitts crochet pattern).
  • Part 3 is also worked flat, it widens the mitt to fit your hands and ends by crocheting the edges together.

Instructions

NOTE 1: all increase and decrease stitches in this part are crocheted through the back loop of the underlying stitch only.

NOTE 2: Please note that the sequences in brackets don't always match the number of stitches left (e.g. it might say [dec, sctbl 5], but there are only 4 stitches left) - that's OK. Just continue with the sequence until the condition is met and then stop (in case of the example above, just make one decrease and sctbl the 3 stitches to the end)

NOTE 3: Whenever you encounter a marker, work that stitch and replace the marker up to the current row - unless indicated otherwise.

First mitt

Part 1 (Thumb)
With C1
Row 0: ch 10 and 1 turning-chain
Row 1: sc 10; 1 turning-chain
Row 2: sctbl 10; 1 turning-chain
Row 3: sctbl 8, dec; 1 turning-chain
Row 4: sctbl 9; 1 turning-chain
Row 5: sctbl 7, dec; 1 turning-chain
Row 6: sctbl 8; 1 turning-chain
Row 7: sctbl 6, dec; 1 turning-chain

(Your piece should now be as high as half of your thumb circumference. If it's too small for that you can add an even number of "sctbl all, 1 turning-chain"-rounds.)

Row 8: sctbl 7; 1 turning-chain
Row 9: sctbl 6, inc; 1 turning-chain
Row 10: sctbl 8; 1 turning-chain
Row 11: sctbl 7, inc; 1 turning-chain
Row 12: stbl 9; 1 turning-chain
Row 13: sctbl 8, inc; 1 turning-chain
Row 14: sctbl 10; 1 turning-chain

Now your piece should look like in illustration 1.

Fold the edges together (chain edge and your last row) and connect.
Illustrations

Part 2

Row 0 (C1): chain 36 + 1 turning chain - now your piece looks similar to illustration 2
Row 1 (WS, C1): [A]*3, place marker, sc around the rim of the thumb (from the inside, I picked up 24 sts, if you added a few rows between row 7 and 8 of part 1, you will have a different stitch count), place marker [B]*3
Row 2 (RS, C2): [B]*3, dec, [sctbl2, inc] to 2 before marker, dec, [A]*3
Row 3 (WS, C2): [A]*3, sctbl1, dec [sctbl1, inc, sctbl2] to 3 bef marker, sctbl1, dec, [B]*3
Row 4 (RS, C1): [B]*3, dec, sctbl2, [sctbl2, inc, sctbl2] to 4 bef marker sctbl2, dec , [A]*3
Row 5 (WS, C1): [A]*3, dec, sctbl3, [sctbl3, inc, sctbl2] to 5 bef marker, sctbl3, dec , [B]*3
(Now your piece should look similar to illustration 3.)

Row 6 (RS, C2): [B]*3, dec, sctbl3, inc, [sctbl1, inc, sctbl5] to 6 bef marker, dec, sctbl3, inc, [A]*3
Row 7 (WS, C2): [A]*3, inc, sctbl3, dec, sctbl1, [sctbl1, inc, sctbl6] to 7 bef marker sctbl1, inc, sctbl3, dec, [B]*3
Row 8 (RS, C1): [B]*3, dec, sctbl3, inc, [sctbl4, inc, sctbl4] to 6 bef marker, dec, sctbl3, inc, [A]*3
Row 9 (WS, C1): [A]*3, inc, sctbl3, dec, [inc, sctbl9] to 6 bef marker inc, sctbl3, dec, [B]*3
Row 10 (RS, C2): [B]*4, [sctbl2, inc, sctbl8] to marker sctbl2, [A]*4
Row 11 (WS, C2): [A]*4, [sctbl4, inc, sctbl7] to  marker, [B]*4
Row 12 (RS, C1): [B]*4, [sctbl8, inc, sctbl4]] to marker, [A]*4
Row 13 (WS, C1): [A]*4, [inc, sctbl13] to marker, [B]*4
Row 14 (RS, C2): [B]*4, dec, sctbl3, inc, [sctbl2, inc, sctbl1] to 6 bef marker, dec, sctbl3, inc, [A]*4
Row 15 (WS, C2): [A]*4, inc, sctbl3, dec, [sctbl2, inc, sctbl12] to 6 bef marker inc, sctbl3, dec, [B]*

Part 3
Row 1 (RS, C1): [B]*4, dec, sctbl3, inc, 1 turning chain
Row 2 (WS, C1):  inc, sctbl3, dec, [B]*4, 1 turning chain
Row 3 (RS, C2): [B]*4, dec, sctbl3, inc, 1 turning chain
Row 4 (WS, C2):  inc, sctbl3, dec, [B]*4, 1 turning chain
Row 5 (RS, C1): [B]*4, dec, sctbl3, inc, 1 turning chain
Row 6 (WS, C1):  inc, sctbl3, dec, [B]*4, 1 turning chain
Try or measure whether the piece fits your hands. If it is not wide enough, repeat rows 3 to 6.
Your piece should look similar to illustration 4.

Hold right sides together (aligning at the lower edge) and connect both sides.

Cut yarns and weave in ends.


Second Mitt
If you want one mitt to be the mirror image of the other, you need to exchange the wave sequences, i.e. every time the pattern for mitt 1 says "A", you need to crochet sequence B and vice versa. The increases around the thumb are the same for both mitts.
I also switched the colors, i.e. whenever I used C1 for mitt 1, I used C2 for mitt 2 - and vice versa.


This post was featured on Oombawka Design's Wednesday Link Party #226 . Thank you!

Montag, 18. Dezember 2017

Halsvarmer med chevrons - Chevrons All Round Cowl in Danish

In addition to translating the Hexagon Mitts into Danish, Marianne Holmen from strikkeglad.dk has also written a translation for the cowl that matches these mitts, the Chevrons All Round Cowl. The translation called "Halsvarmer med chevrons" is available here on strikkeglad.dk. Thank you very much for this translation!

The original english version of this pattern can be found here.


Creative Commons License
This work by Knitting and so on is licensed under a Creative Commons Attribution-NonCommercial-ShareAlike 4.0 International License.

Sonntag, 10. Dezember 2017

Samstag, 9. Dezember 2017

Bonus: Tannenbäumchen Christmas Cookies

Don't worry. I promise I won't become a food blogger :) But this recipe went so nicely with the Tannenbäumchen Potholders that I couldn't resist. So here - for the first time - is a recipe for christmas cookies.
These cookies are not too sweet and they have the fine Matcha taste, that I love. Furthermore, the green color makes them look like christmas trees (or Tannenbäumchen in german :).
Depending on the type of margarine and the white chocolate you use, the cookies can even be vegan.


Ingredients
  • 200 grams of flour
  • 10 grams of Matcha powder
  • 70 grams of confectioners' sugar
  • 130 grams of margarine
  • 2 table spoons of cold green tea
  • white chocolate coating (couverture) - plain white chocolate will do as well
The knitting pattern for the potholder is available here

Directions
  • Mix the dry ingredients (flour, Matcha powder & icing sugar together).
  • Add margarine and tea. Knead until it forms a smooth dough.
  • Form into a ball, wrap with clingfilm and let it rest in the fridge for at least one hour.
  • Preheat the oven to 180°C.
  • On a floured surface (or between two sheets of baking paper), roll the dough out to about 5mm thickness. 
  • Cut cookies with tree shaped cookie cutter - or cut your dough into triangles with an acute angle. 
  • Bake about 12 to 14 minutes - but keep an eye on them since they burn easily.
  • When the cookies are cooled, melt the chocolate coating and decorate the your cookies and wait till the chocolate sets.
    As you can see on all photos, my piping skills are non-existent - however, I melted the chocolate in a freezer bag and cut a small hole into one of the corners and decorated with this makeshift piping bag. So, the use of a real piping bag might have helped ... 


Freitag, 8. Dezember 2017

Tannenbäumchen Potholder

I love baking for christmas. Apart from the result - sweet cookies - there is also the experience of making them with your own hands and it makes your home smell lovely. This experience can even be more fun, if you have a bit of christmas themed equipment - like these lovely potholders with a christmas tree motif.
This potholder is knitted in a combination of short rows and intarsia. That way you don't have too many ends to weave in and the WS of the piece looks presentable


As to the name, Tannenbäumchen is the german word for a small christmas tree - or fir tree to be exact.

Creative Commons License
This work by Knitting and so on is licensed under a Creative Commons Attribution-NonCommercial-ShareAlike 4.0 International License.


Materials
  • a total of about 30 grams of DK weight cotton yarn - about 10 grams of C2 (color of Xmas tree) and 20 grams of C1 (background color)
  • 3.5 mm needles - if you use yarn of a different weight, use a needle that is one size below the size that the yarn calls for
  • scrap yarn for provisional CO
  • a tapestry needle for grafting and to weave in ends


Techniques & Notation
  • Throughout the pattern, the following notation is used:  C1 (k4), C2 (k10, w+t, k10), C1 (k to end) means, knit 4 stitches in C1, change to C2 and knit 10 sts, do a wrap and turn, knit 10 stitches and then change back to C1 and k to end. I.e. color is indicated before the knitting instructions for that yarn and the knitting instructions for that yarn are given in brackets after the color. 
  • Short rows with wrap and turn (w+t) - as shown in this YouTube video by Very Pink Knits.
    Even though this potholder is knit in garter stitch, I picked up the wraps, i.e. two wraps that are on top of each other. Here's a YouTube video that shows how to pick up your wraps (also by Very Pink Knits).
  • Note: in some rows the wrap has to be made just at the color change in the row below, e.g. Ridge B11 where you knit 11 sts in C1 and the 12 stitch that is to be wrapped was knitted in C2. In this case, it's advisable to change the color (as if to knit the next stitch in the new color), wrap and turn in the new color, and then to change back. This gives nicer color edges.
  • Provisional CO: My favorite method for a provisional CO is the crochet provisional CO - it is shown in this Youtube video by New Stitch a Day.
  • Grafting in Garter Stitch: A technique to get an invisible (knitted) seam - this technique is shown in this YouTube Video by knittinghelp.com. 
  • Weaving in (ends) while knitting: as shown in this YouTube video by So, I make stuff. This technique is used here to carry yarn of another color to point further along in your row while avoiding a long float.
  • Weaving in yarn while carrying it back: Draw a long loop of C2 (white in the illustration) to the point closer to the beginning of the rowwhere you want to knit it (picture 1). This gives you a really long float. Knit the first stitch (picture 2). Before knitting the second stitch, catch the float by put the left hand needle under the float (picutre 3) and then knit the stitch with your working yarn as usual. If you catch the float every second stitch, the WS will look as shown in picture 4. (This is a bit like catching floats in stranded knitting as shown in this YouTube video by Knit Purl Hunter.)
    The last two techniques (this and weaving in (ends) while knitting) will are used to avoid a long float that runs parallel to your knitting - and to avoid cutting your yarn. 
  • Click to enlarge
Construction
This potholder is knitted in 5 parts. It starts with a provisional CO. Then each row is a stitch shorter than the last one, One part ends, when the row is only 1 stitch (plus 1 w+t) long - then the next part begins and each row is one stitch longer than the last one until all stitches are knitted and we've sucessfully knitted around a corner. Then the row length is getting shorter again for the next corner. 
After knitting around four corners and the two sides (CO and last row) are grafted in garter stitch.


Size
With DK yarn, the piece measures about 17 cm x 17 cm.


Instructions
With scrap yarn provisionally CO 17 stitches

Part A:
Setup row A0 (WS): C2 (k12), C1 (k5)
Ridge A1: C1 (k6), C2 (k10, w+t, k10), C1 (k6)
Ridge A2: C1 (k7), C2 (k8, w+t, k8), C1 (k7)
Ridge A3: C1 (k8), C2 (k6, w+t, k6), C1 (k8)
Ridge A4: C1 (k9), C2 (k4, w+t, k4), C1 (k9)
Ridge A5: C1 (k10), C2 (k2, w+t, k2), C1 (k10)
Ridge A6: C1 (k11), C2 (w+t), C1 (k10)
Ridge A7: C1 (k10, w+t, k10)
Ridge A8: C1 (k9, w+t, k9)
Ridge A9: C1 (k8, w+t, k8)
Ridge A10: C1 (k7, w+t, k7)
Ridge A11: C1 (k6, w+t, k6)
Ridge A12: C1 (k5, w+t, k5)
Ridge A13: C1 (k4, w+t, k4)
Ridge A14: C1 (k3, w+t, k3)
Ridge A15: C1 (k2, w+t, k2)
Ridge A16: C1 (k1, w+t, k1)

Part B:
Ridge B1: C1 (k1, w+t, k1)
Ridge B2: C1 (k2, w+t, k2)
Ridge B3: C1 (k3, w+t, k3)
Ridge B4: C1 (k4, w+t, k4)
Ridge B5: C1 (k5, w+t, k5)
Ridge B6: C1 (k6, w+t, k6)
Ridge B7: C1 (k7, w+t, k7)
Ridge B8: C1 (k8, w+t, k8)
Ridge B9: C1 (k9, w+t, k9)
Ridge B10: C1 (k10, w+t, k10)
Ridge B11: C1 (k11), C2 (w+t), C1(k11)
Ridge B12: C1 (k11), C2 (k1, w+t, k1), C1 (k11)
Ridge B13: C1 (k10), C2 (k3, w+t, k3), C1 (k11)
Ridge B14: C1 (k14 - over the last 4 sts carry C2 back and weave it in), C2 (w+t), C1 (k14)
Ridge B15: C1 (k13), C2 (k2, w+t, k2), C1 (k13)
Ridge B16: C1 (k12), C2 (k4, w+t, k4), C1 (k12)
Ridge B17: C1 (k11), C2 (k6, w+t, k6), C1 (k11)
Ridge B18: C1 (k10), C2 (k6, w+t, k6), C1 (k10)
Ridge B19: C1 (k9), C2 (k6, w+t, k6), C1 (k9)
Ridge B20: C1 (k8), C2 (k6, w+t, k6), C1 (k8)
Ridge B21: C1 (k7), C2 (k6, w+t, k6), C1 (k7)
Ridge B22: C1 (k11 - over the last 4 sts carry C2 back and weave it in), C2 (k1, w+t, k1), C1 (k11)
Ridge B23: C1 (k10), C2 (k1, w+t, k1), C1 (k10)
Ridge B24: C1 (k9), C2 (k1, w+t, k1), C1 (k9)
Ridge B25: C1 (k8), C2 (k1, w+t, k1), C1 (k8)
Ridge B26: C1 (k7), C2 (k1, w+t, k1), C1 (k7)
Ridge B27: C1 (k6), C2 (k1, w+t, k1), C1 (k6)
Ridge B28: C1 (k5), C2 (k1, w+t, k1), C1 (k5)
Ridge B29: C1 (k4), C2 (k1, w+t, k1), C1 (k4)
Ridge B30: C1 (k4), C2 (w+t), C1 (k4)
Ridge B31: C1 (k3, w+t, k3)
Ridge B32: C1 (k2, w+t, k2)
Ridge B33: C1 (k1, w+t, k1)


Part C:
Ridge C1: C1 (k1, w+t, k1)
Ridge C2: C1 (k2, w+t, k2)
Ridge C3: C1 (k3, w+t, k3)
Ridge C4: C1 (k4), C2 (w+t), C1 (k4)
Ridge C5: C1 (k4), C2 (k1, w+t, k1), C1 (k4)
Ridge C6: C1 (k4), C2 (k2, w+t, k2), C1 (k4)
Ridge C7: C1 (k4), C2 (k3, w+t, k3), C1 (k4)
Ridge C8: C1 (k4), C2 (k4, w+t, k4), C1 (k4)
Ridge C9: C1 (k4), C2 (k5, w+t, k5), C1 (k4)
Ridge C10: C1 (k4), C2 (k6, w+t, k6), C1 (k4)
Ridge C11: C1 (k4), C2 (k7, w+t, k7), C1 (k4)
Ridge C12: C1 (k4), C2 (k8, w+t, k8), C1 (k4)
Ridge C13: C1 (k4), C2 (k9, w+t, k9), C1 (k4)
Ridge C14: C1 (k4), C2 (k10, w+t, k10), C1 (k4)
Ridge C15: C1 (k4), C2 (k11, w+t, k11), C1 (k4)
Ridge C16: C1 (k4), C2 (k12, w+t, k12), C1 (k4)
Ridge C17: C1 (k4), C2 (k13, w+t, k13), C1 (k4)

The middle of ridge C17 is also the middle of the potholder. From this point on, you have to knit the same rows in reverse order

Ridge C18 = Ridge C16
Ridge C19 = Ridge C15
Ridge C20 = Ridge C14
Ridge C21 = Ridge C13
...
Ridge C32 = Ridge C2
Ridge C33 = Ridge C1

Part D: Part B in reverse order
Ridge D1 = Ridge B33
Ridge D2 = Ridge B32
Ridge D3 = Ridge B31
...
D12 = B22, but carry the C2 yarn backwards and weave it in
...
D24 = B14, but carry the C2 yarn backwards and weave it in
...
Ridge D32 = Ridge B2
Ridge D33 = Ridge B1

Part E: Part A in reverse order
Ridge E1 = Ridge A16
Ridge E2 = Ridge A15
...
Ridge E15 = Ridge A2
Ridge E16 = Ridge A1

Take out your scrap yarn of the provisional cast on and put the live stitches on a knitting needle. Cut your yarns but leave tails long enough for grafting.
Graft in garter stitch: 5 sts in C1 and 12 sts in C2.

After grafting there is still a small hole in the middle of the piece - you can sew this closed with your C2 yarn tail. Sew in ends afterwards.

Chart
The chart below shows one half of the potholder. The numbers indicate the number of stitches per color of each ridge. The green number gives the stitches in C2 and the black number the stitches in C1.


Freitag, 1. Dezember 2017

Snowy Xmas Tree

The day after tomorrow is the first sunday of advent. To get in the mood for Christmas, knit yourself a lovely little ornament to decorate your home. This adorable little Christmas tree is available in two sizes. This project is great to use up some scrap yarn you may have leftover from a bigger project. The trees knit up quickly and you may even learn a new techique while knitting them - such as short rows or intarsia. The pattern contains instructions for a smaller and a bigger tree - both written and as a chart.
Further patterns for Christmas ornaments on my blog are the Garter Stitch Christmas Gnomes the Little Christmas Trees I published last year. Or - if you want to knit a pair of christmassy fingerless gloves, there are Zimtstern Mitts or Xmas Stary Mitts.


Creative Commons License
This work by Knitting and so on is licensed under a Creative Commons Attribution-NonCommercial-ShareAlike 4.0 International License.


Materials
  • leftovers of green and white yarn - I used (really) old DK weight yarn (the bigger tree weighs 12 grams and the smaller one 8 grams)
  • knitting needles that are slightly smaller than what the yarn calls for, I used 2.5 mm dpns
  • a third needle for the three needle BO 
  • scrap yarn for provisional CO
  • a crochet hook for provisional CO

Techniques & Notation
  • Provisional Cast on (pCO): My favorite method for a provision CO is the crochet provisional CO - it is shown in this Youtube video by New Stitch a Day.
  • Intarsia: Changing colors with the intarsia technique - as shown in this YouTube video by knitwithpat; or this YouTube video by Francoise Danoy. That way you don't have to carry long strands on the WS.
    To explain the notation used in this pattern, here's an example of a typical row: "Gr (k14), Wh (k3, w+t, k3), Gr (k14)" means, k14 sts in green, change to white, k3 sts in white, wrap and turn, k3 sts in white, change back to green an k14 sts in green. 
  • Short rows with wrap and turn (w+t): as shown in this YouTube video by Very Pink Knits.
  • Three Needle Bind Offhttps://youtu.be/Ph93jWSzTa0
    The picture below shows how the piece looks before the three-needle BO.


Instructions

Bigger Tree

With scrap yarn pCO 30 stitches, then start with your working yarns
Row 0 (Set-up row): Wh (k15), Gr (k15)
Ridge 1: Gr (k18), Wh (k2, w+t, k2), Gr (k18)
Ridge 2: Gr (k8, w+t, k8)
Ridge 3: Gr (k12), Wh (k10, w+t, k10), Gr (k12)
Ridge 4: Gr (k4, w+t, k4)
Ridge 5: Gr (k10, w+t, k10)
Ridge 6: Gr (k20), Wh (k6, w+t, k6), Gr (k20)
Ridge 7: Gr (k16, w+t, k16)
Ridge 8: Gr (k20, w+t, k20)
Ridge 9: Gr (k17), Wh (k11, w+t, k11), Gr (k17)
Ridge 10: Gr (k12, w+t, k12)
Ridge 11: Gr (k20, w+t, k20)
Ridge 12: Gr (k2, w+t, k2)
Ridge 13: Gr (k12, w+t, k12)
Ridge 14: Gr (k6, w+t, k6)
Ridge 15: Gr (k15), Wh (k15, turn, k15), Gr (k15)

Knit these ridges a total of 3 times. but only knit the RS for the last ridge.

Finishing: Put the stitches from the provisional CO on a knitting needle. Hold the piece rights sides together and do a three needle bind off. Bind off 15 stitches with green yarn, and 15 stitches with white yarn. Afterwards, turn the piece right sides out. Use a pen or something similar to get into the top.

Here's a chart of the bigger tree: each line is one ridge, i.e. two rows of garter stitch. The first number gives the number of stitches in white and the second number the number of stitches in green. The grey dotted vertical lines are included every 10th stitch to make counting easier.

Chart for bigger tree - click to enlarge


Smaller Tree

With scrap yarn pCO 24 stitches, then start with your working yarns
Row 0 (Set-up row): Wh (k12), Gr (k12)
Ridge 1: Gr (k10), Wh (k6, w+t, k6), Gr (k10)
Ridge 2: Gr (k14, w+t, k14)
Ridge 3: Gr (k4, w+t, k4)
Ridge 4: Gr (k15), Wh (k5, w+t, k5), Gr (k15)
Ridge 5: Gr (k8, w+t, k8)
Ridge 6: Gr (k18, w+t, k18)
Ridge 7: Gr (k10, w+t, k10)
Ridge 8: Gr (k13), Wh (k9, w+t, k9), Gr (k13)
Ridge 9: Gr (k6, w+t, k6)
Ridge 10: Gr (k12, w+t, k12)
Ridge 11: Gr (k2, w+t, k2)
Ridge 12: Gr (k12), Wh (k12, turn, k12), Gr (k12)

Knit these ridges a total of 3 times. but only knit the RS for the last ridge.

Below you find a chart of the smaller tree.

Chart for smaller tree - click to enlarge

Finishing: Put the stitches from the provisional CO on a knitting needle. Hold the piece rights sides together and do a three needle bind off. Bind off 12 stitches with green yarn, and 12 stitches with white yarn. Afterwards, turn the piece right sides out. Use a pen or something similar to get into the top.


Freitag, 24. November 2017

Circle Beret

In my part of the world it's getting colder and colder each day. When I leave the house early in the morning, a hat is just what I need to keep warm. If you feel the same, you can knit yourself this easy circle beret. It is started at the crown and increases in circles - just like the Circle Mitts I published a few years ago. Once it is wide enough you decrease and end with a few rows of ribbing.
The beginning may be a bit fiddly, but basically this pattern is suited for beginners and is a lovely showcase for selfstriping yarn. Besides knit and purl stitch you need to be able to do mk1-increases and a basic decrease (e.g. ssk).


There are two versions of the pattern text. One (longer one) exactly to the size, yarn (Aran weight) and gauge that I knitted. And a shorter one, that is written in a general way to fit different sized heads and different weight yarn. The longer version can also be used to get an idea of how the pattern works, e.g. to get you started.

Creative Commons License
This work by Knitting and so on is licensed under a Creative Commons Attribution-NonCommercial-ShareAlike 4.0 International License.


Materials
  • one skein (50 grams) of Aran weight yarn - I used Adriafil Zebrino - or another yarn of a different weight
  • 4.5 mm circular needles (you can used dpn's, too) - or the needles the yarn calls for
  • 4 mm circular needles - or needles a size smaller than the yarn calls for
  • a stitch marker to mark the end of the round
  • a tapestry needle to weave in ends

Techniques
  • Knitting a flat circle: Generally, a flat circle is knitted as follows.
    CO8 and join in round
    Round 1: k
    Round 2: *k1 mk1 repeat from * (i.e. every 2nd stitch is doubled) (-> 16 sts)
    Round 3: k
    Round 4: * k2 mk1 repeat from * (i.e. every 3rd stitch is doubled)(-> 24 sts)
    Round 5: k
    Round 6: * k3 mk1 repeat from * (i.e. every 4th stitch is doubled) (-> 32 sts)
    Round 7: k
    Round 8: * k4 mk1 repeat from * (i.e. every 5th stitch is doubled) (-> 40 sts)
    … I'm sure, the formula is clear by now, namely that you increase by 8 stitches every other row. It also means that the distance between the increases goes up by one in each of the increase-rounds. The same "formula" will be used when constructing the mitts. If you do the increases at the same spot a pattern (maybe even corners) will become visible; to achieve a look like a circle you need to start the increases at a different (randomly chosen) location in each increase row.
    Similarly, if you start with a big stitch number, you can knit a circle starting from the rim and decreasing by 8 stitches - evenly spaced - in each round.
  • Magic Ring CO: Basically, the magic ring technique (from crochet) is used to cast on knitted stitches. There are several videos on Youtube that show the technique - I used something similar to the technique shown in the first video, but since this is fiddly work, just use the one that suits you best.
However, if the Magic Ring CO is too fiddly for you, you can alternatively just CO 8 sts and join them in the round. Later, you can use the tail of your CO to close the open loop, by pulling it through the CO stitches and draw them closed.


Gauge, Size and What you Need to Measure
The pattern is written in a way that it can be adapted to any head size. I measured the circumference of my head and - on a beret that fitted me well - the diameter when it lay flat, i.e. at its widest point.
Since you start from the inside out - you can knit (and increase) until you reach the desired diameter and then knit on (and decrease) until you reach your head circumference. Therefore you don't really have to swatch.
If you want to knit the exact same beret that I knitted. Here are my numbers:

  • Gauge in stockinette stitch: 18 sts = 10 cm in width, 25 rows = 10 cm in height
  • Diameter at the widest point = 26 cm, i.e. 81 cm of circumference
  • Diameter at ribbing = 16 cm, i.e. a diameter of about 50 cm, since the ribbing stretches it fits my head circumference (55 cm).


Instructions

Short Version - to Fit any Size of Head and Weight of Yarn
This version will definitely work for you, if you've knitted a flat circle before (e.g. the Circle Mitts or the Zoom Out Fingerless Gloves).

Do a magic loop CO of 8 stitches. Your piece should now look similar to illustration 1 - see below.
Distribute the sts on the bigger needles (4.5mm) needles and knit one round. Now it should look like illustration 2. Place a stitch marker.

Alternate one round with circle increases (8 increases per round - started at a random point, but distributed evenly) with one knit-only round - until the piece has the circumference/diameter you want.
(I did this a total of 15 increase rounds, this means that I had 120 sts on my needles - I was about 7 cm short of my intended diameter).

Then - to create a bit of a slope - alternate one round of circle increases with two knit only rounds.
(I did this 3 times, i.e. afterwards I had a total of 144 sts on my needles -  the diameter was about 24 cm then.)

Then knit two knit-only rounds - without any increases or decreases.
Then alternate one round of circle decreases (8 decreases per round - started at a random point, but distributed evenly) with one knit-only round - until the inner edge fits snugly around your head.
(I did a total of 8 decrease rounds, i.e. I had 80 sts on my needles before I started the ribbing.)

With the smaller needles (4mm) knit 7 round of k2p2-ribbing. Loosely bind off in pattern in round 8.


Long Version - Exactly to my Gauge and Size
With your 4.5mm needles do a magic loop CO of 8 sts. - If this is too fiddly, you can alternatively just CO 8 sts and join them in the round. You can use the tail to close the open loop, by pulling it through the CO stitches and draw them closed. The piece should look similar to illustration 1.
Distribute the stitches on your 4.5mm needles and knit one round. Place a marker at the end of the round. Now your piece should look simlar to illustration 2.
Round 2: kbf all - now you have a total of 16 sts
Round 3: k all

Illustrations - click to enlarge


Round 4: * k1, mk1, k1 repeat from * to end - now you have a total of 24 sts
Round 5: k all
Round 6: * k3, mk1 repeat from * to end -> 32 sts
Round 7: k all
Round 8: * k1, mk1, k4 repeat from * to end -> 40 sts
Round 9: k all
Round 10: * k4, mk1, k1 repeat from * to end -> 48 sts
Round 11: k all
Round 12: * k2, mk1, k4 repeat from * to end ->  56 sts
Round 13: k all
Round 14: * k6, mk1, k1 repeat from * to end -> 64 sts
Round 15: k all - now your piece should look similar to illustration 3.
Round 16: * mk1, k8 repeat from * to end ->  72 sts
Round 17: k all
Round 18: * k4, mk1, k5 repeat from * to end ->  80 sts
Round 19: k all
Round 20: * k8, mk1, k2 repeat from * to end -> 88 sts
Round 21: k all
Round 22: * k2, mk1, k9 repeat from * to end -> 96 sts
Round 23: k all
Round 24: * k5, mk1, k7 repeat from * to end -> 104 sts
Round 25: k all
Round 26: * k10, mk1, k3 repeat from * to end ->  112 sts
Round 27: k all
Round 28: * k1, mk1, k13 repeat from * to end ->  120 sts
Round 29: k all
Round 30: k all
Round 31: * k10, mk1, k5 repeat from * to end ->  128 sts
Round 32: k all
Round 33: k all
Round 34: * k10, mk1, k5 repeat from * to end -> 136 sts
Round 35: k all
Round 36: k all
Round 37: * k6, mk1, k10 repeat from * to end ->  144 sts
Round 38: k all
Round 39: k all
Round 40: * k1, ssk, k15 repeat from * to end ->  136 sts
Round 41: k all
Round 42: * k10, ssk, k5 repeat from * to end ->  128 sts
Round 43: k all
Round 44: * k6, ssk, k8 repeat from * to end ->  120 sts
Round 45: k all
Round 46: * k12, ssk, k1 repeat from * to end -> 112 sts
Round 47: k all
Round 48: * k2, ssk, k10 repeat from * to end -> 104 sts
Round 49: k all
Round 50: * k11, ssk repeat from * to end ->  96 sts
Round 51: k all
Round 52: * k3, ssk, k7 repeat from * to end -> 88 sts
Round 53: k all
Round 54: * k8, ssk, k1 repeat from * to end -> 80 sts

Change to 4mm needles and do 7 rounds of k2p2-ribbing. Bind off loosely in pattern in round 8.

Weave in ends. 

Freitag, 17. November 2017

U-Turn Hat

While participating in an open KAL hosted by the facebook group "Die Drei vom Blog - Knitalong
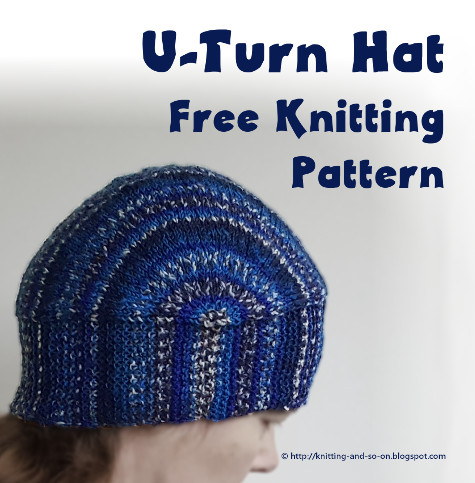
", I designed a few new hats. This is the 3rd one I knitted ... but the first that has its pattern written down :) It is knitted flat from side to side and completely without short rows.
It starts similar to the U-Turn Mitts or the U-Turn Slippers
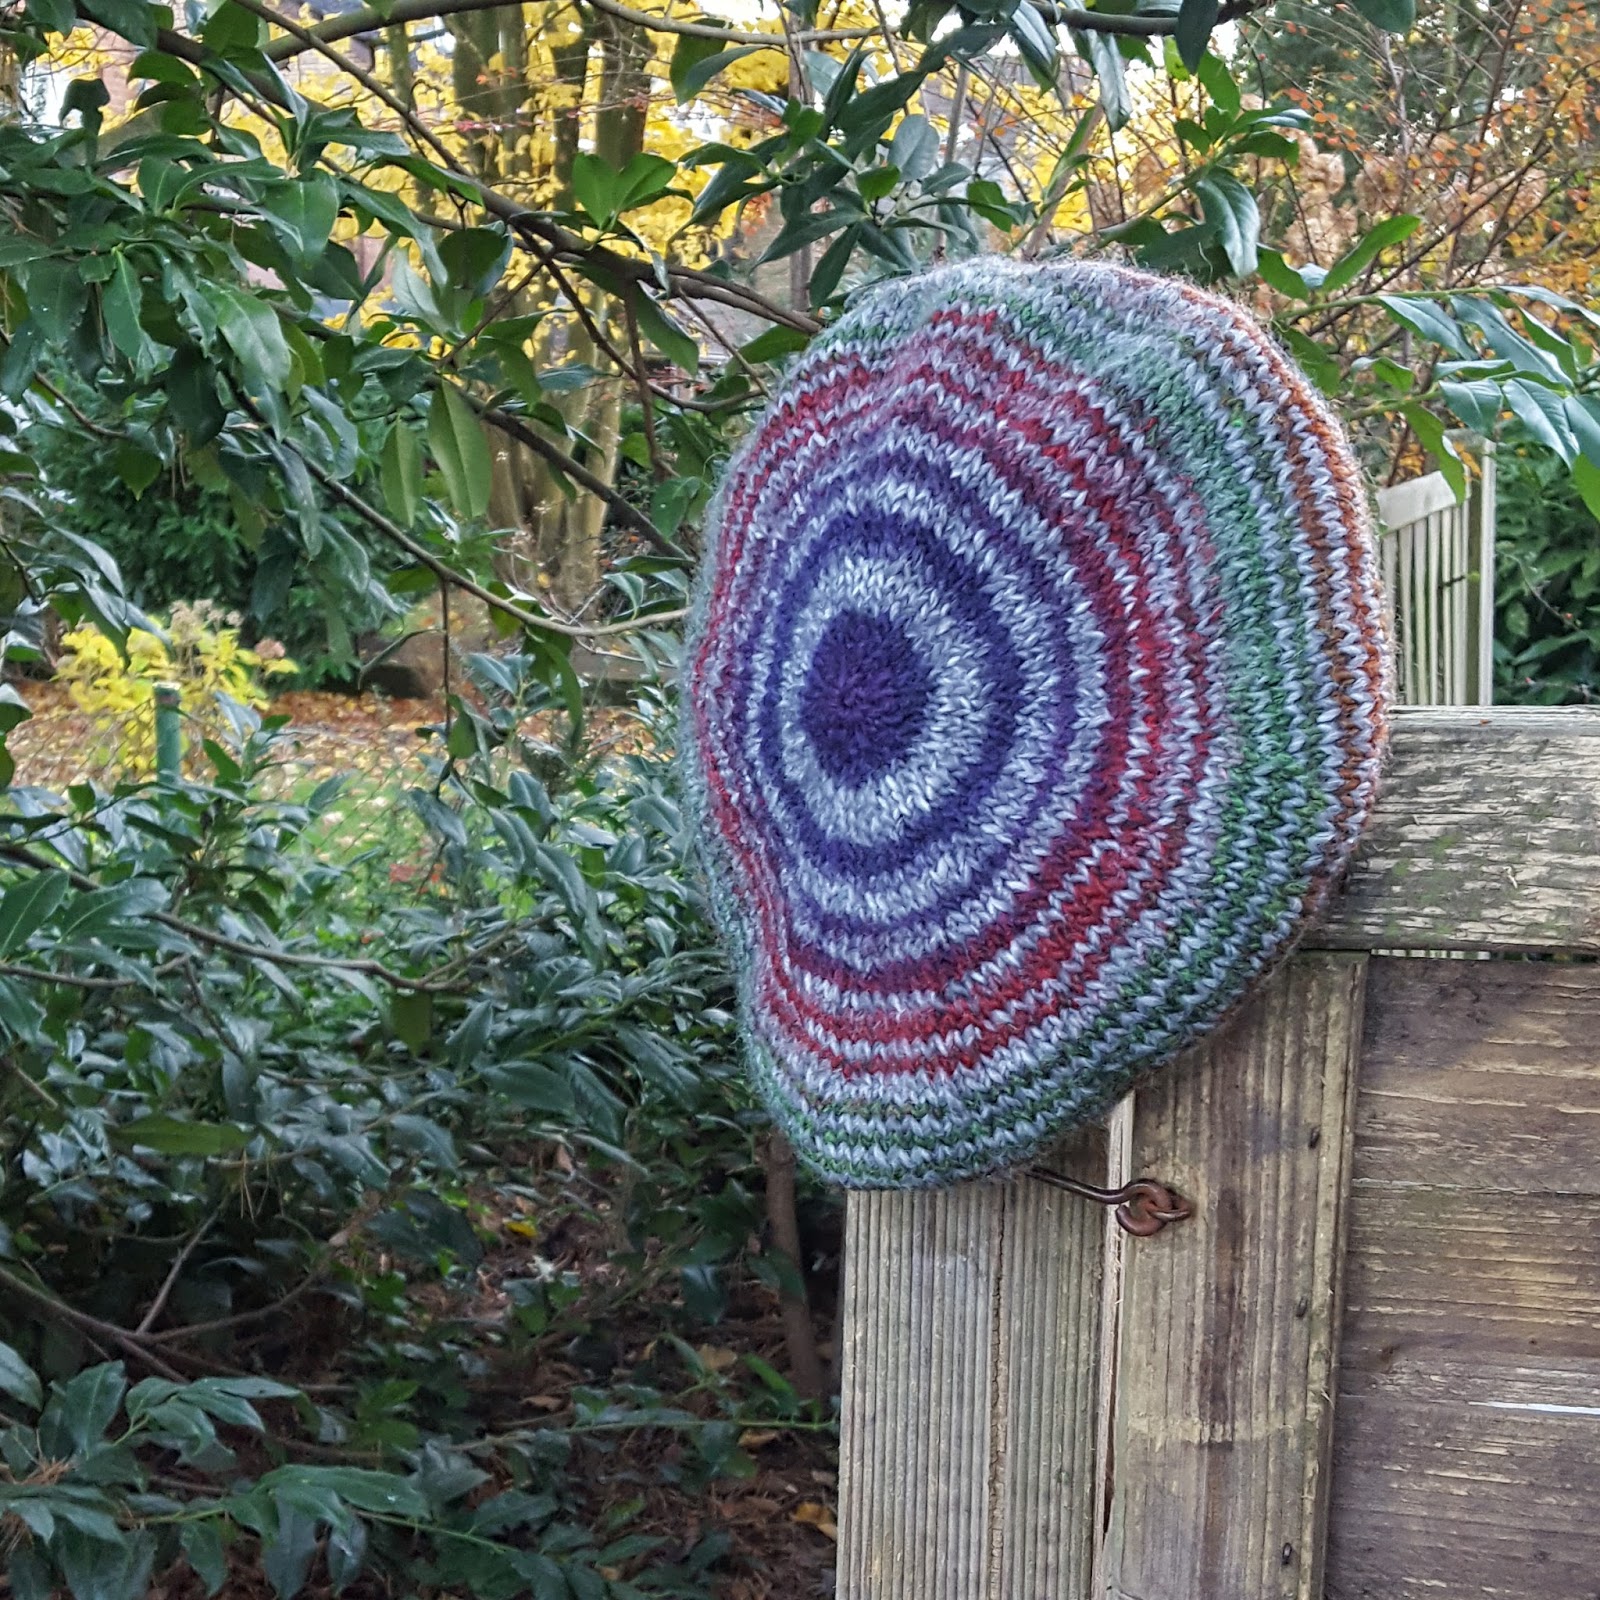
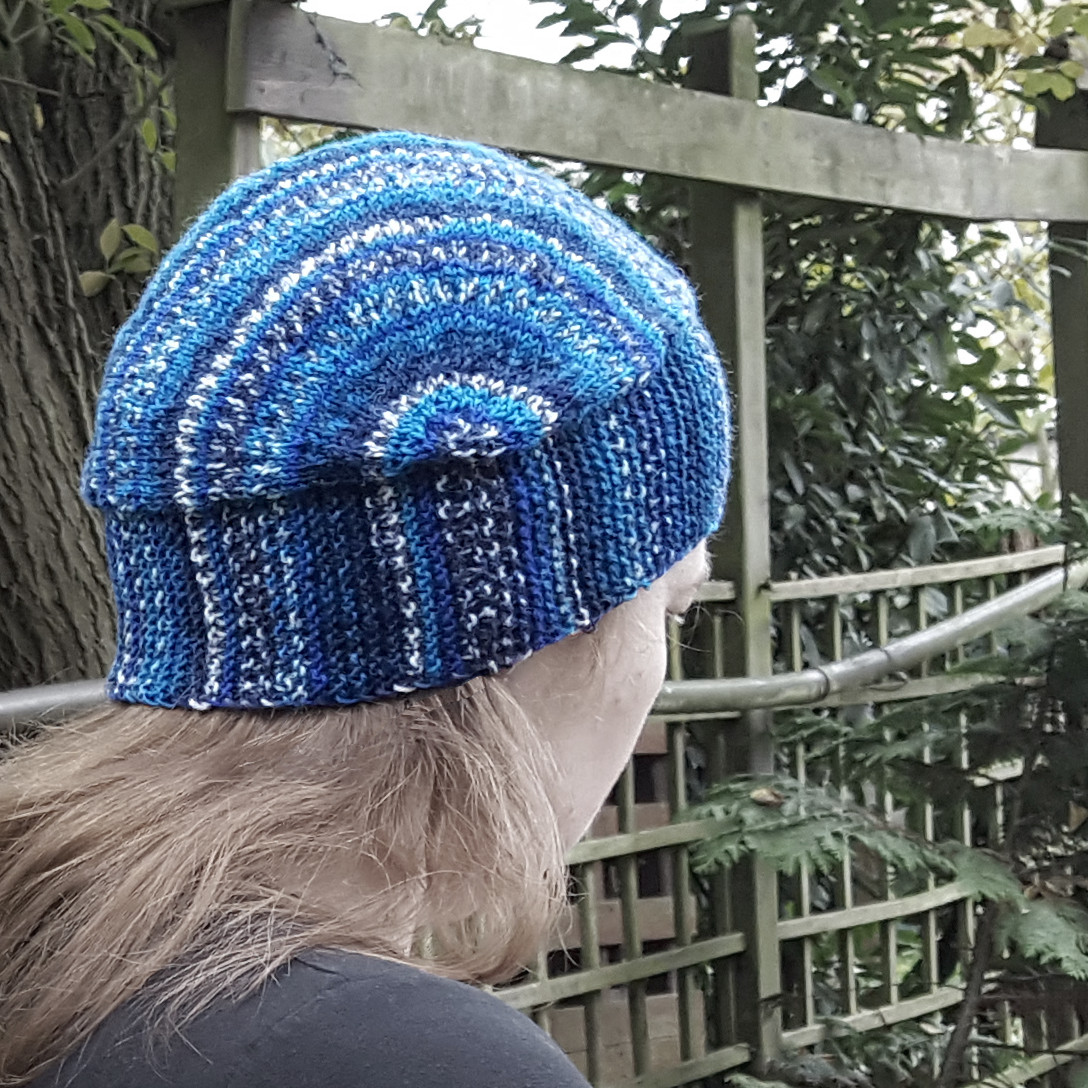
. It has semicircular increases to shape the dome over your head, decreases for the slope on the other side and is finished with a three-needle bind-off. Because of its unique construction, it's great to show off your variegated or self-striping yarn.


The pattern contains one stitch-by-stitch version for exactly the same size that I knitted, an explanation on how to adapt it to a different sizes or different weights of yarn, and a generic version of the pattern.

Creative Commons License
This work by Knitting and so on is licensed under a Creative Commons Attribution-NonCommercial-ShareAlike 4.0 International License.


Eine deutsche Version dieser Anleitung gibt es hier.   
A german version of this pattern is available here.


Materials
  • about 50 grams of fingering weight yarn
  • 3.25mm needles - I used circulars with an 80 cm cord
  • three stitch markers
  • a third knitting needle for the three needle BO
  • a tapestry needle to weave in ends

Techniques & Notation
  • Judy's Magic Cast-On is a technique that gives you live stitches on both sides of your needle - it is generally used for toe-up socks (e.g. in this pattern), but it can be used for other purposes as well. Here's a written description (from Knitty) and here's a YouTube-video by Cat Bordhi and another YouTube-video by Very Pink Knits.
  • Three-Needle Bind-Off: https://youtu.be/Ph93jWSzTa0
  • Knitting a flat circle - or in case of this pattern a semicircle: The technique for knitting a flat circle has been described a few times on this blog, e.g. in the "Zoom Out Mitts"-Post. Basically it consists of doing 8 increases (evenly spaced out in one round) every other row, and varying the starting point for the first increase to avoid an octagon pattern. 
    In this pattern only a semicircle is knitted. This means that there will be only 4 increases on every RS row - and they will be started at a random stitch within the first quarter of the half circle.
    As an increase I used kfb and as decrease I used ssk, but you can use other stitches as well, e.g. a make 1 knit stitch (mk1) as increasing stitch (which may look a bit neater) or a k2tog as a decrease stitch.
  • [X]*Y, means, knit the sequence in brackets (X) Y times, e.g. [k2. kfb]*3 means knit the sequence "k2, kfb" three times.


Gauge and Size
In garter stitch 11 ridges (=22 rows) gave 5 cm in height, and 12 sts gave 5 cm in width.
The finished piece has about 48 to 50 cm of circumference (at the lower edge - ribbing) and is 23 cm high. However, the ribbing stretches easily to 56 cm circumfernce.
I'd advise you to measure the circumference of the intended wearer's head as well as the wished height of the crown.


Construction
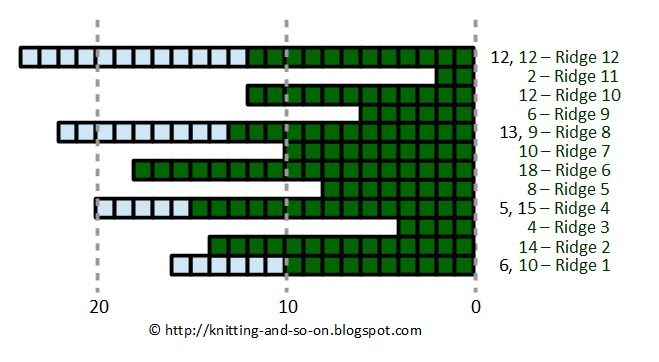
Knitted flat an in a U-shape around the first magic CO. Each row consists of a garter stitch part (ribbing - at the beginning and end of each row) and a semicircular bit around the turning point of the U. The slope is achieved by changing the number of increases and decreases. See schematic below.

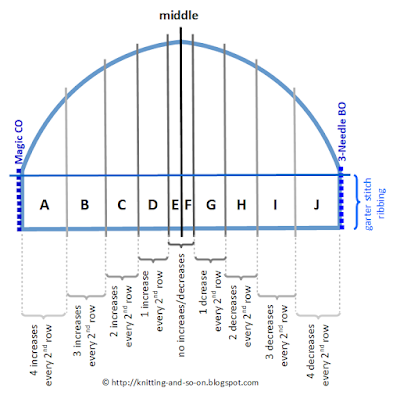
Construction - click to enlarge

First there will be 4 decreases every 2nd row, which basically creates a semicircle above the ribbing. Then only 3 increases will be made, then only 2, then only 1 and finally there will be a few rows without any increases at all.
Once you've reached the middle of your piece, you will knit the same backwards, i.e. there will be decreases instead of increases. That means you start with no decreases, then switch to 1 decrease every 2nd row, then 3 decreases every 2nd row and finally 4 decreases every 2nd row. Until there are only 2x20 stitches left. The piece is finished with a three-needle BO.
The letters in the schematic refer to the parts of the pattern instructions below.


Instructions
These are the specific instructions for a hat with the same yarn weight, same gauge and same size that I knitted. If you'd like to adapt the pattern, see "How to Adapt to Another Head Size - or Generic Instructions" below.

Do a magic CO of 2x20 stitches, i.e. you have 20 sts on each needle
Now turn your needles around in a way that you're looking at the garter stitch bumps.
All rows of the tip will be knitted in a U-shape, i.e. you knit the stitches on the first needle turn the piece upside down (this point will be called turning-point ("TP") and knit the stitches on the other needle. Then you turn your knitting to the WS and knit back.

Part A
Row 1 (WS): k18, place marker, p2, TP, p2, place marker, k18 - the markers will separate the ribbing from he upper (sloped) part.
Row 2 (RS): sl1, k17, [kfb]*4, k18 - your piece will look similar to picture 1 - the U-shape will not yet be visible
Row 3 (WS): sl1, k17, p to next marker (i.e. p4, TP, p4), k18
Row 4 (RS): sl1, k17, [k1, kfb]*4, k18
Row 5 (WS): sl1, k17, p to next marker (i.e. p6, TP, p6), k18
Row 6 (RS): sl1, k17, [kfb, k2]*4, k18
Row 7 (WS): sl1, k17, p to next marker (i.e. p8, TP, p8), k18
Row 8 (RS): sl1, k17, [k2, kfb, k1]*4, k18
Row 9 (WS): sl1, k17, p to next marker (i.e. p10, TP, p10), k18 - now your piece will look roughly like photo 2; the inverted U will start to become visible.
Row 10 (RS): sl1, k17, [k1, kfb, k3]*4, k18
Row 11 (WS): sl1, k17, p to next marker (i.e. p12, TP, p12), k18
Row 12 (RS): sl1, k17, [k4, kfb, k1]*4, k18
Row 13 (WS): sl1, k17, p to next marker (i.e. p14, TP, p14), k18
Row 14 (RS): sl1, k17, [kfb, k6]*4, k18
Row 15 (WS): sl1, k17, p to next marker (i.e. p16, TP, p16), k18
Row 16 (RS): sl1, k17, [k4, kfb, k3]*4, k18
Row 17 (WS): sl1, k17, p to next marker (i.e. p18, TP, p18), k18 
Illustrations

Part B
From now on, there will be only 3 increases in every RS row.
Row 18 (RS): sl1, k17, [k6, kfb, k5]*3, k18
Row 19 (WS): sl1, k17, p to next marker (i.e. p39), k18
Row 20 (RS): sl1, k17, [k2, kfb, k10]*3, k18
Row 21 (WS): sl1, k17, p to next marker (i.e. p42), k18
Row 22 (RS): sl1, k17, [k10, kfb, k3]*3, k18
Row 23 (WS): sl1, k17, p to next marker (i.e. p45), k18
Row 24 (RS): sl1, k17, [k1, kfb, k13]*3, k18
Row 25 (WS): sl1, k17, p to next marker (i.e. p48), k18
Row 26 (RS): sl1, k17, [k11, kfb, k4]*3, k18
Row 27 (WS): sl1, k17, p to next marker (i.e. p51), k18
Row 28 (RS): sl1, k17, [k5, kfb, k11]*3, k18
Row 29 (WS): sl1, k17, p to next marker (i.e. p54), k18
Row 30 (RS): sl1, k17, [k13, kfb, k4]*3, k18
Row 31 (WS): sl1, k17, p to next marker (i.e. p57), k18
Row 32 (RS): sl1, k17, [k2, kfb, k16]*3, k18
Row 33 (WS): sl1, k17, p to next marker (i.e. p60), k18
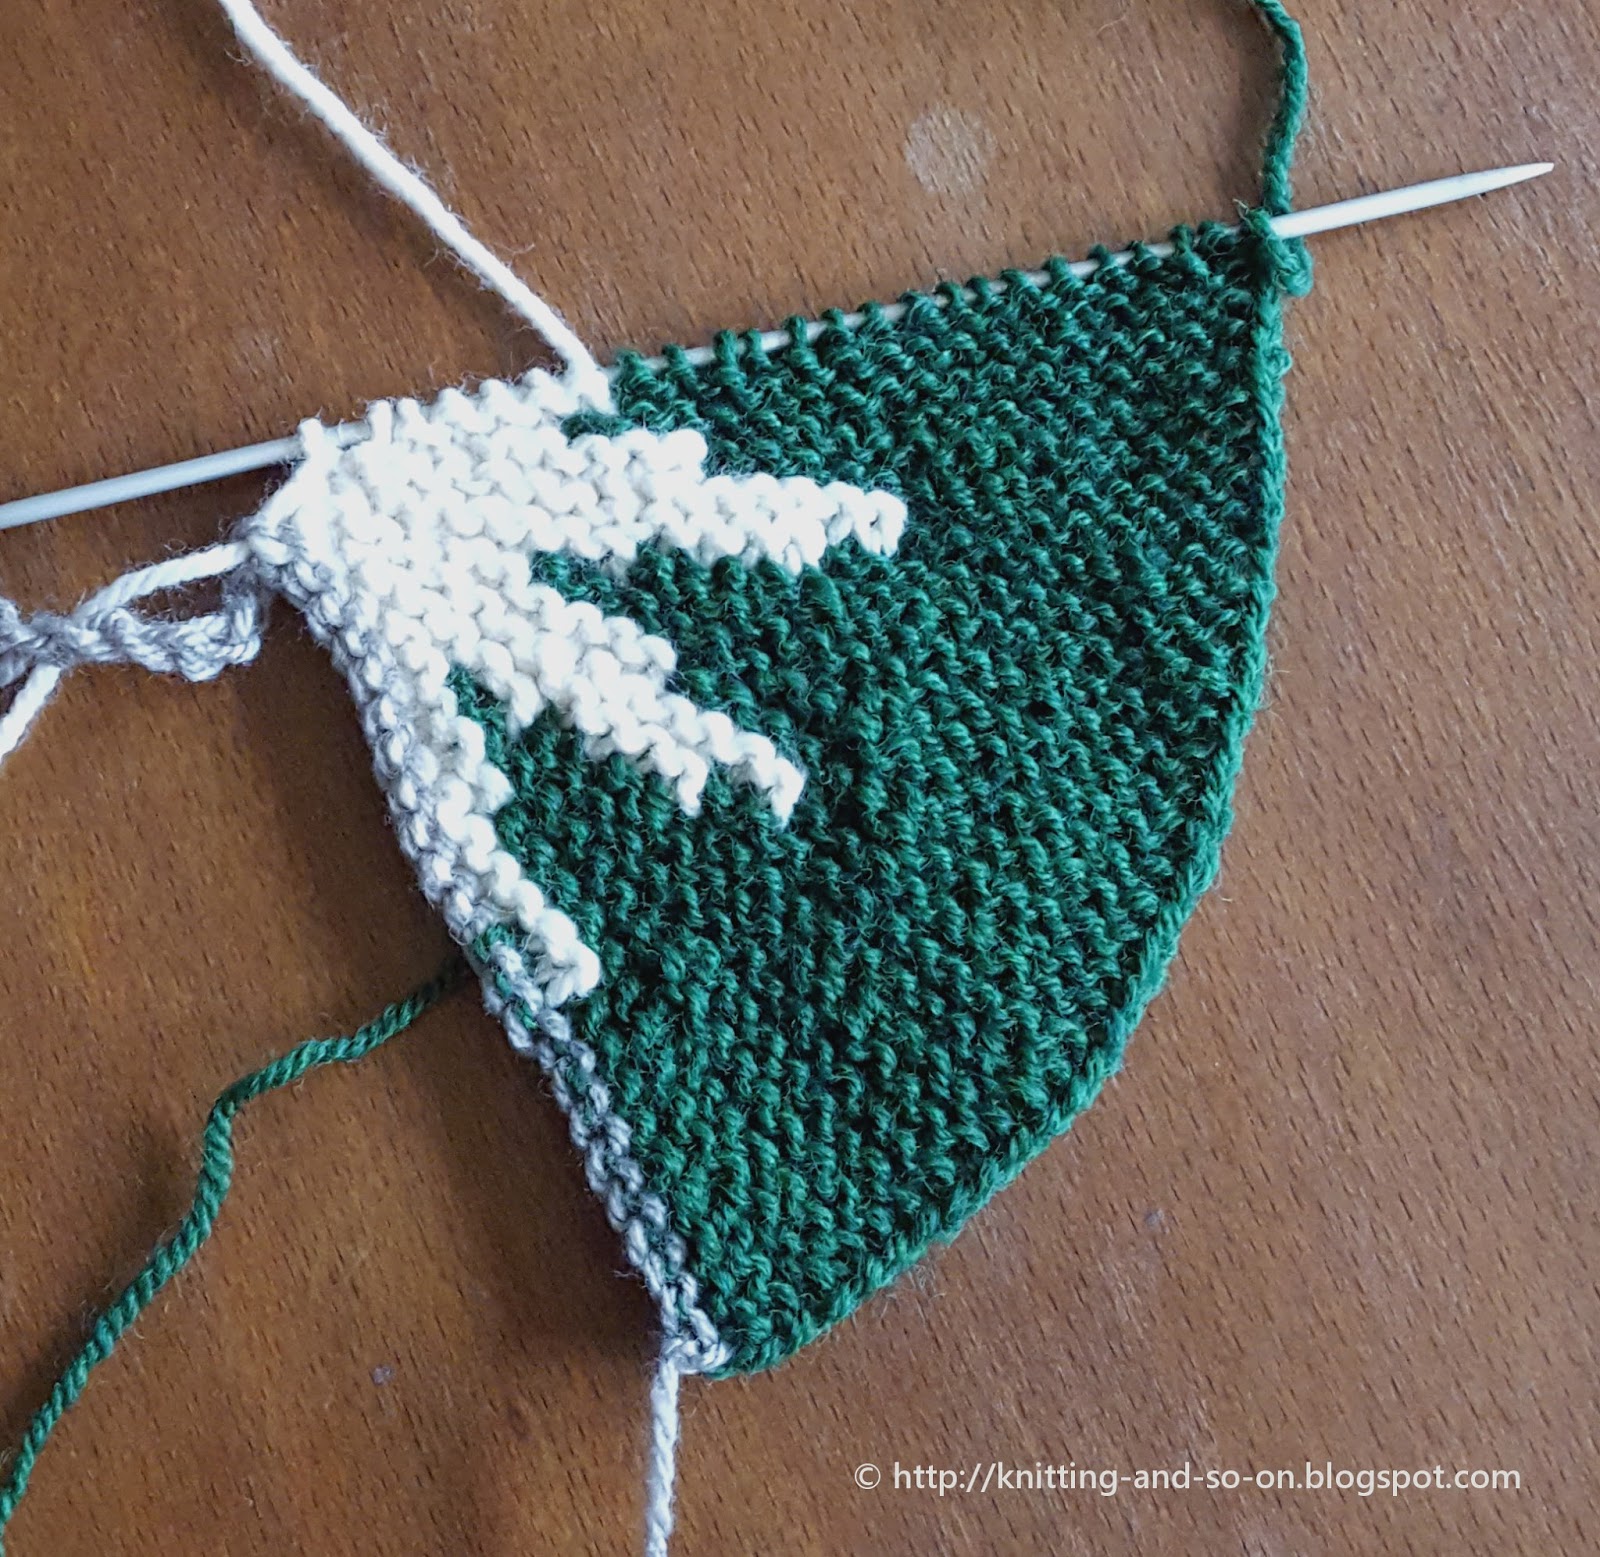
A few rows into part B, your piece should look similar to illustration 3.

Depending on the length of your circular needles, you may switch from magic loop to just knitting without a piece of cord sticking out. When I reached that point, I put a stitch marker at the TP - this makes it easier to count your stitches if you want to make sure that you've increased/decreased correctly.

Part C
From now on there will be only 2 increases in every RS row.
Row 34 (RS): sl1, k17, [k20, kfb, k9]*2, k18
Row 35 (WS): sl1, k17, p to next marker (i.e. p62), k18
Row 36 (RS): sl1, k17, [k2, kfb, k28]*2, k18
Row 37 (WS): sl1, k17, p to next marker (i.e. p64), k18
Row 38 (RS): sl1, k17, [k10, kfb, k21]*2, k18
Row 39 (WS): sl1, k17, p to next marker (i.e. p66), k18
Row 40 (RS): sl1, k17, [k25, kfb, k7]*2, k18
Row 41 (WS): sl1, k17, p to next marker (i.e. p68), k18
Row 42 (RS): sl1, k17, [k13, kfb, k20]*2, k18
Row 43 (WS): sl1, k17, p to next marker (i.e. p70), k18

Part D
From now on there will only be 1 increase in every RS row.
Row 44 (RS): sl1, k17, k27, kfb, k to next marker, k18
Row 45 (WS): sl1, k17, p to next marker (i.e. p71), k18
Row 46 (RS): sl1, k17, k53, kfb, k to next marker, k18
Row 47 (WS): sl1, k17, p to next marker (i.e. p72), k18
Row 48 (RS): sl1, k17, k32, kfb, k to next marker, k18
Row 49 (WS): sl1, k17, p to next marker (i.e. p73), k18
Row 50 (RS): sl1, k17, k39, kfb, k to next marker, k18
Row 51 (WS): sl1, k17, p to next marker (i.e. p74), k18

Parts E
From now on, there will be no increases
Row 52 (RS): sl1, k to end
Row 53 (WS): sl1, k17, p to next marker (i.e. p74), k18
Measure the lower edge of the piece (at the garter stitch ribbing) when stretched comfortably. Check whether it measures half of your head circumference.

Part F (mirrors part E)
Row 54 (RS): sl1, k to end
Row 55 (WS): sl1, k17, p to next marker (i.e. p74), k18

Part G (mirrors part D)
One decrease per RS row.
Row 56 (RS): sl1, k17, k38, ssk, k to next marker, k18
Row 57 (WS): sl1, k17, p to next marker (i.e. p73), k18
Row 58 (RS): sl1, k17, k31, ssk, k to next marker, k18
Row 59 (WS): sl1, k17, p to next marker (i.e. p72), k18
Row 60 (RS): sl1, k17, k52, ssk, k to next marker, k18
Row 61 (WS): sl1, k17, p to next marker (i.e. p71), k18
Row 62 (RS): sl1, k17, k26, ssk, k to next marker, k18
Row 63 (WS): sl1, k17, p to next marker (i.e. p70), k18

Part H (mirrors part C)
Two decreases per RS row.
Row 64 (RS): sl1, k17, [k13, ssk, k20]*2, k18
Row 65 (WS): sl1, k17, p to next marker (i.e. p68), k18
Row 66 (RS): sl1, k17, [k25, ssk, k7]*2, k18
Row 67 (WS): sl1, k17, p to next marker (i.e. p66), k18
Row 68 (RS): sl1, k17, [k10, ssk, k21]*2, k18
Row 69 (WS): sl1, k17, p to next marker (i.e. p64), k18
Row 70 (RS): sl1, k17, [k2, ssk, k29]*2, k18
Row 71 (WS): sl1, k17, p to next marker (i.e. p62), k18
Row 72 (RS): sl1, k17, [k20, ssk, k9]*2, k18
Row 73 (WS): sl1, k17, p to next marker (i.e. p60), k18

Part I (mirrors part B)
Three decreases per RS row.
Row 74 (RS): sl1, k17, [k2, ssk, k16]*3, k18
Row 75 (WS): sl1, k17, p to next marker (i.e. p57), k18
Row 76 (RS): sl1, k17, [k13, ssk, k4]*3, k18
Row 77 (WS): sl1, k17, p to next marker (i.e. p54), k18
Row 78 (RS): sl1, k17, [k5, ssk, k11]*3, k18
Row 79 (WS): sl1, k17, p to next marker (i.e. p51), k18
Row 80 (RS): sl1, k17, [k11, ssk, k4]*3, k18
Row 81 (WS): sl1, k17, p to next marker (i.e. p48), k18
Row 82 (RS): sl1, k17, [k1, ssk, k13]*3, k18
Row 83 (WS): sl1, k17, p to next marker (i.e. p45), k18
Row 84 (RS): sl1, k17, [k10, ssk, k3]*3, k18
Row 85 (WS): sl1, k17, p to next marker (i.e. p42), k18
Row 86 (RS): sl1, k17, [k2, ssk, k10]*3, k18
Row 87 (WS): sl1, k17, p to next marker (i.e. p39), k18
Row 88 (RS): sl1, k17, [k6, ssk, k5]*3, k18
Row 89 (WS): sl1, k17, p to next marker (i.e. p36), k18

Part J (mirrors part A)
Four decreases per RS row.
Row 90 (RS): sl1, k17, [k4, ssk, k3]*4, k18
Row 91 (WS): sl1, k17, p to next marker (i.e. p32), k18 
Row 92 (RS): sl1, k17, [k6, ssk]*4, k18
Row 93 (WS): sl1, k17, p to next marker (i.e. p28), k18
Row 94 (RS): sl1, k17, [k4, ssk, k1]*4, k18
Row 95 (WS): sl1, k17, p to next marker (i.e. p24), k18
Row 96 (RS): sl1, k17, [k1, ssk, k3]*4, k18
Row 97 (WS): sl1, k17, p to next marker (i.e. p20), k18
Row 98 (RS): sl1, k17, [k2, ssk, k1]*4, k18
Row 99 (WS): sl1, k17, p to next marker (i.e. p16), k18
Row 100 (RS): sl1, k17, [ssk, k2]*4, k18
Row 101 (WS): sl1, k17, p to next marker (i.e. p12), k18
Row 102 (RS): sl1, k17, [k1, ssk]*3, k1, k2tog, k18 - I chose a k2tog (instead of an ssk as the 4th decrease, to get a clean edge towards the garter stitch ribbing)
Row 103 (WS): sl1, k17, p to next marker (i.e. p8), k18
Row 104 (RS): sl1, k17, [ssk]*3, k2tog, k18
Row 105 (WS): sl1, k17, p to next marker (i.e. p4, TP, p4), k18

Now there should be the same number of stitches left that you started with, i.e. 2x20.
Turn inside out, hold right sides together and do a three needle BO of the last stitches (see illustration 4).

Weave in ends and turn back right sides out.


How to Adapt to Another Size 

If you have different gauge, have a different size head or use different yarn altogether, you can adapt the pattern to your size. Basically, you can adapt two things:
  • the number of stitches on both ends that are knitted in garter stitch and that form the ribbing - the height of your ribbing - and
  • the number of rows with 4 in/decreases, 3 in/decreases, 2 in/decreases, 1 in/decrease and no increase - this changes the shape of the slope.
If you'd like a shorter/longer ribbing or use different yarn, I'd suggest that you cast on fewer/more stitches with the magic CO. On each needle, you need the intended number of ribbing stitches plus 2.

I'd suggest that of the total number of rows you need to reach the middle of the piece,
  • you use about 1/3 for RS rows with 4 in/decreases
  • about the same number for RS rows with 3 in/decreses
  • about 1/6 for RS rows with 2 in/decreases
  • you devide the remaining rows equally into rows 1 in/decrease and no in/decrease. 
As you can see in the instructions above - for me it was a total of 26 rows to reach the middle, 8 of which with 4 increases, 8 with 3 increases, 5 with 2, and 4 with 1 increase - which is roughly the distribution above. 
When you change from 4 increases to 3 increases, it's possible that you have a stitch count between the markers, that is not divisible by 3. In this case, you need to distribute the new increases as evenly as possible throughout the stockinette stitches. The same goes for all other changes in the number of in/decreases.

For a wider circumference, you can just add a few rows, without any increases or decreases in the middle of the piece. For a higher dome, do more rows with 4 and 3 increases, and fewer with 2 and 1 increases.

Important: With all adjustments, make sure to knit two equal halves, i.e. do the same decreases during the 2nd half then you did increases during the 1st. That's why I'd advise to take notes of the knitted rows.


Generic Instructions

With magic CO cast on the number of stitches you want for the ribbing plus 2 to start the semicircle increases and all of that on both sides of the needles (i.e. calculated number of stitches times two).

So your first row after the magic CO would be;
Row 1 (WS): k to 2 bef turning point ("TP"), place marker, k2, then turn, k2, place marker, k to end

Part A
You start with a few rows with 4 increases per RS row, ie.
Row 2 (RS): sl1, k to marker, between here and the next marker evenly distribute 4 increases (e.g. kfb) among your knit stitches - starting from a random stitch during the first quarter, slip marker, k to end
Row 3 (WS): sl1, k to marker, p to next marker, k to end
Repeat rows 2 and 3 until you've reached about a third of half your circumference
Important: Take notes of the number of repeats that you work for all parts. You'll need these numbers to do an equal amount of decrease rows.

Part B
Now you change to only 3 increases per RS row, i.e.
Row 4 (RS): sl1, k to marker, between here and the next marker evenly distribute 3 increases among your knit stitches - starting from a random stitch during the first third, slip marker, k to end
Row 5 (WS): sl1, k to marker, p to next marker, k to end
Repeat rows 4 and 5 until you've reached about two thirds of half your circumference - so roughly the same number of repeats in part A.
Also, take a note of the number of rows you worked with 3 increases.

Part C
Then you switch to 2 increases per RS row.
Row 6 (RS): sl1, k to marker, between here and the next marker evenly distribute 2 increases among your knit stitches - starting from a random stitch during the first half, slip marker, k to end
Row 7 (WS): sl1, k to marker, p to next marker, k to end
Repeat these rows about a half of the repeats of part A.

Part D
Then you switch to 1 increases per RS
Row 6 (RS): sl1, k to marker, between here and the next marker randomly do 1 increase among your knit stitches, slip marker, k to end
Row 7 (WS): sl1, k to marker, p to next marker, k to end
Repeat these rows for about half of the remaining rows until you've reached half of your circumference

Part E
Then to switch to no increases.
Row 8 (RS): sl1, k to end
Row 9 (WS): sl1, k to end
Repeat these rows until you've reached half of the intended circumference

Now you start the second half, ad you basically knit the mirror image of the first.

Part F
First the rows with no increases:
Row 10 (RS): sl1, k to end
Row 11 (WS): sl1, k to end
Repeat the rows the same number of times as in part E.

Part G
Only one decrease per RS row.
Row 12 (RS): sl1, k to marker, between here and the next marker randomly do 1 decrease (eg. ssk) among your knit stitches, slip marker, k to end
Row 13 (WS): sl1, k to marker, p to next marker, k to end
Repeat these rows the same number of times as the rows in part D.

Part H
Two decreases per RS row.
Row 14 (RS): sl1, k to marker, between here and the next marker evenly distribute 2 decreases among your knit stitches - starting from a random stitch during the first half, slip marker, k to end
Row 15 (WS): sl1, k to marker, p to next marker, k to end
Repeat rows the same number of time as the rows of  part C

Part I
Three decreases per RS row.
Row 16 (RS): sl1, k to marker, between here and the next marker evenly distribute 3 decreases among your knit stitches - starting from a random stitch during the first third, slip marker, k to end
Row 17 (WS): sl1, k to marker, p to next marker, k to end
Repeat rows 16 and 17 the same number of times as the rows of part B

Part J
And towards the end, four decreases per RS row.
Row 18 (RS): sl1, k to marker, between here and the next marker evenly distribute 4 decreases (e.g. ssk) among your knit stitches - starting from a random stitch during the first quarter, slip marker, k to end
Row 19 (WS): sl1, k to marker, p to next marker, k to end
Repeat rows 18 and 19 the same number of times as the rows of part A.

Now there should be the same numer of stitches that you started with.
Turn inside out, hold right sides together and do a three needle BO of the last stitches.

Weave in ends, turn back right sides out and enjoy wearing your hat.

U-Turn Hat and U-Turn Mitts