Posts mit dem Label Christmas werden angezeigt. Alle Posts anzeigen

Freitag, 26. November 2021

Starry Christmas Decorations - Knitted

The first sunday of advent is coming up, which is the time to decorate your space as christmassy as possible. And for me stars - knitted and otherwise - are the best way to do so. 

So here are two seasonal patterns that help to bring a starry sparkle to your home.

Stella Star-Shaped Potholders

These potholders (doilies, coasters) are knitted flat and in garter stitch. This pattern was published two years ago. Lately, I have completely reviewed it and added two more variations. 

The new pattern PDF 14 pages long and contains:

  • the complete written patterns for stars in two sizes including charts
  • a general pattern how to knit stars in other sizes – containing also a photo tutorial
  • three further variations of this pattern (see photos below)
    • a lacy variation of this star – written pattern and a chart
    • a pattern for a two-colour variation – written pattern, a chart and detailed instructions how to undo the provisional CO in two colours and how to do the grafting in two colours
    • a three-colour variation – chart only 
  • short photo tutorials for the following techniques
    • provisional cast on with a crochet hook and how to undo it
    • grafting in garter stitch
    • intarsia

You can buy this pattern


Sternchen 3D-Stars

Even though these stars are 3-dimensional they are knitted flat. They have six points, are constructed of short rows and knitted (nearly) all in garter stitch. They come in four sizes and can be used to decorate your house for Christmas.

The pattern PDF contains

  • a written pattern for four sizes of these little stars (ranging from 6 to 14 cm in diameter - if knitted in fingering weight yarn)
  • a chart for two sizes
  • photo illustrations for various stages of star

The pattern is available as a PDF


Sonntag, 8. Dezember 2019

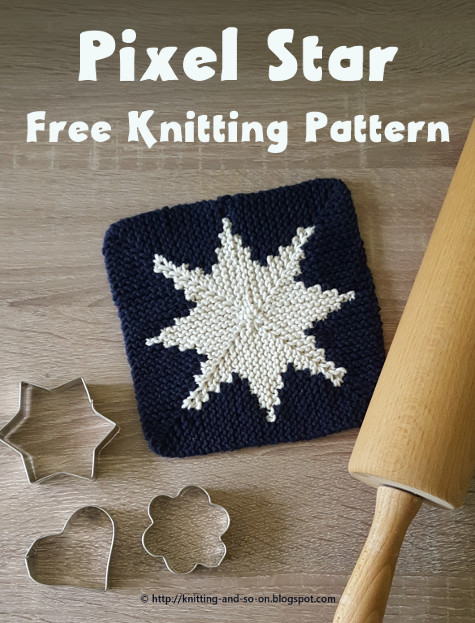
Pixel Star

After publishing the Stella potholders pattern, I thought it might be a good idea to do an 8-pointed star within a knitted square. I had done similar constructions before (e.g. Tannenbäumchen potholders) - i.e. something within a square, using short rows combined with intarsia.
In the end, it didn't look exactly the way I wanted - more like a pixelized star :) But I realized that this was something more or less built in with this kind of construction - and so I didn't change it.
So here it is. Enjoy!


Creative Commons License
This work by Knitting and so on is licensed under a Creative Commons Attribution-NonCommercial-NoDerivatives 4.0 International License.


Materials
  • a total of about 30 grams of DK weight cotton yarn in two colors (C1 = background color, C2 = color of star)
  • 3 mm needles - if you use yarn of a different weight, use a needle that is one size below the size that the yarn calls for
  • scrap yarn for provisional CO
  • a tapestry needle for grafting and to weave in ends


Techniques and Notation
  • Provisional CO: My favorite method for a provision CO is the crochet provisional CO - it is shown in this Youtube video by New Stitch a Day.
  • Short rows with wrap and turn (w+t) - as shown in this YouTube video by Very Pink Knits.
    Note: in some rows the wrap has to be made just at the color change in the row below, e.g. Ridge B11 where you knit 11 sts in C1 and the 12 stitch that is to be wrapped was knitted in C2. In this case, it's advisable to change the color (as if to knit the next stitch in the new color), wrap and turn in the new color, and then to change back. This gives nicer color edges.
  • Grafting in Garter Stitch: A technique to get an invisible (knitted) seam - this technique is shown in this YouTube Video by knittinghelp.com.
  • Intarsia: Changing colors with the intarsia technique - as shown in this YouTube video by knitwithpat; or this YouTube video by Francoise Danoy. That way you don't have to carry long strands on the WS. The picture below shows the RS and WS of the piece.
    Throughout the pattern, the following notation is used:  C1 (k4), C2 (k10, w+t, k10), C1 (k to end) means, knit 4 stitches in C1, change to C2 and knit 10 sts, do a wrap and turn, knit 10 stitches and then change back to C1 and k to end. I.e. color is indicated before the knitting instructions for that yarn and the knitting instructions for that yarn are given in brackets after the color. 

Construction

This potholder is knitted in 4 parts. It starts with a provisional CO. Then each row is a stitch shorter than the last one, One part ends,
  • when the row is only 1 stitch (plus 1 w+t) long - then the next part begins and each row is one stitch longer than the last one until all stitches are knitted and we've sucessfully knitted around a corner - or
  • when the row length is knitted to the end and after a normal turn (as opposed to a w+t) starts with a slip stitch; then the row  length is getting shorter as you approach the next corner.
After knitting around four corners, the two sides (CO and last row) are grafted in garter stitch.
The photo on the right shows the piece, just before taking out the stitches of the provisional CO and grafting this to the last row.

Size
Knitted in DK yarn, the piece measures about 15 cm x 15 cm.


Instructions
With scrap yarn provisionally CO 17 stitches

Part A:
Setup row (WS): C2 (k14), C1 (k3)
Ridge 1: C1 (k5), C2 (k11, w+t, k11), C1 (k5)
Ridge 2: C1 (k7), C2 (k8, w+t, k8), C1 (k7)
Ridge 3: C1 (k9), C2 (k5, w+t, k5), C1 (k9)
Ridge 4: C1 (k10), C2 (k3, w+t, k3), C1 (k10)
Ridge 5: C1 (k9), C2 (k3, w+t, k3), C1 (k9)
Ridge 6: C1 (k9), C2 (k2, w+t, k2), C1 (k9)
Ridge 7: C1 (k8), C2 (k2, w+t, k2), C1 (k8)
Ridge 8: C1 (k8), C2 (k1, w+t, k1), C1 (k8)
Ridge 9: C1 (k7), C2 (k1, w+t, k1), C1 (k7)
Ridge 10: C1 (k6), C2 (k1, w+t, k1), C1 (k6)
Ridge 11: C1 (k6), C2 (w+t), C1 (k6)
Ridge 12: C1 (k5, w+t, k5)
Ridge 13: C1 (k4, w+t, k4)
Ridge 14: C1 (k3, w+t, k3)
Ridge 15: C1 (k2, w+t, k2)
Ridge 16: C1 (k1, w+t, k1)

Ridge 17 = Ridge 16
Ridge 18 = Ridge 15
Ridge 19 = Ridge 14
Ridge 20 = Ridge 13
Ridge 21 = Ridge 12
Ridge 22 = Ridge 11
Ridge 23 = Ridge 10
Ridge 24 = Ridge 9
Ridge 25 = Ridge 8
Ridge 26 = Ridge 7
Ridge 27 = Ridge 6
Ridge 28 = Ridge 5
Ridge 29 = Ridge 4
Ridge 30 = Ridge 3
Ridge 31 = Ridge 2
Ridge 32 = Ridge 1
Ridge 33:  C1 (k3), C2 (k14, turn, sl1, k13), C1 (k3)

That's the first part finished.

Now repeat this (ridges 1 to 33) two more times (parts 2 and 3) - and then once again ridges 1 to 32 (part 4).

Take out your scrap yarn of the provisional cast on and put the live stitches on a knitting needle. Cut your yarns but leave tails long enough for grafting.
Graft in garter stitch: 3 sts in C1 and 14 sts in C2.

After grafting there is still a small hole in the middle of the piece - you can sew this closed with your C2 yarn tail. Sew in ends afterwards.


Chart
The chart below shows one forth of the potholder. The numbers indicate the number of stitches per color of each ridge. The orange number gives the stitches in C2 and the black number the stitches in C1.

Samstag, 16. November 2019

Stella - Star-Shaped Potholders

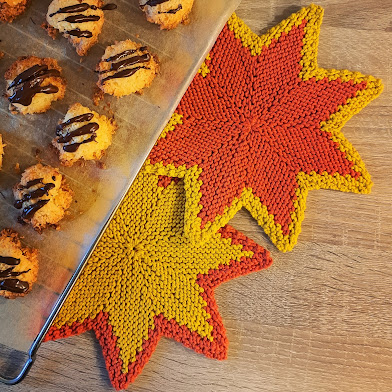
Christmas is the time to decorate the space around you with pretty things. And as a knitter, in the run-up to Christmas I like to knit decorations. And if these decorations are also useful, it's even better. These 8-pointed stars can be used as hotpads, doilies or coasters.
They are knitted in one piece and all in garter stithc– starting with a provisional CO, then point by point around the center. Grafting the first and last rows together gives it a seamless look. The construction uses short rows and basic increases and decreases.
So, if you want a quick knit to get you into a Christmas mood – and maybe learning a couple of new techniques along the way – this pattern is for you.


The pattern is available for purchase 
The pattern PDF 14 pages long and contains:

  • the complete written patterns for stars in two sizes including charts
  • a general pattern how to knit stars in other sizes – containing also a photo tutorial
  • three further variations of this pattern (see photos below)
    • lacy variation of this star – written pattern and a chart
    • a pattern for a two-colour variation – written pattern, a chart and detailed instructions how to undo the provisional CO in two colours and how to do the grafting in two colours
    • a three-colour variation – chart only 
  • short photo tutorials for the following techniques
    • provisional cast on with a crochet hook and how to undo it
    • grafting in garter stitch
    • intarsia


Skills you need to knit this pattern:
  • provisional CO
  • short rows with wrap and turn
  • grafting in garter stich
  • basic increases (kfb) and decreases (ssk and k2tog)


Materials
  • yarn – I used cotton yarns, for the off white ones in Aran weight (15 grams for the small star, 30 grams for the bigger star) and Sports weight yarn for the orange lacy star (about 40 grams)
  • knitting needles that are smaller than what the yarn calls for – I used 2.5mm needles
  • scrap yarn and a crochet hook for a provisional CO
  • a tapestry needle for grafting

Sizes
The bigger star in Aran weight measures 24 cm from tip to tip, the smaller one 16 cm.
The big lacy star in Sports weight yarn measures about 36 cm.


Mittwoch, 19. Dezember 2018

Last Minute Christmas Tree

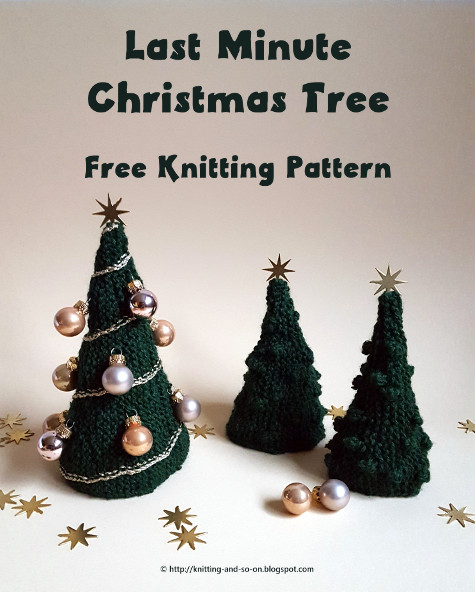
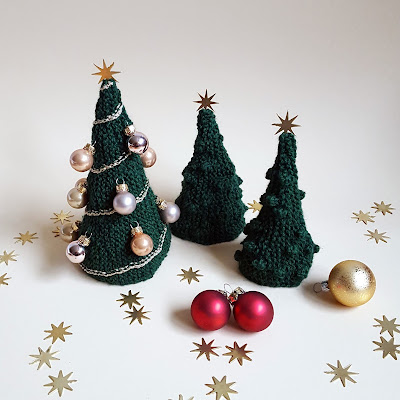
When my Dad was still alive. we used to have a real Christmas tree. Ever since he died, we didn't. So when I went shopping a couple of days before Xmas last year and saw a packet of really small discounted baubles, I thought that I might as well knit a small tree. It took me less than an afternoon and the project got me a bit into a Christmas mood.
This Christmas tree is knitted sideways and in garter stitch. It is constructed with short rows and finished using a three-needle BO. Afterwards it is decorated with surface crochet and by sewing on baubles.


The instructions below are the knitting pattern for the tree on the left - the one with the baubles. The one I knitted is about 17 cm high. For the smaller trees on the right you can find the free pattern here.


Creative Commons License
This work by Knitting and so on is licensed under a Creative Commons Attribution-NonCommercial-NoDerivatives 4.0 International License.


Materials
  • green yarn - I used (really) old DK weight yarn
  • golden yarn
  • small christmas baubles - the ones I used have a diameter of about 1.5 cm
  • knitting needles that are slightly smaller than what the yarn calls for, I used 3 mm dpns
  • a third needle for the three needle BO 
  • scrap yarn for provisional CO
  • a crochet hook for provisional CO and for the surface crochet
  • a tapestry needle to sew on the baubles

Techniques & Notation

Instructions

Do a provisional CO of 42 sts

With green yarn:
Setup row: k all
Ridge 1: k all, turn, sl1, k all
Ridge 2: k30, w+t, k to end
Ridge 3: k 10, w+t, k to end
Ridge 4: k 39, w+t, k to end
Ridge 5: k 5, w+t, k to end
Ridge 6: k 20, w+t, k to end
Ridge 7: k 10, w+t, k to end
Ridge 8: k 35, w+t, k to end
Ridge 9: k 25, w+t, k to end
Ridge 10: k 8, w+t, k to end
Ridge 11: k 15, w+t, k to end
Ridge 12: k 3, w+t, k to end
Ridge 13: k 22, w+t, k to end

Repeat ridges 1 to 13 four times.

Now you have a piece that looks like a piece of pizza.

Put the stitches from the provisional CO on a knitting needle. Hold the piece rights sides together and do a three needle bind off. Bind off 15 stitches with green yarn, and 15 stitches with white yarn. Afterwards, turn the piece right sides out. Use a pen or something similar to get into the top.

With golden yarn and crochet hook:
Starting from the lower edge work your way up with surface crochet in a spiral - until you reach the top of the tree.

If the yarn you used was rather soft, you might want to stabilize the tree. You can do this by cutting out a piece of paper or soft cardboard in the shape of a 90° pizza slice (similar to the tree before the three needle BO) and insert it into the tree.
The yarn I used was stiff enough that there wasn't any need for stabilization.

As a further decoration I put a small star on the top.


Freitag, 7. Dezember 2018

Little Snowman

I like knitted Christmas ornaments. This year I wanted to knit a snowman. I first tried it with a sideways garter stitch construction that I had used before (e.g. Xmas trees or little Xmas Gnomes), but I didn't get the shaping right (see this photo on Instagram). So I decided  to do a stockinette, bottom-up construction. After finishing, the snowmen also got little hats and scarfs.

Please note, this is fiddly work - esprecially the cast on and the first few rounds, but the resulting snowmen are really cute.


Creative Commons License
This work by Knitting and so on is licensed under a Creative Commons Attribution-NonCommercial-NoDerivatives 4.0 International License.


Materials
  • white yarn - I used approximately 15 grams of (probably) worsted weight yarn
  • leftover orange yarn - I used old (probably) sports weight yarn
  • leftover black yarn - I used old (probably) worsted weight yarn
  • leftover yarn of a different color for hat and scarf (less than 5 grams of fingering weight yarn)
  • 2.25 dpns and 2.5 dpns - I used needles that were too small for the given yarn weight
  • a stitch marker to mark the end of the round
  • stuffing - to give them some stability I even put a couple of pebbles right into the bottom of the lower half of their body
  • a tapestry needle


Size and Variations
The snowmen wearing stocking caps are knitted exactly to the instructions (with 2.5mm needles) and are about 10 cm high.
The one wearing a top hat is knitted with thicker yarn and with 3.25mm needles. Here I left out rows 24 - 28 (k all rows in the middle of the body) - so he's a bit rounder and shorter in proportion.


Instructions

Carrot

With orange yarn CO4 sts and join in round
Knit 4 rounds - increasing by 1 st every round - now you have 8 sts on your needles
Knit 4 rounds - increasing by 1 st every other round - now you have 10 sts on your needles
Bind off.

Leave the tail of your bind off - it will be used for stitching the carrot on later.
Stuff the tail from your CO into the carrot.


Snowman

You can stitch face and the (coal) buttons after you've finished, but I've done it while knitting - and that is how it is described in the pattern

With white yarn CO8 and join in round
Round 1: * kfb repeat from * to end
Round 2: k all
Round 3: * k1, kfb repeat from * to end
Round 4: k all
Round 5: * kfb, k2 repeat from * to end
Rounds 6 and 7: k all
Round 8: * k2, kfb, k1 repeat from * to end
Rounds 9 - 11: k all
Round 12: * k4, kfb repeat from * to end - you now have 48 sts on your needles
Rounds 13 - 28: k all
Round 29: * k2, ssk, k2 repeat from * to end
Rounds 30 and 31: k all

With black yarn and tapestry needle stitch on 3 coal buttons. Start to stuff the body.
Continue knitting with white yarn.

Round 32: * ssk, k3 repeat from * to end
Round 33: k all
Round 34: * k1, ssk, k1 repeat from * to end
Round 35: * ssk, k1 repeat from * to end
Round 36: k all

Round 37: * k1, kfb repeat from * to end
Round 38: k all
Round 39: * kfb, k2 repeat from * to end
Rounds 40 - 44: k all
Round 45: * ssk, k2 repeat from * to end
Round 46 - 48: k all

With the tail of the carrot, stitch on the carrot. Make sure to align it on top of the coal buttons.
With black yarn stitch on two coals for the eyes and 5 coals as a mouth.
Fill in stuffing. You can use the blunt end of a pencil to make sure that the stuffing gets everywhere.

Round 49: * k1, ssk repeat from * to end
Round 50: k all
Round 51: * ssk repeat from * to end

Fill in a bit more stuffing.
Cut white yarn and thread the tail into a tapestry needle. Catch the remaining 8 stitches with the needle and pull tight. Fasten off and weave in ends.


Hat: Stocking Cap
CO4 and join in round.
Knit in rounds increasing by 1 st per round - until the hat fits over the head of your snowman.
(I knitted until I had 32 sts on my needles).
Finish with 4 rounds of ribbing (either k1p1 or k2p2).
BO in ribbing pattern.

Attach a small pompom to the top of the hat. (I used this method and a dessert fork to make a pompom - but it still was a big too big.)
Weave in ends


Scarf
CO8 sts
Knit the same ribbing you did for the hat - either k1p1 or k2p2 - until your scarf measures about 25 cm (or until it is long enough to fit around the snowman's neck).
BO and weave in ends.


Alternative: Top Hat
CO8 and join in round
Round 1: * kfb repeat from * to end
Round 2: k all
Round 3: * k1, kfb repeat from * to end
Round 4: k all
Round 5: * kfb, k2 repeat from * to end
Round 6: p all
Round 7: * k1, ssk, k5 repeat from * to end
Rounds 8 to 16: k all
Round 17: * k4, ssk, k1 repeat from * to end
Round 18: k all
Round 19: * k1, kfb, k1 repeat from * to end
Round 20: k all
Round 21: * k3, kfb repeat from * to end
Round 22: k all
Round 24: * kfb, k4 repeat from * to end
BO and weave in ends.

Mittwoch, 14. November 2018

Sternchen - Star-Shaped Ornament

Now that we're in the middle of November, Christmas decorations are starting to be seen again. To get into the right mood, I tried to a knit small 3-dimensional star. And once I finished one, I couldn't stop and did quite a few more - because they really look cute and it's fun knitting them.
Even though these stars are 3-dimensional they are knitted flat. They have six points, are constructed of short rows and knitted (nearly) all in garter stitch. They come in four sizes and can be used to decorate your house for Christmas.
As to the name, "Sternchen" is the German word for little star.


The pattern is available as a PDF
The pattern PDF contains
  • a written pattern for all four sizes
  • a chart for two sizes
  • photo illustrations for various stages of star


Skills
In order to knit one of these stars, you need the following knitting skills:
  • Provisional CO
  • Short rows with wrap and turn - there is also an explanation how to adapt it to use german short rows
  • Grafting in garter stitch
  • Grafting in stockinette
  • kfb and ssk

Materials
To knit these stars you need
  • yarn - leftovers will do, when using fingering weight yarn, I used about 5 grams of yarn to knit a bigger star, with Sports weight it was about 10 grams
  • straight knitting needles - I used a size that was a bit too small for the yarn to get a tight texture
  • crochet hook and scrap yarn for provisional CO
  • stuffing - I used old yarn ends that I had collected from my last knitting projects
  • a tapestry needle for grafting and to weave in ends
  • one stitch marker


Samstag, 9. Dezember 2017

Bonus: Tannenbäumchen Christmas Cookies

Don't worry. I promise I won't become a food blogger :) But this recipe went so nicely with the Tannenbäumchen Potholders that I couldn't resist. So here - for the first time - is a recipe for christmas cookies.
These cookies are not too sweet and they have the fine Matcha taste, that I love. Furthermore, the green color makes them look like christmas trees (or Tannenbäumchen in german :).
Depending on the type of margarine and the white chocolate you use, the cookies can even be vegan.


Ingredients
  • 200 grams of flour
  • 10 grams of Matcha powder
  • 70 grams of confectioners' sugar
  • 130 grams of margarine
  • 2 table spoons of cold green tea
  • white chocolate coating (couverture) - plain white chocolate will do as well
The knitting pattern for the potholder is available here

Directions
  • Mix the dry ingredients (flour, Matcha powder & icing sugar together).
  • Add margarine and tea. Knead until it forms a smooth dough.
  • Form into a ball, wrap with clingfilm and let it rest in the fridge for at least one hour.
  • Preheat the oven to 180°C.
  • On a floured surface (or between two sheets of baking paper), roll the dough out to about 5mm thickness. 
  • Cut cookies with tree shaped cookie cutter - or cut your dough into triangles with an acute angle. 
  • Bake about 12 to 14 minutes - but keep an eye on them since they burn easily.
  • When the cookies are cooled, melt the chocolate coating and decorate the your cookies and wait till the chocolate sets.
    As you can see on all photos, my piping skills are non-existent - however, I melted the chocolate in a freezer bag and cut a small hole into one of the corners and decorated with this makeshift piping bag. So, the use of a real piping bag might have helped ... 


Freitag, 8. Dezember 2017

Tannenbäumchen Potholder

I love baking for christmas. Apart from the result - sweet cookies - there is also the experience of making them with your own hands and it makes your home smell lovely. This experience can even be more fun, if you have a bit of christmas themed equipment - like these lovely potholders with a christmas tree motif.
This potholder is knitted in a combination of short rows and intarsia. That way you don't have too many ends to weave in and the WS of the piece looks presentable


As to the name, Tannenbäumchen is the german word for a small christmas tree - or fir tree to be exact.

Creative Commons License
This work by Knitting and so on is licensed under a Creative Commons Attribution-NonCommercial-ShareAlike 4.0 International License.


Materials
  • a total of about 30 grams of DK weight cotton yarn - about 10 grams of C2 (color of Xmas tree) and 20 grams of C1 (background color)
  • 3.5 mm needles - if you use yarn of a different weight, use a needle that is one size below the size that the yarn calls for
  • scrap yarn for provisional CO
  • a tapestry needle for grafting and to weave in ends


Techniques & Notation
  • Throughout the pattern, the following notation is used:  C1 (k4), C2 (k10, w+t, k10), C1 (k to end) means, knit 4 stitches in C1, change to C2 and knit 10 sts, do a wrap and turn, knit 10 stitches and then change back to C1 and k to end. I.e. color is indicated before the knitting instructions for that yarn and the knitting instructions for that yarn are given in brackets after the color. 
  • Short rows with wrap and turn (w+t) - as shown in this YouTube video by Very Pink Knits.
    Even though this potholder is knit in garter stitch, I picked up the wraps, i.e. two wraps that are on top of each other. Here's a YouTube video that shows how to pick up your wraps (also by Very Pink Knits).
  • Note: in some rows the wrap has to be made just at the color change in the row below, e.g. Ridge B11 where you knit 11 sts in C1 and the 12 stitch that is to be wrapped was knitted in C2. In this case, it's advisable to change the color (as if to knit the next stitch in the new color), wrap and turn in the new color, and then to change back. This gives nicer color edges.
  • Provisional CO: My favorite method for a provisional CO is the crochet provisional CO - it is shown in this Youtube video by New Stitch a Day.
  • Grafting in Garter Stitch: A technique to get an invisible (knitted) seam - this technique is shown in this YouTube Video by knittinghelp.com. 
  • Weaving in (ends) while knitting: as shown in this YouTube video by So, I make stuff. This technique is used here to carry yarn of another color to point further along in your row while avoiding a long float.
  • Weaving in yarn while carrying it back: Draw a long loop of C2 (white in the illustration) to the point closer to the beginning of the rowwhere you want to knit it (picture 1). This gives you a really long float. Knit the first stitch (picture 2). Before knitting the second stitch, catch the float by put the left hand needle under the float (picutre 3) and then knit the stitch with your working yarn as usual. If you catch the float every second stitch, the WS will look as shown in picture 4. (This is a bit like catching floats in stranded knitting as shown in this YouTube video by Knit Purl Hunter.)
    The last two techniques (this and weaving in (ends) while knitting) will are used to avoid a long float that runs parallel to your knitting - and to avoid cutting your yarn. 
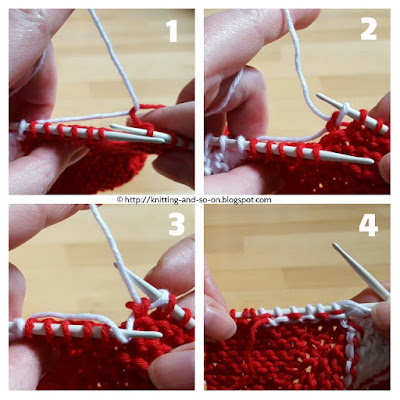
  • Click to enlarge
Construction
This potholder is knitted in 5 parts. It starts with a provisional CO. Then each row is a stitch shorter than the last one, One part ends, when the row is only 1 stitch (plus 1 w+t) long - then the next part begins and each row is one stitch longer than the last one until all stitches are knitted and we've sucessfully knitted around a corner. Then the row length is getting shorter again for the next corner. 
After knitting around four corners and the two sides (CO and last row) are grafted in garter stitch.


Size
With DK yarn, the piece measures about 17 cm x 17 cm.


Instructions
With scrap yarn provisionally CO 17 stitches

Part A:
Setup row A0 (WS): C2 (k12), C1 (k5)
Ridge A1: C1 (k6), C2 (k10, w+t, k10), C1 (k6)
Ridge A2: C1 (k7), C2 (k8, w+t, k8), C1 (k7)
Ridge A3: C1 (k8), C2 (k6, w+t, k6), C1 (k8)
Ridge A4: C1 (k9), C2 (k4, w+t, k4), C1 (k9)
Ridge A5: C1 (k10), C2 (k2, w+t, k2), C1 (k10)
Ridge A6: C1 (k11), C2 (w+t), C1 (k10)
Ridge A7: C1 (k10, w+t, k10)
Ridge A8: C1 (k9, w+t, k9)
Ridge A9: C1 (k8, w+t, k8)
Ridge A10: C1 (k7, w+t, k7)
Ridge A11: C1 (k6, w+t, k6)
Ridge A12: C1 (k5, w+t, k5)
Ridge A13: C1 (k4, w+t, k4)
Ridge A14: C1 (k3, w+t, k3)
Ridge A15: C1 (k2, w+t, k2)
Ridge A16: C1 (k1, w+t, k1)

Part B:
Ridge B1: C1 (k1, w+t, k1)
Ridge B2: C1 (k2, w+t, k2)
Ridge B3: C1 (k3, w+t, k3)
Ridge B4: C1 (k4, w+t, k4)
Ridge B5: C1 (k5, w+t, k5)
Ridge B6: C1 (k6, w+t, k6)
Ridge B7: C1 (k7, w+t, k7)
Ridge B8: C1 (k8, w+t, k8)
Ridge B9: C1 (k9, w+t, k9)
Ridge B10: C1 (k10, w+t, k10)
Ridge B11: C1 (k11), C2 (w+t), C1(k11)
Ridge B12: C1 (k11), C2 (k1, w+t, k1), C1 (k11)
Ridge B13: C1 (k10), C2 (k3, w+t, k3), C1 (k11)
Ridge B14: C1 (k14 - over the last 4 sts carry C2 back and weave it in), C2 (w+t), C1 (k14)
Ridge B15: C1 (k13), C2 (k2, w+t, k2), C1 (k13)
Ridge B16: C1 (k12), C2 (k4, w+t, k4), C1 (k12)
Ridge B17: C1 (k11), C2 (k6, w+t, k6), C1 (k11)
Ridge B18: C1 (k10), C2 (k6, w+t, k6), C1 (k10)
Ridge B19: C1 (k9), C2 (k6, w+t, k6), C1 (k9)
Ridge B20: C1 (k8), C2 (k6, w+t, k6), C1 (k8)
Ridge B21: C1 (k7), C2 (k6, w+t, k6), C1 (k7)
Ridge B22: C1 (k11 - over the last 4 sts carry C2 back and weave it in), C2 (k1, w+t, k1), C1 (k11)
Ridge B23: C1 (k10), C2 (k1, w+t, k1), C1 (k10)
Ridge B24: C1 (k9), C2 (k1, w+t, k1), C1 (k9)
Ridge B25: C1 (k8), C2 (k1, w+t, k1), C1 (k8)
Ridge B26: C1 (k7), C2 (k1, w+t, k1), C1 (k7)
Ridge B27: C1 (k6), C2 (k1, w+t, k1), C1 (k6)
Ridge B28: C1 (k5), C2 (k1, w+t, k1), C1 (k5)
Ridge B29: C1 (k4), C2 (k1, w+t, k1), C1 (k4)
Ridge B30: C1 (k4), C2 (w+t), C1 (k4)
Ridge B31: C1 (k3, w+t, k3)
Ridge B32: C1 (k2, w+t, k2)
Ridge B33: C1 (k1, w+t, k1)


Part C:
Ridge C1: C1 (k1, w+t, k1)
Ridge C2: C1 (k2, w+t, k2)
Ridge C3: C1 (k3, w+t, k3)
Ridge C4: C1 (k4), C2 (w+t), C1 (k4)
Ridge C5: C1 (k4), C2 (k1, w+t, k1), C1 (k4)
Ridge C6: C1 (k4), C2 (k2, w+t, k2), C1 (k4)
Ridge C7: C1 (k4), C2 (k3, w+t, k3), C1 (k4)
Ridge C8: C1 (k4), C2 (k4, w+t, k4), C1 (k4)
Ridge C9: C1 (k4), C2 (k5, w+t, k5), C1 (k4)
Ridge C10: C1 (k4), C2 (k6, w+t, k6), C1 (k4)
Ridge C11: C1 (k4), C2 (k7, w+t, k7), C1 (k4)
Ridge C12: C1 (k4), C2 (k8, w+t, k8), C1 (k4)
Ridge C13: C1 (k4), C2 (k9, w+t, k9), C1 (k4)
Ridge C14: C1 (k4), C2 (k10, w+t, k10), C1 (k4)
Ridge C15: C1 (k4), C2 (k11, w+t, k11), C1 (k4)
Ridge C16: C1 (k4), C2 (k12, w+t, k12), C1 (k4)
Ridge C17: C1 (k4), C2 (k13, w+t, k13), C1 (k4)

The middle of ridge C17 is also the middle of the potholder. From this point on, you have to knit the same rows in reverse order

Ridge C18 = Ridge C16
Ridge C19 = Ridge C15
Ridge C20 = Ridge C14
Ridge C21 = Ridge C13
...
Ridge C32 = Ridge C2
Ridge C33 = Ridge C1

Part D: Part B in reverse order
Ridge D1 = Ridge B33
Ridge D2 = Ridge B32
Ridge D3 = Ridge B31
...
D12 = B22, but carry the C2 yarn backwards and weave it in
...
D24 = B14, but carry the C2 yarn backwards and weave it in
...
Ridge D32 = Ridge B2
Ridge D33 = Ridge B1

Part E: Part A in reverse order
Ridge E1 = Ridge A16
Ridge E2 = Ridge A15
...
Ridge E15 = Ridge A2
Ridge E16 = Ridge A1

Take out your scrap yarn of the provisional cast on and put the live stitches on a knitting needle. Cut your yarns but leave tails long enough for grafting.
Graft in garter stitch: 5 sts in C1 and 12 sts in C2.

After grafting there is still a small hole in the middle of the piece - you can sew this closed with your C2 yarn tail. Sew in ends afterwards.

Chart
The chart below shows one half of the potholder. The numbers indicate the number of stitches per color of each ridge. The green number gives the stitches in C2 and the black number the stitches in C1.