Donnerstag, 24. Mai 2018

T-Shirt Upcycling - The Knitter's Way

I started this project back in 2016, when I was quite into watching DIY videos on YouTube (especially sewing toturials). I had the idea of upcycling thrifted stuff, but with a certain knitting element :). I first tried the general idea on an old black T-Shirt I had, but the finished product had so many flaws so that it wasn't fit to be worn in public. But you learn from your mistakes, right?
So I started with a similar idea on a nice dotted t-shirt that I had bought at the thrift shop. However, it was a bit tight especially around the arms, so I decided to make it a bit wider by inserting a ribbon into the sideseams ... but this ribbon as well as a piece for the neckline are hand-knitted :)


This is NOT a tutorial, but just an explanation of the basic idea.

Creative Commons License
This work by Knitting and so on is licensed under a Creative Commons Attribution-NonCommercial-ShareAlike 4.0 International License.


The Materials I Used
  • an old T-shirt
  • thin cotton yarn (fingering or sport weight)
  • knitting needles the yarn calls for
  • scissors and a seamripper
  • sewing needle and thread 

How I Did It
  • First I decided on the design. Since this piece had a low back that I didn't quite like, I decided to turn it around, but to include a knitted panel in front to make the neckline not quite as low.
  • To get the measurements of the pieces to be knitted 
    • I measured the distance from the bottom hem along the side seam to the end of the arm hem
    • and with a piece of paper inserted into the front, I drew a semicircular shape that I'd need for the front piece - and cut that out (plus about 5mm seam allowance around the curve).
  • Then I knitted the three pieces:
    • two garter stitch ribbons (10 sts wide) that are as long as the measured distance from the bottom hem along the side seam to the end of the arm hem
    • the semicircle (starting with a few stitches and increasing symmetrically)
  • And I gently blocked my hand-knitted pieces.
  • I seamripped the side seams of your T-shirt - including the underarm seam. 
  • With a sewing needle and thread that matched my yarn I handstitched the knitted pieces to the T-Shirt (starting in 2016 ... and finishing just now :)

Even though I'm not completely happy with the result, I think the idea of combining T-shirts with hand-knitted elements has a certain potential. (T-shirts are also knitted, after all :). Plus, I think that upcycling (or reusing) old stuff is a good thing. But I guess before I achieve something that is wearable outside, I need to work on my sewing skills - e.g. learning to do this on a sewing machine ... and get over my "fear" of using a sewing machine on my hand-knitted pieces.
Have you ever combined hand-knitted (or hand-crocheted) pieces with cloth (jersey or woven)? If so, do you have any tips how to apply a sewing machine to hand-knitted pieces? I'd be grateful for anything helpful :)

Sonntag, 20. Mai 2018

Lovely Little Stitch Pattern(s)

When I went to the city center this friday I bought a ball of cotton sock yarn (Regia Cotton Tutti Frutti to be exact, here's the link to the yarn's Ravelry page) - in a lovely fruity self-striping color way. I was planning to do something with short rows - though I wasn't sure what exactly. My first try didn't really work the way I planned, so I frogged it ... and decided to knit a plain sock (yes, no short rows), but I wanted a nice stitch pattern at least. So I searched Ravelry for inspiration. The best sock patterns are usually knitted over a small stitch count (i.e. repeats over 4 stitches or so) - and it's a plus if they're stretchy.

In the end, I used the stitch pattern from the Syncopation Socks (pattern by Mary Heininger - available on Ravelry). It's a really simple rib pattern, but the effect is gorgeous. Since I'm usually too lazy to read patterns (unless I really want to learn a new technique), I only used the stitch pattern and did the construction that I currently like most (toe-up and a shadow-wrap heel).


Creative Commons License
This work by Knitting and so on is licensed under a Creative Commons Attribution-NonCommercial-ShareAlike 4.0 International License.

Other stitch patterns that I really want to try with socks are:
What are your favorite stitch patterns for socks?

Donnerstag, 10. Mai 2018

Tipsy Toe Socks

When using self striping sock yarn it's always fun to try different ways of knitting common shapes like sock toes, because the self striping yarn will create attractive patterns. A while ago I had the idea of knitting slanted toes and using short rows to even them out before getting to the heel. I tried and frogged quite a few times before I actually managed to knit something to fit around human feet, but I finally made it.
These socks are knitted from the toe up, but they start at an angle and continuing with short row wedges. This slanted effect shows best with variegated yarn ... it's possible to knit it with a solid yarn, but you won't see the slanted effect. I've used and described a shadow wrap heel, but you can use any toe-up heel you like.
As with many of my patterns, this is not exactly a beginner pattern. It's also helpful, if you've knitted another pair of socks before.


Eine deutsche Version dieser Anleitung gibt es hier.
A German version of this pattern is available here.

Creative Commons License
This work by Kniting and so on is licensed under a Creative Commons Attribution-NonCommercial-ShareAlike 4.0 International License.


Materials
  • 50 to 80 grams of fingering weight yarn - depending on how long you like your sock cuff; for the lighter ones (in pastell colors) I used Lana Grossa Meilenweit Special Confetti (color 2508; here's the link to the yarn's Ravelry page) for the darker ones (dark blue, brown, orange etc.) I used Vendita Sockenwolle bought at Aldi's about three years ago (here's a link to the yarn's Ravelry page)
  • 2.5mm needles - I used Addi CrasyTrio, but you can use dpns or a circular needle (with Magic Loop method) as well
  • 2 different stitch markers - one to mark the end of round (called "end marker") and one to mark the middle of the round (called "middle marker")
  • a tapestry needle to weave in ends

Techniques
  • Judy's Magic Cast-On is a technique that gives you live stitches on both sides of your needle - it is generally used for toe-up socks (e.g. in this pattern), but it can be used for other purposes as well. Here's a written description (from Knitty) and here's a YouTube-video by Cat Bordhi and another YouTube-video by Very Pink Knits.
  • German Short Rows (t+p): when you turn, bring yarn to the front and pull it back so that a sort of double-stitch is created, then knit back as usual - when you have to knit the double-stitch, be careful to knit it as one stitch (see also https://www.youtube.com/watch?v=P6n561SMZXQ); this method has the advantage the no picking up of stitches is necessary. In the pattern, this stitch will be called t+p (turn and pull).
  • Shadow Wrap Short Rows - as used for the heel: as shown in this YouTube video by Lee Meredith. A video by Miriam Felton that shows how to do a heel with shadow wraps can be found here on YouTube. However, the heel knitted here is knitted slightly different because here there are two rounds between the two parts of the heel, i.e. there won't be any triple stitches.

Gauge and Sizes
When I knitted these 19 rows of stockinette gave 5cm in height and 16 sts (stockinette) gave 5 cm in width. But If you've knitted socks before, you'll know which total stitch count to aim for. Here's the table that shows you the usual amount of stitches you need for your shoe size. Furthermore, it shows over how many stitches you're going to knit the heel (after some increases) and how these stitches are distributed, i.e. how many stitches are used for short rows at each side.
E.g. for size 36 you work the heel over 34 stitches, i.e. you do short rows for 11 stitches on both sides and 12 stitches in the middle are knitted normally.

shoe sizetotal number of stitchesheel stitches (after increasing)distribution of heel stitches
32-3556 = 2x2828 + 4 = 3211 - 10 - 11
36-3960 = 2x3030 + 4 = 3411 - 12 - 11
40-4364 = 2x3232 + 4 = 3612 - 12 - 12

Instructions for sizes are given as follows: sizes 32-35 [sizes 36-39, sizes 40-43]. I.e. the instructions before the brackets are for sizes 32 to 35 and in brackets first for sizes 36 to 39 and then for sizes 40 to 43.


Instructions

First Sock

Toe
Do a magic CO of 2x10 sts [2x10, 2x12]
Round 1: k8 [k8, k10], kfb k1, place marker ("half marker"), k1 kfb k8 [k8, k10], place marker ("end marker")
Round 2: k1, kfb, k to 2 bef half marker, kfb, k1, slip half marker, k1, kfb, k to 2 bef end marker, kfb, k1
Round 3: k to 2 bef half marker, kfb, k1, slip half marker, k1, kfb, k to end
Repeat rounds 2 and 3 four more times. (Now you have 2x26 [2x26, 2x28] sts on your needles)
For sizes 36-39 and 40-43 repeat round 2 once more.

Now you have 2x26 [2x28, 2x30] sts on your needles

Round 12 [13, 13]: k all
Round 13 [14, 14] = Round 2
Round 14 [15, 15]: k all
Round 15 [16, 16] = Round 3

Now you have 2x29 [2x31, 2x33] sts on your needles (i.e. 1 too much for the stitch count you're actually aiming for) - and the short row wedges will be started.

Wedge 1
Round 16: k to 4 bef half marker, t+p, p to end (and without changing direction) p to 4 bef half marker, t+p, k to end
Round 17: k to 8 bef half marker, t+p, p to end (and without changing direction) p to 8 bef half marker, t+p, k to end
Round 18: k to 12 bef half marker, t+p, p to end (and without changing direction) p to 12 bef half marker, t+p, k to end
Round 19: k to 16 bef half marker, t+p, p to end (and without changing direction) p to 16 bef half marker, t+p, k to end
Round 20: k to 20 bef half marker, t+p, p to end (and without changing direction) p to 20 bef half marker, t+p, k to end
Round 21: k to 24 bef half marker, t+p, p to end (and without changing direction) p to 24 bef half marker, t+p, k to end

Round 22: k1, ssk, k to 3 bef end marker, k2tog, k1
Round 23: k to 2 bef half marker, kfb, k1, slip half marker, k1, kfb, k to end

Wedge 2
Round 24: k to 6 bef half marker, t+p, p to end (and without changing direction) p to 6 bef half marker, t+p, k to end
Round 25: k to 12 bef half marker, t+p, p to end (and without changing direction) p to 12 bef half marker, t+p, k to end
Round 26: k to 18 bef half marker, t+p, p to end (and without changing direction) p to 18 bef half marker, t+p, k to end
Round 27: k to 24 bef half marker, t+p, p to end (and without changing direction) p to 24 bef half marker, t+p, k to end

Round 28: k1, ssk, k to 3 bef end marker, k2tog, k1
Round 29: k all

Wedge 3 = Wedge 1 (i.e. Rounds 16 to 21)

Now you've finished the toe and 2x28 [2x30, 2x32] sts on your needles.

Foot
Knit plain stockinette rows until it's time to start the heel.

Heel
If you want to knit a short row heel (e.g. shadow wrap heel, as described here) you usually start it when you're about 5 cm short of the total foot length.
But I like to make my heels a bit bigger, so I do a few increases at the sides of the "heel" half and I start a bit earlier, about 6 to 6.5 cm short of the total length.

Round 1: k to half marker, slip half marker, kfb, k to 1 bef end marker, kfb,
Round 2: k all
Repeat rounds 1 and 2 once more - now the heel part of your socks has 4 (=2x2) more stitches than the other part

And now for the real heel - this is worked only over the stitches after the half marker:
Round 5:
(a) k to one stitch before end marker, knit into the mother stitch of the next st (i.e. do a shadow wrap), turn
(b) slip shadow wrap stitch, p to one stitch before half marker, purl into the mother stitch of the next st, turn
(c) slip shadow wrap stitch, k to one stitch before the last shadow wrap, knit into the mother stitch of the next st, turn
(d) slip shadow wrap stitch, p to one stitch before the last shadow wrap, purl into the mother stitch of the next st, turn
Repeat (c) and (d) until the remaining (knitted) stitches are only one third of your heel stitches.
k to end of row (making sure to pick up the shadow wraps, i.e. to knit the twin-stitches as one stitch) and mk1l (this last increase is to avoid a hole at the gap)

Round 6: k to half marker, slip half marker, mk1r (also to avoid a hole), k to end (also making sure to pick up the shadow wraps) - now the heel part of your socks has 6 (=4+2) more stitches than the other part
Round 7 and 8: k all

Round 9: k to half marker,
(a) k two thirds of the heel stitches, knit into the mother stitch of the next st (i.e. do a shadow wrap), turn
(b) slip shadow wrap stitch, p one third of the heel stitches, purl into the mother stitch of the next stitch, turn
(c) slip shadow wrap stitch, k up to and including the twin-stitch, knit into the mother stitch of the next st (i.e. do a shadow wrap), turn
(d) slip shadow wrap stitch, p up to and including the twin-stitch, purl into the mother stitch of the next st (i.e. do a shadow wrap), turn
Repeat (c) and (d) until the twin-stitches on both sides are one stitch away from the markers (end marker and half marker),
k to end of row and mk1l

Round 10: k to half marker, slip half marker, mk1r, k to end  - now the heel part of your socks has 8 (=6+2) more stitches than the other part
Round 11: k all

Now the extra stitches for the heel (four per side) must be decreased again.
Round 12: k to half marker, slip half marker, ssk, k to 2 bef end marker, k2tog
Round 13: k all
Repeat rounds 12 and 13 three times more.

Cuff
Knit plain stockinette rounds and end with about 10 rounds of k2p2-ribbing.
Bind off loosely in ribbing pattern.


Second Sock
Knit toe and foot like the first sock, but start the heel on the opposite side, i.e. when knitting the first sock, the instructions told you to start the heel after the half marker (second half of the stitches), so for the second sock you should start it just at the beginning of the round (over the first half of the stitches).


Mittwoch, 9. Mai 2018

"Tipsy Toe" Socken mit schrägen Spitzen

Ich mag es mit buntem Sockengarn zu experimentieren. Wenn man bekannte Formen etwas anders als "normal" strickt, kommen dabei interessante Muster heraus. Vor kurzem hatte ich die Idee, die Spitze einer Socke schräg zu beginnen und dann mit verkürzten Reihen zu weiter zu arbeiten. Nach etwa fünf Versuchen und Ribbeln hat es geklappt und ich hatte eine Spitze, die mir gut passte.
Diese Socken werden von der Spitze her gestrickt - sie beginnen mit einem magischen Maschenanschlag, der aber schräg am Fuß sitzt. Anschließend wird mit Keilen aus verkürzten Reihen ausgeglichen, so dass der Rest der Socke normal gestrickt werden kann. Dieser schräge Effekt kommt gut heraus, wenn man bunten Sockengarn benutzt ... mit einfarbigem Garn tritt der Effekt nicht zu Tage.
Wie viele meiner Anleitungen ist diese nicht wirklich für Anfänger geeignet. Es ist außerdem hilfreich, wenn man schon einmal Socken gestrickt hat.


This pattern is also available in English.
Eine Version dieser Anleitung auf Englisch gibt es hier.

Creative Commons License
This work by Kniting and so on is licensed under a Creative Commons Attribution-NonCommercial-ShareAlike 4.0 International License.


Material
  • 50 bis 80 Gramm 4-fädiges Sockengarn - für die helleren Socken (in Pastelltönen) habe ich  Lana Grossa Meilenweit Special Confetti benutzt (Farbe 2508; hier der Link zur Ravelry-Seite des Garns) und für die dunkleren (in dunkelblau, -orange und braun) Vendita Sockenwolle von Aldi vor ca. 3 Jahren (Link zur Seite des Garns bei Ravelry)
  • 2.5mm Nadeln - ich habe das Addi CrasyTrio verwendet, aber normale Sockennadeln oder eine Rundstricknadel (mit Magic Loop) gehen natürlich auch 
  • 2 verschiedene Maschenmarkierer - einen für die Mitte der Runde (Mittelmarker oder MM) und einen für's Ende der Runde (Endmarker oder EM) 
  • eine stumpfe Stopfnadel zum Vernähen der Enden

Techniken und Abkürzungen
Natürlich kann man für die Ferse auch andere verkürzte Reihen verwenden (oder eine völlig andere Fersentechnik) - ebenso eine andere Technik für die verkürzten Reihen an den Zehen. Ich habe in dieser Anleitung die Techniken beschrieben, die ich selber verwendet habe - eben weil diese bei mir für den jeweiligen Anwendungsbereich am besten funktionieren.


Maschenprobe und Größe
Bei mir gaben 19 Reihen glatt rechts 5 cm (Höhe) und 16 Maschen glatt rechts 5 cm (Breite).
Ich empfehle als Ziel diejenige Maschenanzahl anzupeilen, die du normalerweise beim Sockenstricken brauchst. Die Tabelle unten zeigt an, welche welche Schuhgröße, welche Maschenanzahl hat. Außerdem zeigt sie die Ergebnisse der Berechnungen für die Ferse an, d.h. über wieviele Maschen die Ferse nach einigen Zunahmen gestrickt wird und wie diese Maschen beim Stricken der Ferse aufgeteilt werden, für Größe 36, z.B. werden an jeder Seite 11 Maschen in Shadow Wraps gestrickt und 12 Maschen bleiben in der Mitte.

SchuhgrößeGesamtzahl an MaschenFersenmaschen (nach Zunahmen)Maschenaufteilung in Ferse
32-3556 = 2x2828 + 4 = 3211 - 10 - 11
36-3960 = 2x3030 + 4 = 3411 - 12 - 11
40-4364 = 2x3232 + 4 = 3612 - 12 - 12

Die Anleitung gibt die Größen wie folgt an 32-35 [36-38, 40-43]. Also vor der eckigen Klammer für 32 bis 35 und in der Klammer für 36 bis 39 und 40 bis 43.


Anleitung

Erste Socke

Zehenspitze
Nehme 2x10 Maschen [2x10, 2x12] mit dem magischen Maschenanschlag auf.
Runde 1: 8 re. M. [8 re. M., 10 re. M], kfb 1 re. M., Maschenmarkierer einsetzen (im folgenden Mittelmarkierer oder MM genannt), 1 re. M, kfb, 8 re. M. [8 re. M., 10 re. M] (Maschenmarkierer einsetzten (im folgenden Endmarkierer oder EM genannt)
Runde 2: 1 re. M., kfb, re. M. bis zu 2 vor MM, kfb, 1 re. M.; 1 re. M. kfb, re. M. bis zu 2 vor EM, kfb, 1 re. M.
Runde 3: re. M. bis zu 2 vor MM, kfb, 1 re. M.; 1 re. M, kfb, re. M bis zum Ende
Runden 2 und 3 viermal wiederholen. Jetzt hast du 2x26 [2x26, 2x28] Maschen auf den Nadeln.
Für die Grössen 36-39 und 40-43 Runde 2 noch einmal wiederholen.
Jetzt solltest du 2x26 [2x28, 2x30] Maschen auf den Nadeln haben.

Runde 12 [13, 13]: re. M
Runde 13 [14, 14]= Runde 2
Runde 14 [15, 15]: re. M.
Runde 15 [16, 16]= Runde 3

Jetzt hast du 2x29 [2x31, 2x33] Maschen auf den Nadeln (also 2x einen mehr als die angepeilte Anzahl) - und die Keile aus den verkürzten Reihen werden begonnen

Keil 1
Runde 16: re. M. bis 4 vor MM, w+z, li. M. bis EM (und dann weiter ohne wenden) li. M. bis 4 vor MM, w+z, re. M. bis EM
Runde 17: re. M. bis 8 vor MM, w+z, li. M. bis EM (und dann weiter ohne wenden) li. M. bis 8 vor MM, w+z, re. M. bis EM
Runde 18: re. M. bis 12 vor MM, w+z, li. M. bis EM (und dann weiter ohne wenden) li. M. bis 12 vor MM, w+z, re. M. bis EM
Runde 19: re. M. bis 16 vor MM, w+z, li. M. bis EM (und dann weiter ohne wenden) li. M. bis 16 vor MM, w+z, re. M. bis EM
Runde 20: re. M. bis 20 vor MM, w+z, li. M. bis EM (und dann weiter ohne wenden) li. M. bis 20 vor MM, w+z, re. M. bis EM
Runde 21: re. M. bis 24 vor MM, w+z, li. M. bis EM (und dann weiter ohne wenden) li. M. bis 24 vor MM, w+z, re. M. bis EM

Runde 22: 1 re. M., 2 M. zus., re. M. bis 3 vor EM, 2 M. zus., 1 re. M.
Runde 23: re. M. bis 2 vor MM, kfb, 1 re. M.; 1 re. M. kfb, re. M. bis zum Ende

Keil 2
Runde 24: re. M. bis 6 vor MM, w+z, li. M. bis EM (und dann weiter ohne wenden) li. M. bis 6 vor MM, w+z, re. M. bis EM
Runde 25: re. M. bis 12 vor MM, w+z, li. M. bis EM (und dann weiter ohne wenden) li. M. bis 12 vor MM, w+z, re. M. bis EM
Runde 26: re. M. bis 18 vor MM, w+z, li. M. bis EM (und dann weiter ohne wenden) li. M. bis 18 vor MM, w+z, re. M. bis EM
Runde 27: re. M. bis 24 vor MM, w+z, li. M. bis EM (und dann weiter ohne wenden) li. M. bis 24 vor MM, w+z, re. M. bis EM

Runde 28: 1 re. M., 2 M. zus., re. M. bis 3 vor EM, 2 M. zus., 1 re. M.
Runde 29: re. M.

Keil 3 = Keil 1 (i.e. Runden 16 bis 21)

Die Spitze ist fertig und du solltest 2x28 [2x30, 2x32] Maschen auf den Nadeln haben.

Fuß
Glatt rechts bis es Zeit wird, die Ferse zu beginnen.

Ferse
Normalerweise beginne ich eine Ferse aus verkürzten Reihen, wenn die Socke etwa 5 cm kürzer ist als die Gesamtlänge des Fußes.
Allerdings passen mir Socken besser, wenn ich vor der eigentlichen Ferse noch ein paar Maschen auf der Fersenseite zunehme, d.h. ich starte wenn die Socke etwa 6 bis 6.5 cm kürzer als die Gesamtlänge ist - und zwar so:

Runde 1: re. M. bis MM, und nach MM, kfb, re. M. bis 1 vor EM, kfb
Runde 2: re. M.
Runden 1 und 2 nochmals stricken

Jetzt ist die Fersenseite 4 Maschen breiter als die Vorderseite - die Ferse ist also etwas geräumiger. Für die erste Socke wird die Ferse über die zweite "Hälfte" der Maschen gearbeitet.

Runde 5:
(a) re. M. bis zu 1 vor EM, in die Masche unterhalb der nächsten Masche re. stricken, wenden,
(b) die erste Masche abheben, li. M. bis zu 1 vor MM, Masche unterhalb der nächsten Masche li. stricken, wenden
(c) die erste (doppelte) Masche abheben, re. M. bis zu 1 vor dem letzten Shadow Wrap, in die Masche unterhalb der nächsten Masche re. stricken, wenden,
(d) die erste Masche abheben, li. M. bis zu 1 vor letztem Shadow Wrap, Masche unterhalb der nächsten Masche li. stricken, wenden
(c) und (d) solange wiederholen bis die Anzahl der gestrickten Maschen in der Mitte nur noch ein Drittel der Fersenmaschen sind; es wurden also auf jeder Seite 11 [11, 12] Maschen in Shadow Wraps gestrickt und in der Mitte befinden sich noch 10 [12, 12 Maschen].
(e) re. M. bis zum Ende der Runde - und darauf achten, dass die Shadow Wraps als eine Masche abgestrickt werden - am Ende der Runde eine Masche verschränkt aus dem Querfaden herausstricken (dies hilft Löcher an der Seite zu vermeiden).

Runde 6: re. M. bis zu MM, nach MM eine Masche verschränkt aus dem Querfaden herausstricken, re. M. bis zum Ende (auch hier wieder darauf achten die Shadow Wraps als eine Masche abzustricken - die Fersenseite hat nun 6 Maschen mehr als die andere.
Runden 7 und 8: re. M.

Runde 9: re. M. bis MM,
(a) 21 [24, 24] re. M.,  in die Masche unterhalb der nächsten Masche re. stricken, wenden,
(b) die erste Masche abheben, 10 [12, 12] li. M., Masche unterhalb der nächsten Masche li. stricken, wenden
(c) die erste (doppelte) Masche abheben, re. M. bis zur nächsten Shadow Wrap-Masche, diese Masche re. abstricken, in die Masche unterhalb der nächsten Masche re. stricken, wenden,
(d) die erste Masche abheben, li. M. bis zur nächsten Shadow Wrap-Masche, diese Masche li. abstricken und die Masche unterhalb der nächsten Masche li. stricken, wenden
(c) und (d) solange wiederholen bis alle Maschen auf der Fersenseite abgearbeitet sind, d.h. die letzten Shadow Wrap-Maschen befinden sich neben den beiden Maschenmarkieren.
(e) re. M bis zum Ende der Runde  - am Ende der Runde eine Masche verschränkt aus dem Querfaden herausstricken (dies hilft Löcher an der Seite zu vermeiden)

Runde 10: re. M. bis zu MM, nach MM eine Masche verschränkt aus dem Querfaden herausstricken, re. M. bis zum Ende - jetzt hat die Fersenseite 8 Maschen mehr als die Vorderseite.
Runde 11: re. M.

Jetzt müssen die Maschen abgenommen werden, die für die Ferse zusätzlich aufgenommen wurden:
Runde 12: re. M. bis MM, 2 M. re. zus., re. M. bis 2 vor EM, 2 M re. zus.
Runde 13: re. M.
Runden 12 und 13 noch dreimal wiederholen, um auf die originale Maschenzahl zurück zu kommen.

Schaft und Bündchen
Glatt rechts stricken, bis man das Bündchen beginnen will.
Dann etwa 10 Reihen 2re. 2li. Bündchen stricken und lose abketten.


Zweite Socke
Zehenspitze und Fuß wie bei der ersten Socke stricken. Dann aber die Ferse über die erste Hälfte der Maschen stricken, d.h. die Fersenzunahmen direkt am Anfang der Runde und vor dem Mittelmarkierer durchführen und Fersenrunden 5 und 9 so ändern, dass die Shadow Wraps auf der ersten Hälfte der Runde gestrickt werden.
Schaft und Bündchen exakt wie für die erste Socke stricken.


Mittwoch, 2. Mai 2018

Color Explosion Mitts

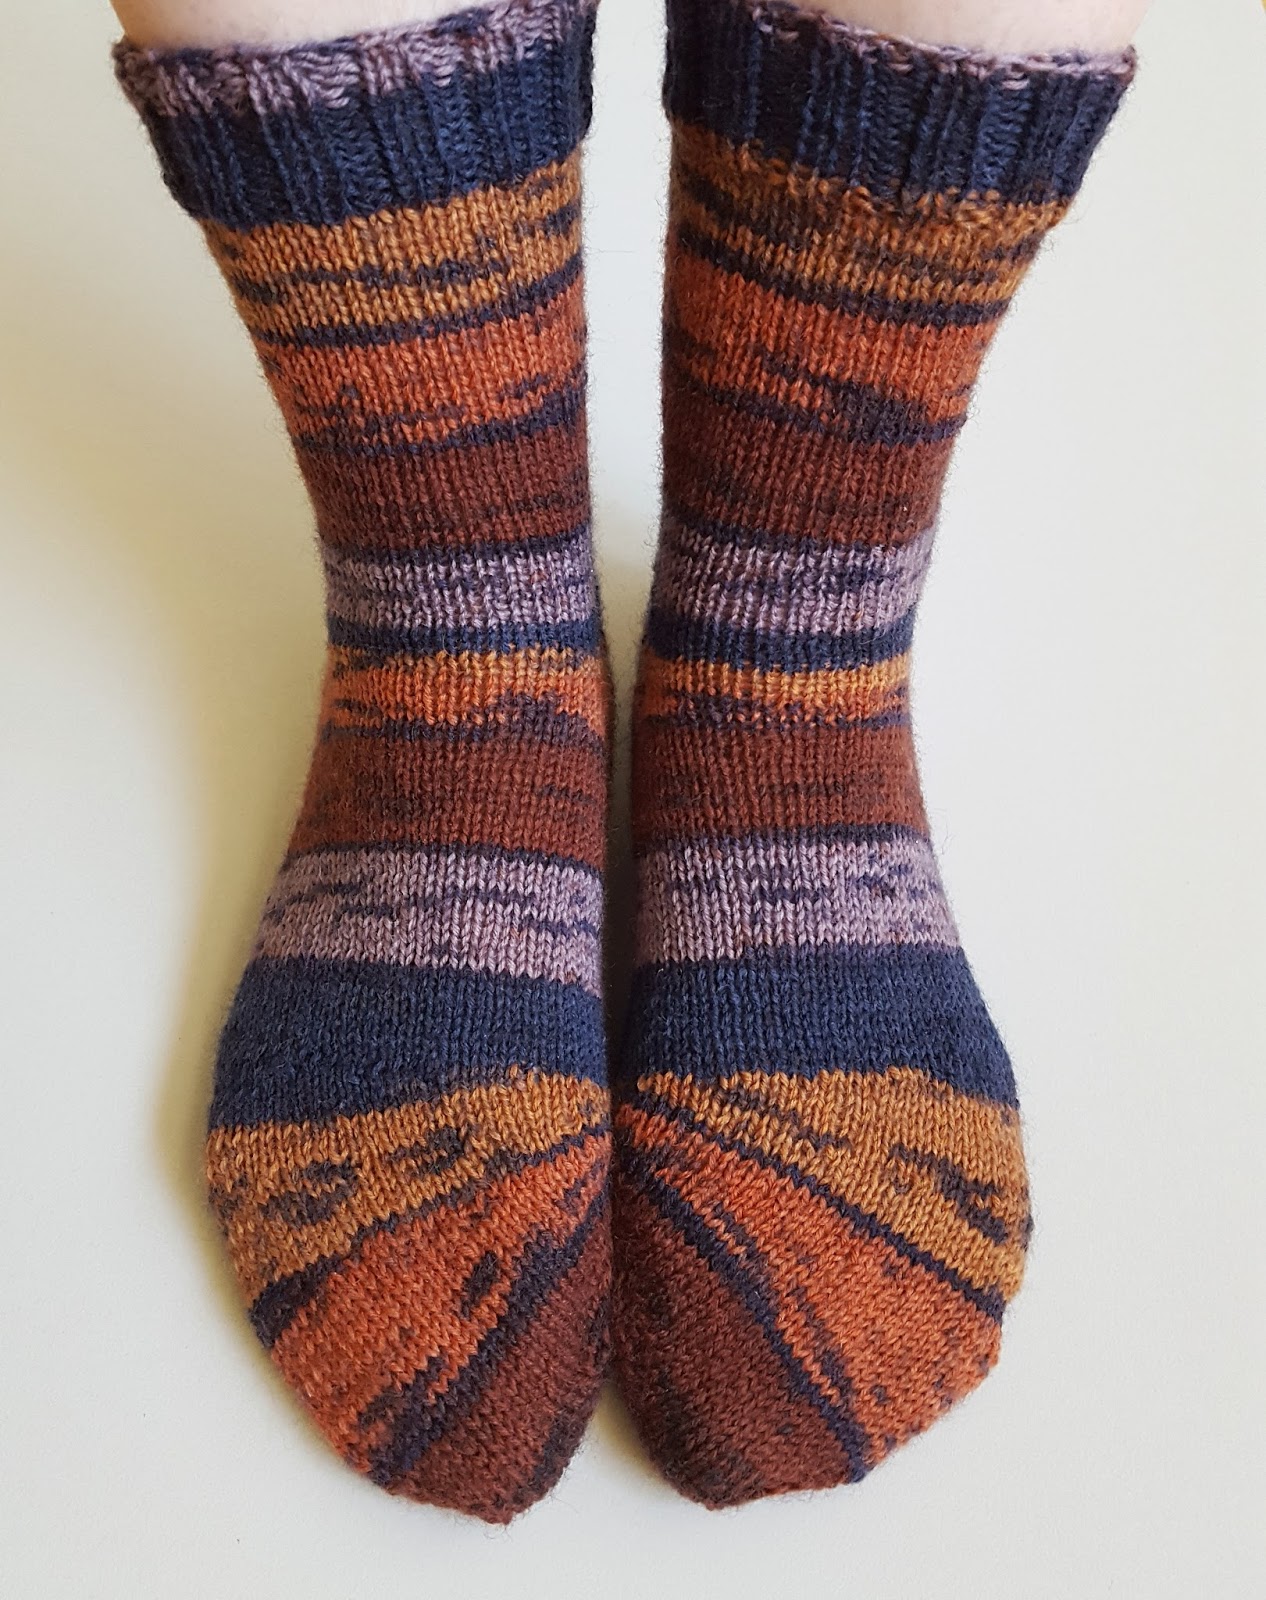
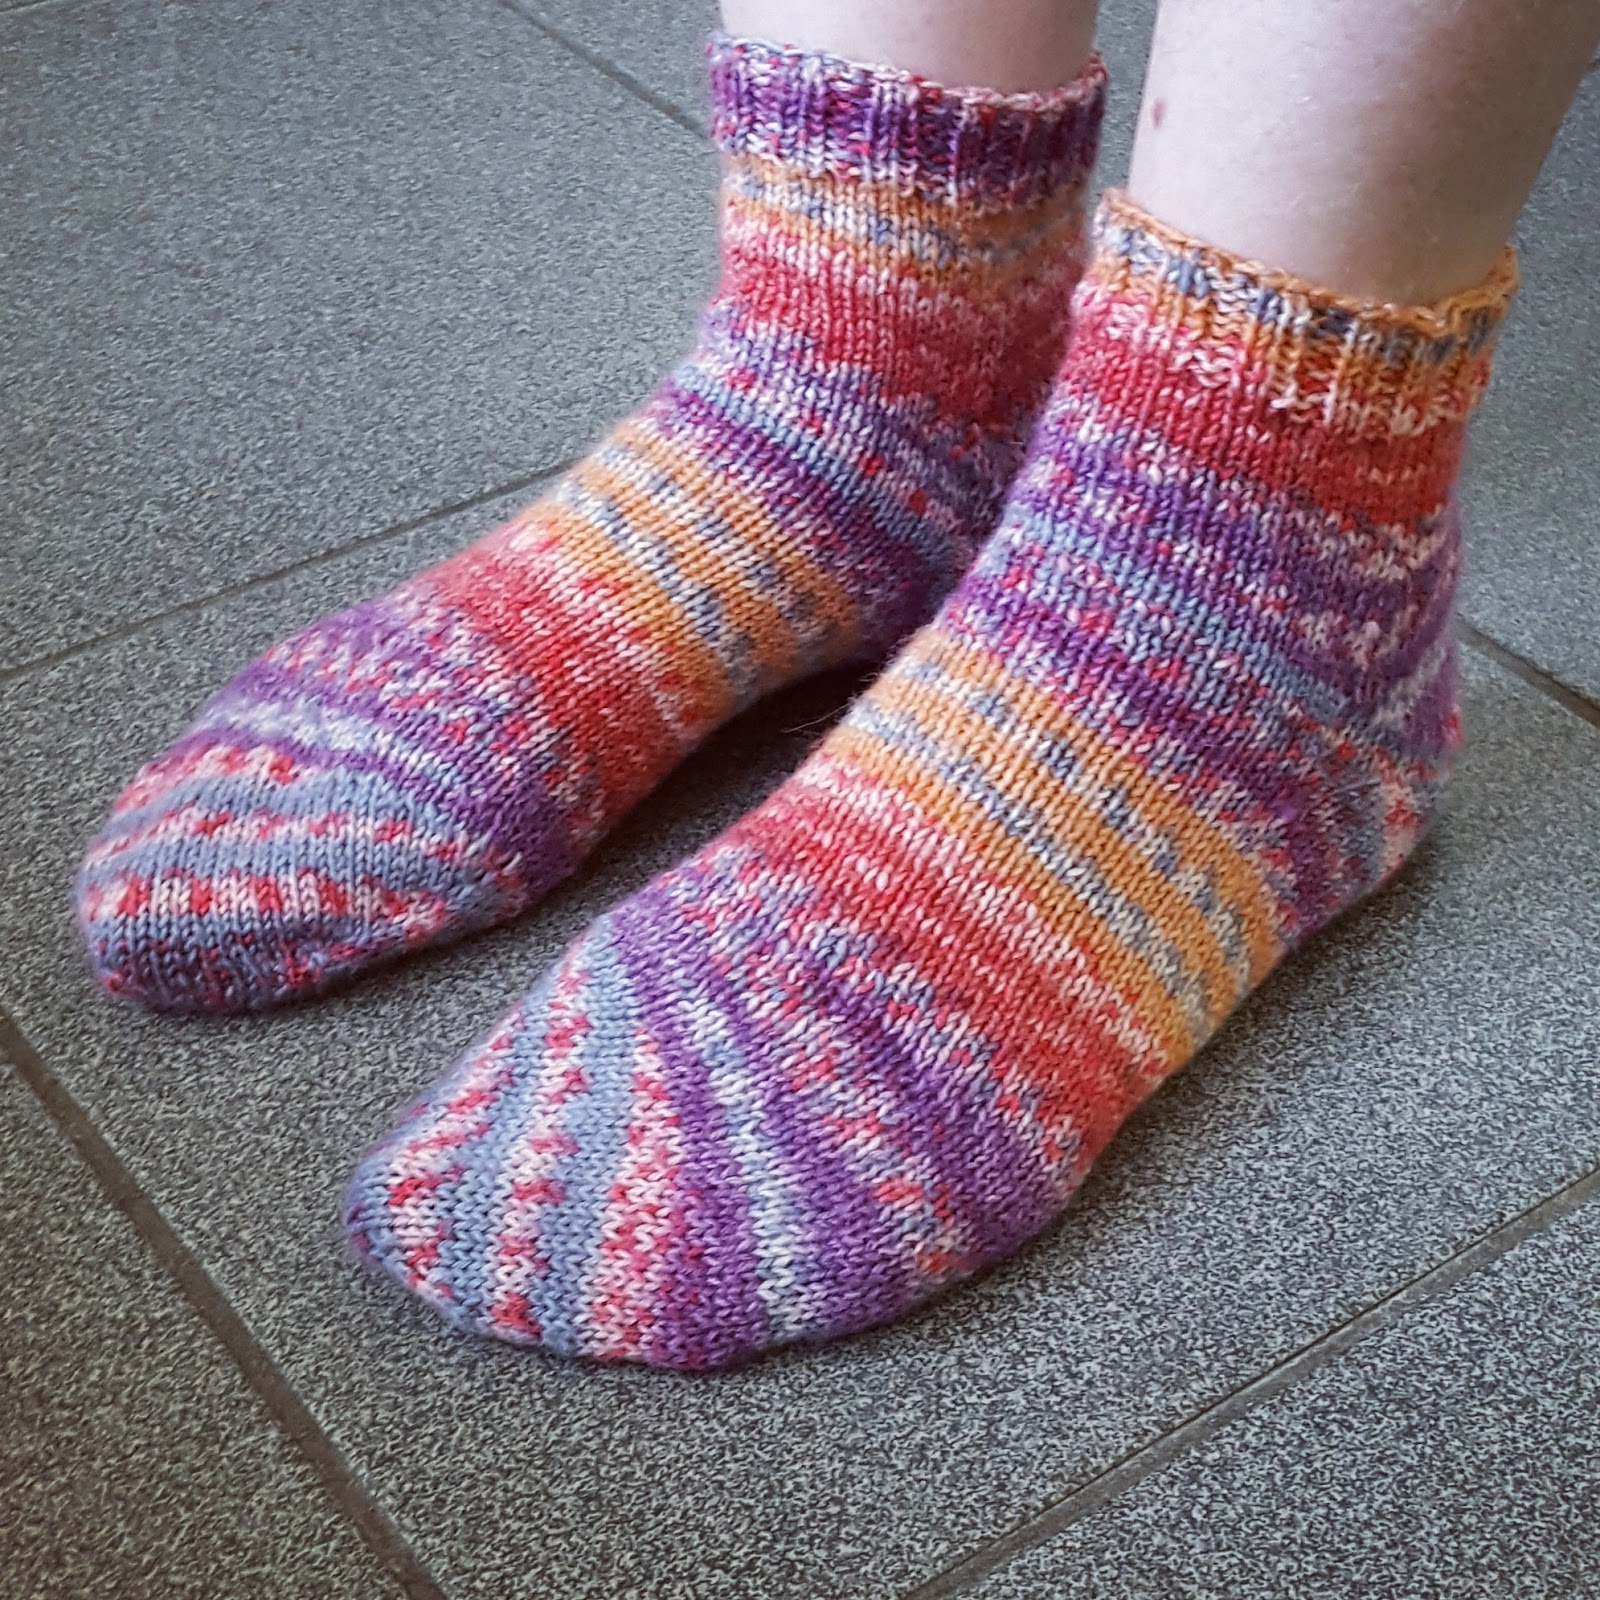
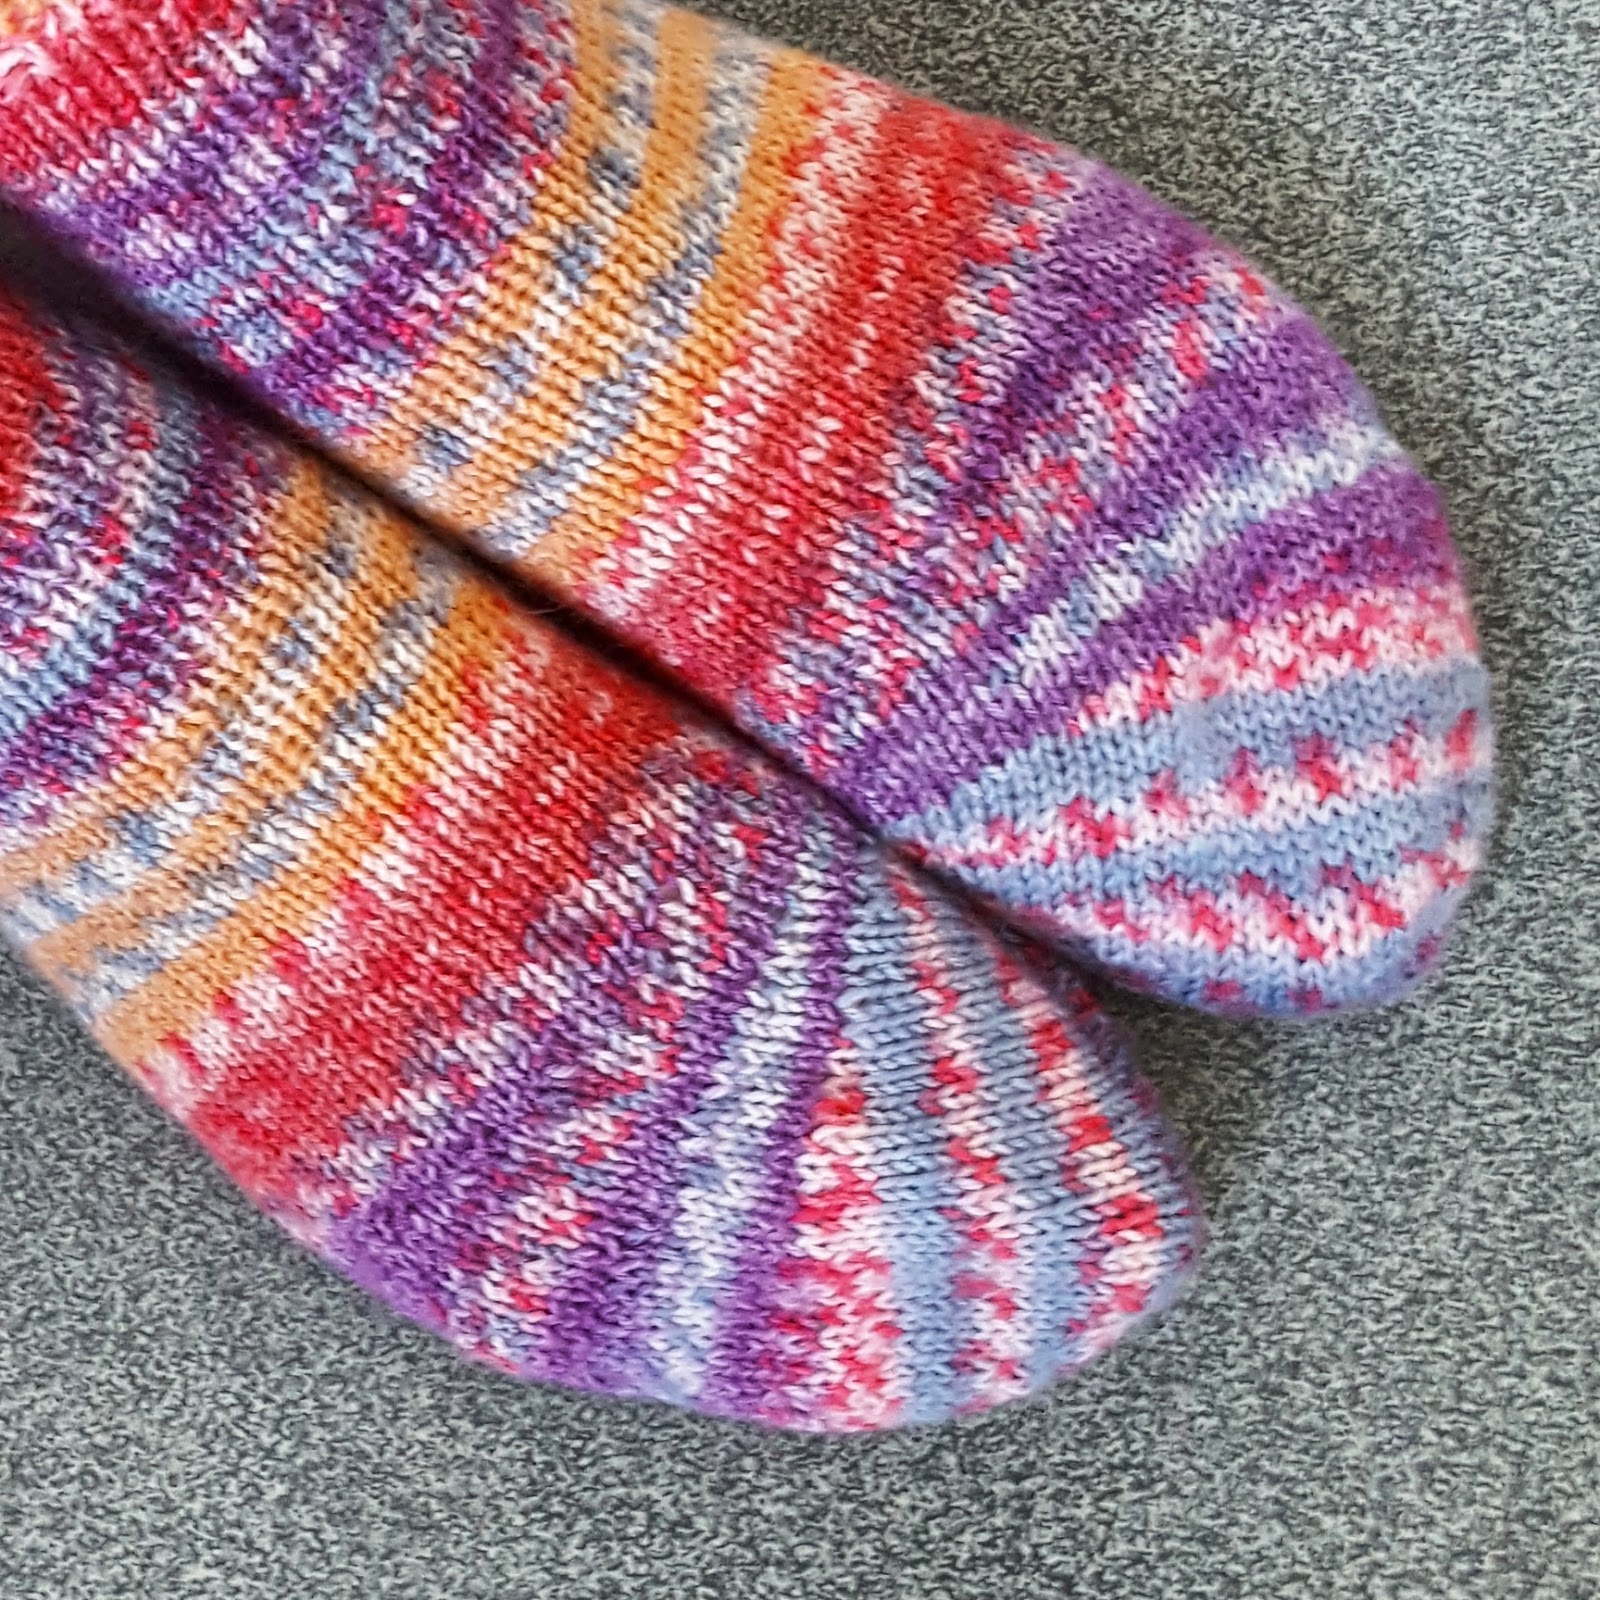
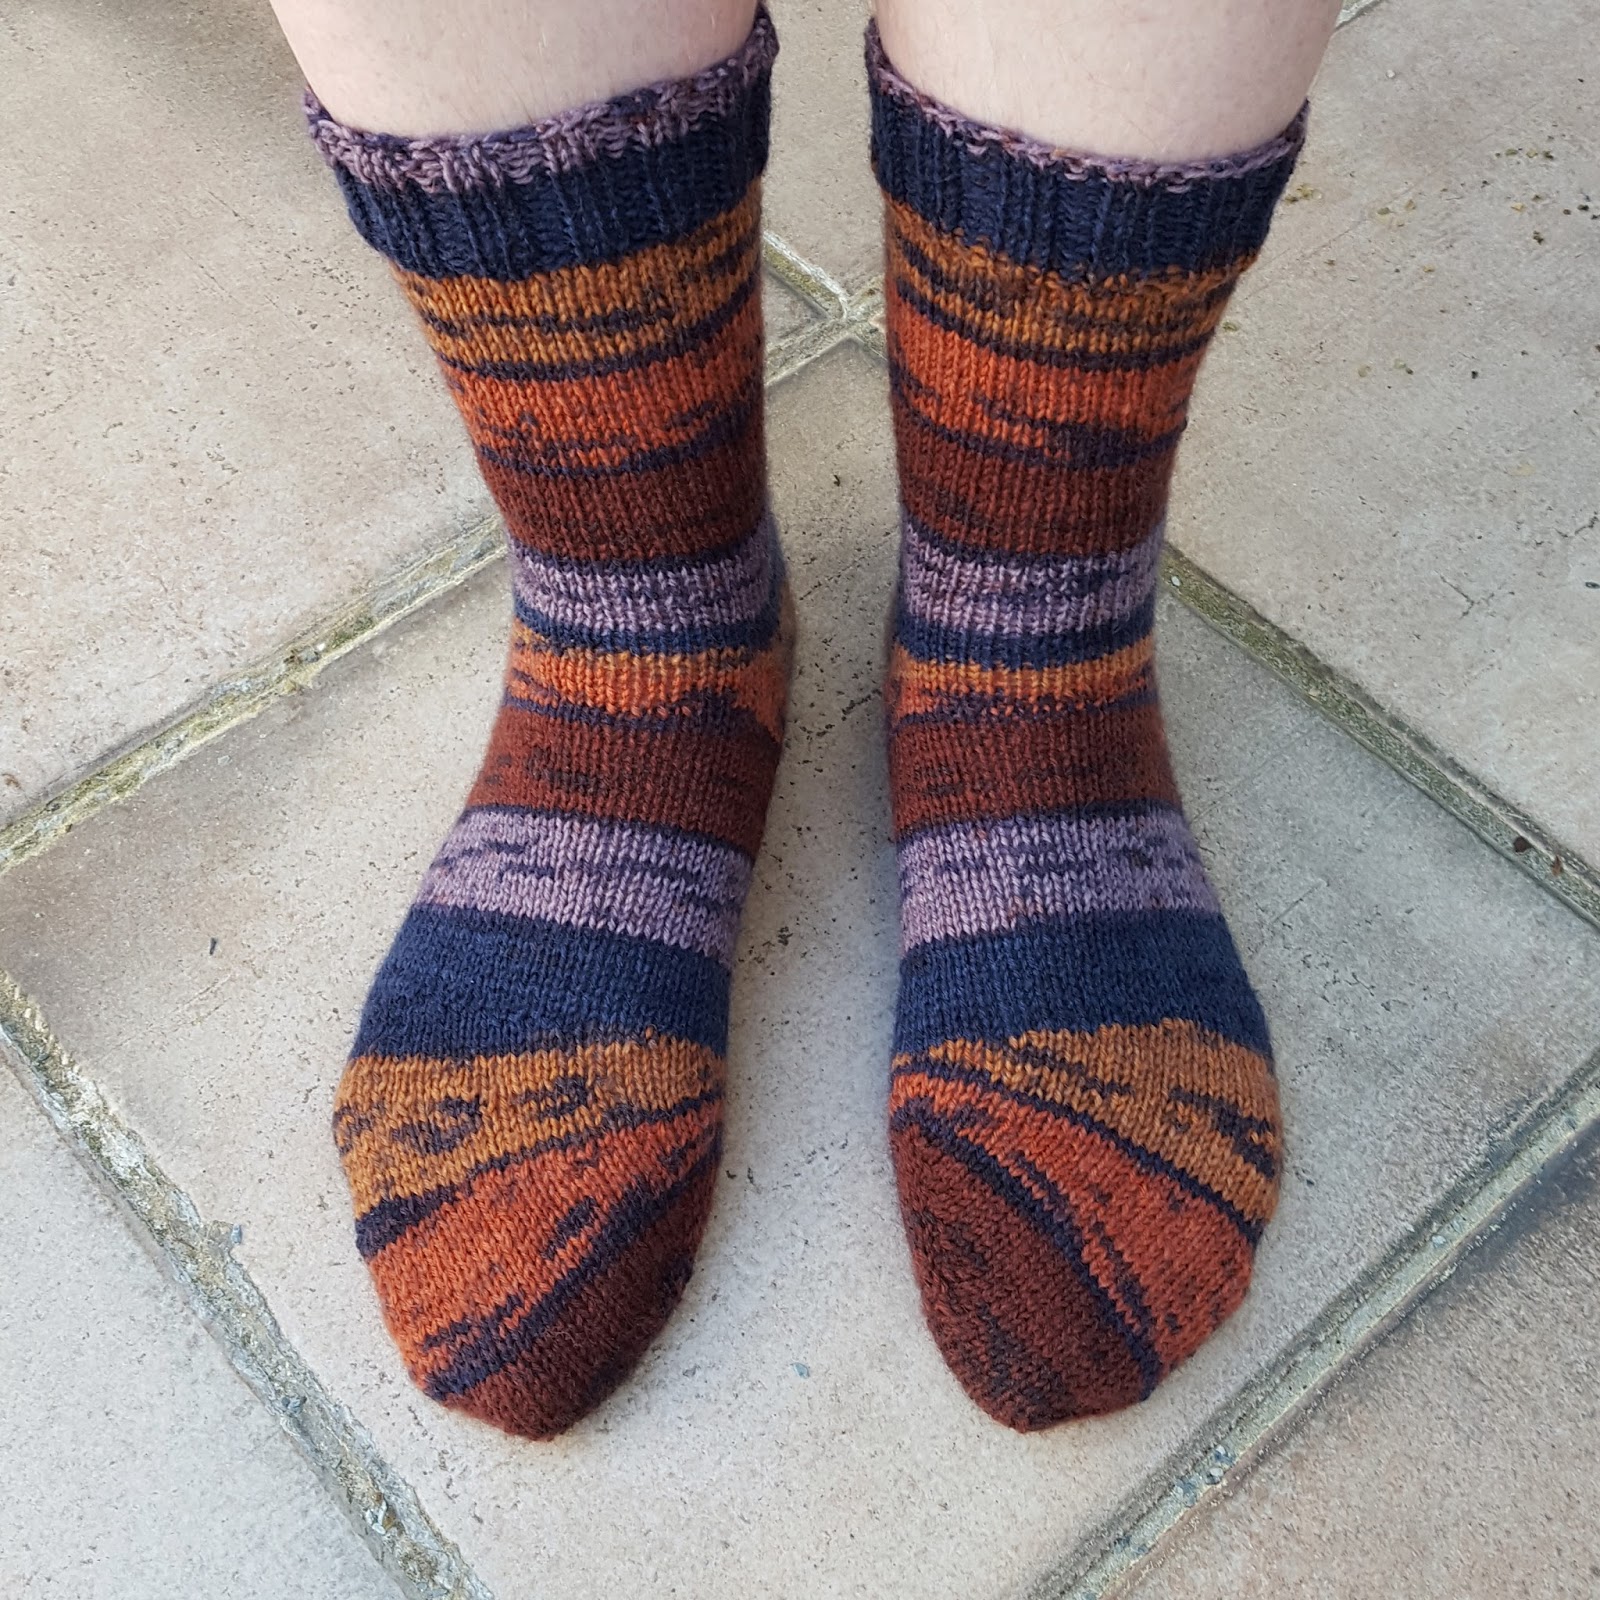
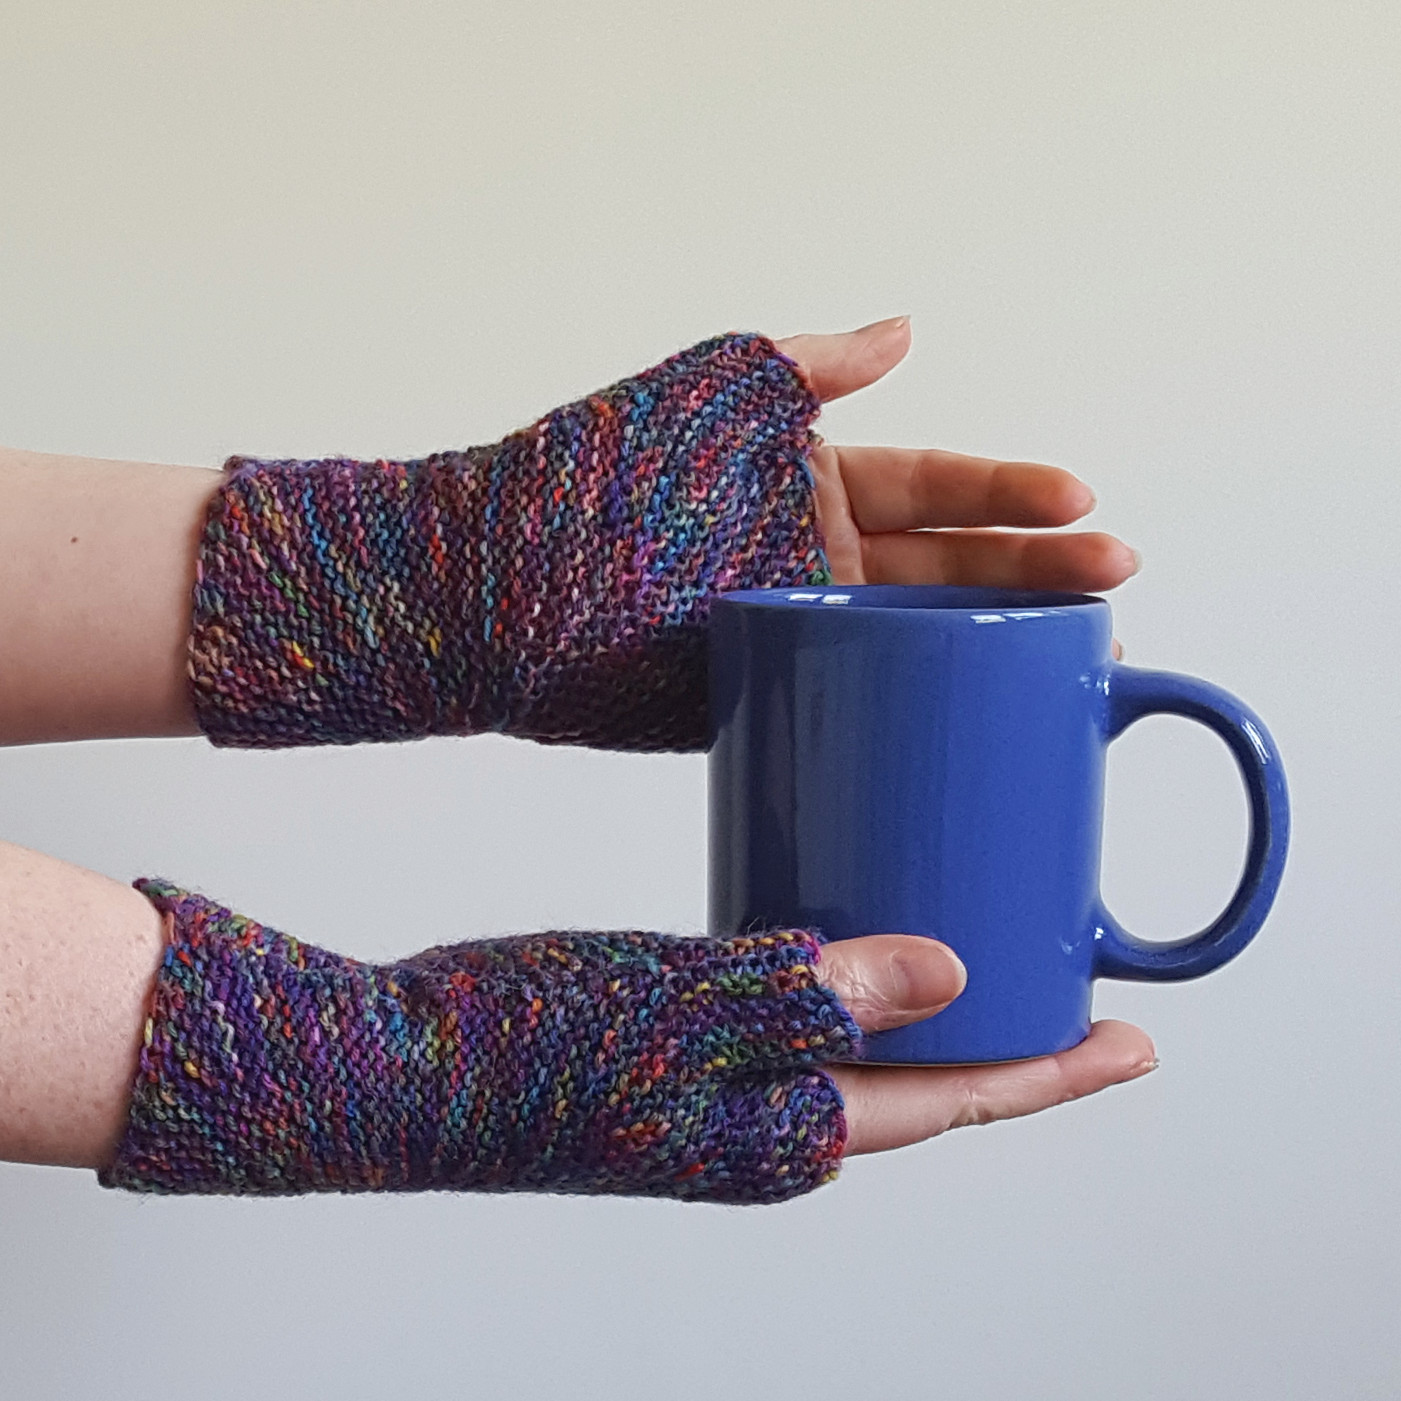
I had the idea for these fingerless gloves in the summer of 2014, but I couldn't make it work. During the last Xmas holidays I tried it once again - this time with different yarn and more experience with short rows under my belt. However, I still knitted two mitts that didn't quite fit and had to be frogged - but the third try went well enough. Now I really like the look of them.
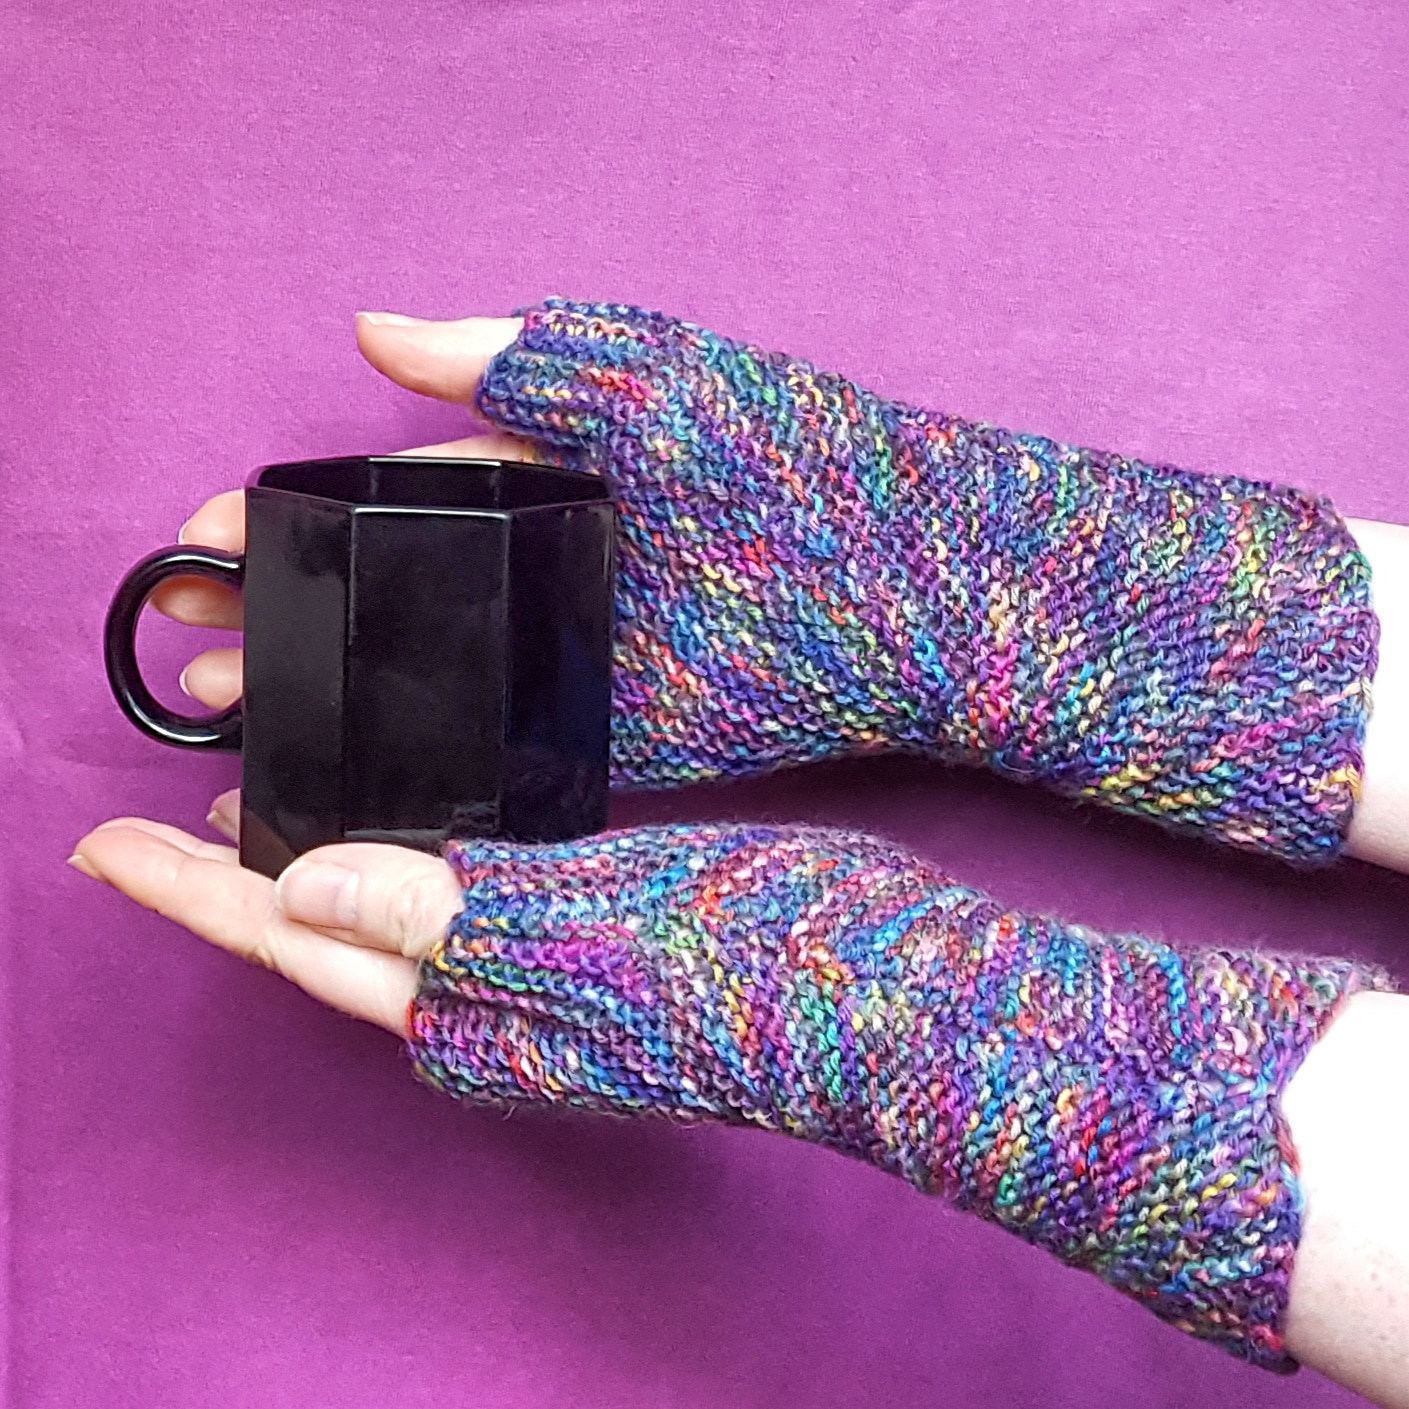
These fingerless gloves are knitted flat and each in one piece. They use short rows for shaping
Knitted flat, in one piece each, makes use of short rows for shaping. They are great for variegated yarn with a  really short color gradient
They are sort of the opposite construction to my Starburst Mitts, i.e. the short rows don't focus around the thumb but around a point close to the outer wrist.


Creative Commons License
This work by Knitting and son on is licensed under a Creative Commons Attribution-NonCommercial-ShareAlike 4.0 International License.


Materials
  • about 30 grams of fingering weight yarn
  • three 2.5mm needles - I used short dpns, but you can use straight or circulars as well
  • scrap yarn for provisional CO
  • two removable stitch holders (e.g. safety pins)
  • a stitch holder or long safety pin
  • tapestry needle for grafting and to weave in ends


Techniques
  • Provisional CO: My favorite method for a provision CO is the crochet provisional CO - it is shown in this Youtube video by New Stitch a Day.
  • Short rows with wrap and turn (w+t) - as shown in this YouTube video by Very Pink Knits.
  • Three Needle Bind Offhttps://youtu.be/Ph93jWSzTa0
  • Grafting in Garter Stitch: A technique to get an invisible (knitted) seam - this technique is shown in this YouTube Video by knittinghelp.com.
  • Picking up stitches from the edge and joining as you go: to attach the first stitch of one row to the edge stitch of the row opposite, pick up the selvedge stitch from the opposite side (illustration 1), slip the first stitch of the new row as if to purl (with yarn in front, illustration 2), bring the yarn backwards, reinsert the left needle into the last 2 loops and knit them together (like doing a ssk, illustration 3); this will be called ssk+c (ssk and connect) in this pattern - a similar method is shown in this video: http://youtu.be/3zPXZ4cu66Q
    Alternatively, you can just do a slip stitch edge in sections F and G and sew it to the edge of sections C and B in the end.
ssk+c illustrations (click to enlarge)

Gauge and Size
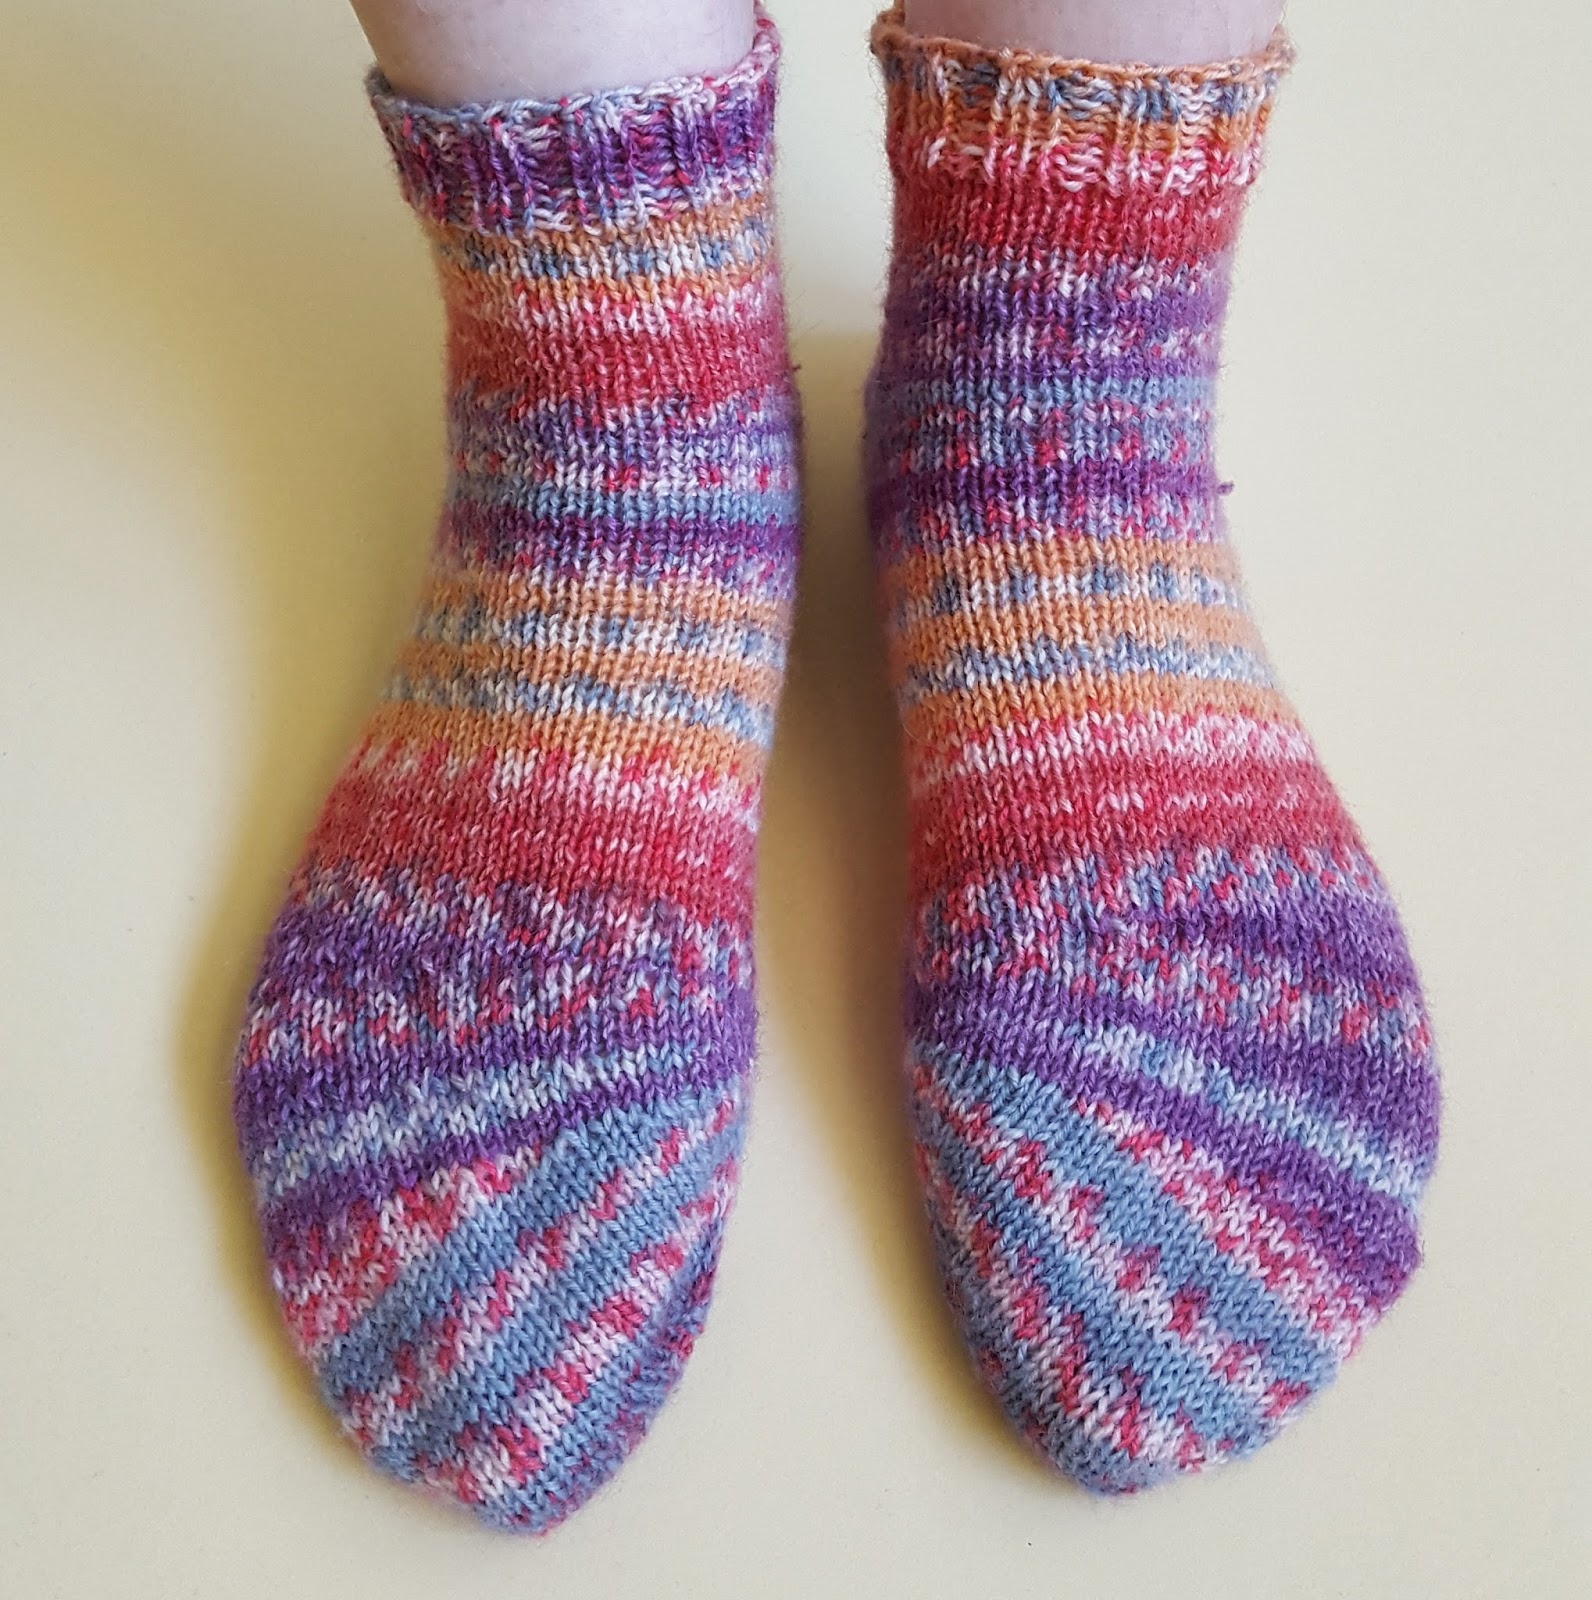
The finished fingerless gloves (as knitted by me) measure about 17 cm in height, 15 cm in circumference at the top, and about 18 cm at the bottom.
11 sts gave 4 cm in width and 9 ridges (i.e. 18 garter stitch rows) 3 cm in height.

The pattern is given in one size only, but there is some advice on how to adapt it to different sizes.
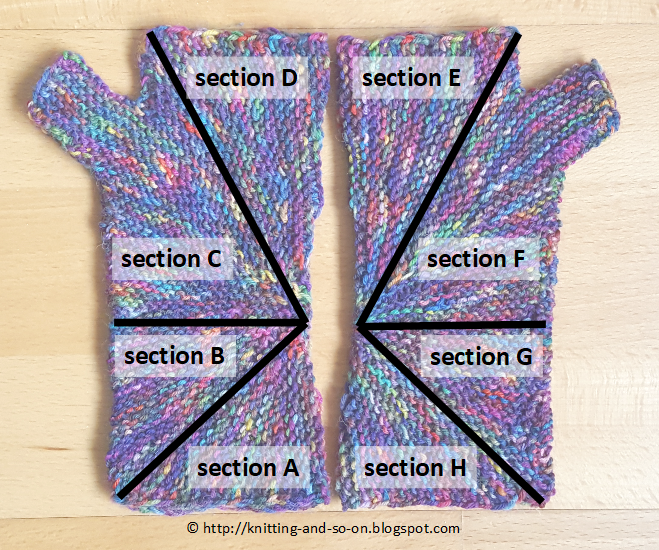


Construction

One gloves is knitted flat in 8 sections (called sections A to H). To get the effect of ... there will be short rows varying in length. To achieve the shape there will be increases or decreases close to the outer edge or - for the thumb - another shorter provisional CO and leaving stitches on a stitch marker will be used.
You start out with a short provisional cast on and continue with short rows while increasing on the edge (section A), in section B there are decreases, in section C increases again as well as newly cast on stitches as well as putting stitches on the stitch holder when half of the thumb is finished. In section D there will be decreases again. From section E on, you will basically knit sections D to H backwards, i.e. increases will be substituted with decreases and vice versa.
In sections F and G you will attach the first stitch of each row to the edge stitch of the corresponding row of sections C and B. In section F you will also use the stitches from the stitch holder to complete the thumb. To finish the thumb completely, a short three-needle bind off is used before continuing with section F. After finishing section H, you've completed a whole circle now and two rows of live stitches are closed by grafting in garter stitch.


Instructions

Section A
With scrap yarn do a provsional CO of 14 sts
Row A0: k all
Ridge A1: sl1, k10, w+t, k11
Ridge A2: sl1, k8, w+t, k7, kfb, k1 [now there are 15 sts on your needles, subsequently if the stitch count changes, I will give the new stitch count at the end of the row in square brackets, the number of stitches on your needles - not the number of stitches you just knitted]
Ridge A3: sl1, k13, w+t, k14
Ridge A4: sl1, k5, w+t, k6
Ridge A5: sl1, k8, w+t, k7, kfb, k1 [16 sts]
Ridge A6: sl1, k11, w+t, k12
Ridge A7: sl1, k4, w+t, k5
Ridge A8: sl1, k13, w+t, k12, kfb, k1 [17 sts]
Ridge A9: sl1, k6, w+t, k7
Ridge A10: sl1, k10, w+t, k11
Ridge A11: sl1, k13, w+t, k12, kfb, k1 [18 sts]
Ridge A12: sl1, k7, w+t, k8
Ridge A13: sl1, k13, w+t, k12, kfb, k1 [19 sts]
Ridge A14: sl1, k10, w+t, k11
Ridge A15: sl1, k5, w+t, k4, kfb, k1 [20 sts] - place a removable stitchmarker into the first stitch of the last ridge (called stitch marker A)

Section B
Ridge B1: sl1, k19, turn, sl1, k19; place stitch marker in first stitch on needle (this marker will be called marker A)
Ridge B2: sl1, k4, w+t, k5
Ridge B3: sl1, k9, w+t, k10
Ridge B4: sl1, k3, w+t, k4
Ridge B5: sl1, k14, w+t, k12, ssk, k1 [19 sts]
Ridge B6: sl1, k10, w+t, k11
Ridge B7: sl1, k6, w+t, k7
Ridge B8: sl1, k15, w+t, k13, ssk, k1 [18 sts]
Ridge B9: sl1, k4, w+t, k5
Ridge B10: sl1, k13, w+t, k14
Ridge B11: sl1, k15, w+t, k16
Ridge B12: sl1, k9, w+t, k10
Ridge B13: sl1, k7, w+t, k8

Section C
Ridge C1: sl1, k17, turn, sl1, k17
Ridge C2: sl1, k12, w+t, k13
Ridge C3: sl1, k8, w+t, k9
Ridge C4: sl1, k3, w+t, k4
Ridge C5: sl1, k16, w+t, k17
Ridge C6: sl1, k5, w+t, k4, kfb, k1 [19 sts]
Ridge C7: sl1, k10, w+t, k11
Ridge C8: sl1, k16, w+t, k17
Ridge C9: sl1, k8, w+t, k9
Ridge C10: sl1, k12, w+t, k11, kfb, k1 [20 sts]
Ridge C11: sl1, k5, w+t, k6
Ridge C12: sl1, k15, w+t, k16
Ridge C13: sl1, k12, w+t, k11, kfb, k1 [21 sts]
Ridge C14: sl1, k11, w+t, k12
Ridge C15: sl1, k9, w+t, k8, kfb, k1 [22 sts]
Ridge C16: sl1, k6, w+t, k7; provisionally CO 8 sts, and continue to knit these 8 sts - see photos 1 and 2 in illustrations A below [30 sts]
Ridge C17: sl1, k6, ktbl, ktbl, k8, w+t, k17
Ridge C18: sl1, k23, w+t, k24
Ridge C19: sl1, k14, w+t, k13, kfb, k1 [31 sts]
Ridge C20: sl1, k13, w+t, k14
Ridge C21: sl1, k23, w+t, k24
Ridge C22: sl1, k16, w+t, k17
Ridge C23: sl1, k21, w+t, k22
Ridge C24: sl1, k18, w+t, k12 - and put the last 7 sts on a stitch holder (see photo 3 in illustration A below) [24 sts]
Ridge C25: sl1, k6, w+t, k5, kfb, k1 [25 sts]
Ridge C26: sl1, k16, w+t, k15, kfb, k1 [26 sts]
Ridge C27: sl1, k7, w+t, k6, kfb, k1 [27 sts]
Ridge C28: sl1, k21, w+t, k20, kfb, k1 [28 sts]  - place a removable stitchmarker into the first stitch of the last ridge (called stitch marker B)
Illustrations A (click to enlarge)

Section D

Ridge D1: sl1, k27, turn, sl1, k27, place stitch marker in first stitch on needle (this marker will be called marker B)
Ridge D2: sl1, k4, w+t, k2, ssk, k1 [27 sts]
Ridge D3: sl1, k7, w+t, k5, ssk, k1 [26 sts]
Ridge D4: sl1, k20, w+t, k21
Ridge D5: sl1, k8, w+t, k9
Ridge D6: sl1, k15, w+t, k13, ssk, k1 [25 sts]
Ridge D7: sl1, k6, w+t, k7
Ridge D8: sl1, k13, w+t, k14
Ridge D9: sl1, k22, w+t, k23
Ridge D10: sl1, k10, w+t, k11
Ridge D11: sl1, k5, w+t, k6
Ridge D12: sl1, k18, w+t, k16, ssk, k1 [24 sts]
Ridge D13: sl1, k20, w+t, k21
Ridge D14: sl1, k7, w+t, k8
Ridge D15: sl1, k14, w+t, k15

Ridge D16: sl1, k23, pick up 2 sts from the space between the last st and the first st of the very first row, turn, sl1, ssk, k23 (this ensures that there won't be a hole in the middle of the mitt, see photo 4 of illustrations A) [25 sts]

Section E
Ridge E1: sl1, k14, w+t, k15
Ridge E2: sl1, k7, w+t, k8
Ridge E3: sl1, k20, w+t, k21
Ridge E4: sl1, k18, w+t, k17, kfb, k1 [26 sts]
Ridge E5: sl1, k5, w+t, k6
Ridge E6: sl1, k10, w+t, k11
Ridge E7: sl1, k24, w+t, ssk, k22 [25 sts] (the ssk evens out the 2nd of the stitches that was picked up at the end of section D)
Ridge E8: sl1, k13, w+t, k14
Ridge E9: sl1, k6, w+t, k7
Ridge E10: sl1, k15, w+t, k14, kfb, k1 [26 sts]
Ridge E11: sl1, k8, w+t, k9
Ridge E12: sl1, k20, w+t, k21
Ridge E13: sl1, k7, w+t, k6, kfb, k1 [27 sts]
Ridge E14: sl1, k4, w+t, k3, kfb, k1 [28 sts]
Ridge E15: sl1, k27, turn, sl1, k27

Section F
Ridge F1: sl1, k21, w+t, k19, ssk, k1 [27 sts]
Now your piece will look similar to photo 5 of illustrations B below. To attach the edges of sections C and B to F and G, you need to fold the piece over as shown in photo 6 of illustrations B. The first stitch to pick up from the opposite edge is the stitch just below marker B - or the edge stitch of ridge C28. In the subsequent rows, always connect to the next stitch below.
When you're connecting the two sides like this, there will be a visible ridge - however, later the piece will be turned inside out and this ridge will be on the inside of the mitt.

Ridge F2: ssk+c (i.e. connect the first st of your working row to the edge stitch of row C28), k7, w+t, k5, ssk, k1 [26 sts]
Ridge F3: ssk+c (i.e. connect to the next edge stitch of section C, i.e. the edge st of row C27), k16, w+t, k14, ssk, k1 [25 sts]
Ridge F4: ssk+c (i.e. connect to the next edge stitch of section C, i.e. the edge st of row C26), k6, w+t, k4, ssk, k1 [24sts]
Ridge F5: ssk+c, k18, w+t, k19 - put the 7 sts from the stitch holder on your needles and continue knitting these 7 sts (see photo 7 in illustration B below) [31 sts]
Ridge F6: sl1, k21, w+t, k22
Ridge F7: sl1, k16, w+t, k17
Ridge F8: sl1, k23, w+t, k24
Ridge F9: sl1, k13, w+t, k14
Ridge F10: sl1, k14, w+t, k12, ssk, k1 [30 sts]
Ridge F11:  sl1, k23, w+t, k24
Ridge F12: sl1, k16, w+t, k17
Ridge F13: put the 8 sts from the provisional CO (of section C) on a needle and do a three needle BO of 8 stitches, you're connecting the lower edge of the thumb of both sides (see photo 8 of illustration below), and continue knitting:  k6, w+t, k7 [22 sts]
Ridge F14: ssk+c, k9, w+t, k7, ssk, k1 [21 sts]
Ridge F15: ssk+c, k11, w+t, k12
Ridge F16: ssk+c, k12, w+t, k10, ssk, k1 [20 sts]
Ridge F17: ssk+c, k15, w+t, k16
Ridge F18: ssk+c, k5, w+t, k6
Ridge F19: ssk+c, k12, w+t, k10, ssk, k1 [19 sts]
Ridge F20: ssk+c, k8, w+t, k9
Ridge F21: ssk+c, k16, w+t, k17
Ridge F22: ssk+c, k10, w+t, k11
Ridge F23: ssk+c, k5, w+t, k3, ssk, k1 [18 sts]
Ridge F24: ssk+c, k16, w+t, k17
Ridge F25: ssk+c, k3, w+t, k4
Ridge F26: ssk+c, k8, w+t, k9
Ridge F27: ssk+c, k12, w+t, k13
Ridge F28: ssk+c, k17, turn, sl1, k17
Illustrations B (click to enlarge)
Section G
Ridge G1: ssk+c, k7, w+t, k8
Ridge G2: ssk+c, k9, w+t, k10
Ridge G3: ssk+c, k15, w+t, k16
Ridge G4: ssk+c, k13, w+t, k14
Ridge G5: ssk+c, k4, w+t, k5
Ridge G6: ssk+c, k15, w+t, k14, kfb, k1 [19 sts]
Ridge G7: ssk+c, k6, w+t, k7
Ridge G8: ssk+c, k10, w+t, k11
Ridge G9: ssk+c, k14, w+t, k13, kfb, k1 [20 sts]
Ridge G10: ssk+c, k3, w+t, k4
Ridge G11: ssk+c, k9, w+t, k10
Ridge G12: ssk+c, k4, w+t, k5
Ridge G13: ssk+c, k19, turn, sl1, k 19 (on the side of section B, you should've reached marker A)

Section H
Ridge H1: sl1, k5, w+t, k3, ssk, k1 [19 sts]
Ridge H2: sl1, k10, w+t, k11
Ridge H3: sl1, k13, w+t, k11, ssk, k1 [18 sts]
Ridge H4: sl1, k7, w+t, k8
Ridge H5: sl1, k14, w+t, k12, ssk, k1 [17 sts]
Ridge H6: sl1, k10, w+t, k11
Ridge H7: sl1, k6, w+t, k7
Ridge H8: sl1, k12, w+t, k10, ssk, k1 [16 sts]
Ridge H9: sl1, k4, w+t, k5
Ridge H10: sl1, k13, w+t, k14
Ridge H11: sl1, k9, w+t, k7, ssk, k1 [16 sts]
Ridge H12: sl1, k5, w+t, k6
Ridge H13: sl1, k14, w+t, k15
Ridge H14: sl1, k8, w+t, k6, ssk, k1 [15 sts]
Ridge H15: sl1, k10, w+t, k11

Put the stitches of the provisional CO of section A on a needle (this will give you only 14 sts), use the tail of your CO to pick up one more stitch from the selvedge right in the middle of the mitts (similar to what you did at the end of section D). Now you have 15 sts on both needles - and the hole in the middle will be closed a bit.

Graft both sides together in garter stitch.
Use the tail to sew the hole in the middle closed and weave in ends.

Turn mitt right sides out.
Make two - and block them gently.


How to Adapt the Pattern to Different Hand Sizes

To change height and width of these gloves you obviously need to adjust the number of stitches you cast on ... but, a change in the number of stitches also leads to other changes as well, i.e. one stitch more, usually means one short row more in each section.
If you knit a few stitches more you need to increase the number of (short) rows per section as well - by the same count. E.g. (with the gauge I had) if you want to add about 2 cm to the height and circumference of the mitts, you need to CO 3 sts (3 sts roughly equal 1 cm, and this centimeter is added twice - once at the lower edge (in sections A and H) and once at the top (sections D and E) - this also goes for the circumference, if you add 3 sts, they add 1 cm to the width in sections B and C, and also 1 cm in sections F and G). To balance this you need to knit short row 3 ridges more in each section.
I'd advise to add these short row ridges randomly inbetween the other ridges of each section - and to vary the lenght of these short row ridges. E.g. if the ridge before was rather short (less than 10 sts long), I'd add a longer short row ridge, e.g. 20 sts long - making sure that you don't put one w+t directly above another of a previous ridge. This ensures an even distribution of short rows.