Freitag, 24. April 2015

Monster Tooth Scarf

Tired of wearing wintry gray? In need of something that looks strong and colorful? Then knit yourself an antidote with this nice wide scarf for spring in beautiful colors with a strong graphic pattern.


This scarf is knitted (nearly) only in garter stitch; the graphic effect is achieved with short rows.


Creative Commons License
This work by Knitting and so on is licensed under a Creative Commons Attribution-NonCommercial-ShareAlike 4.0 International License.


There are two versions of instructions – one (short and descriptive) that just gives the gist of what is done when. And one with rows and stitches spelled out.

Personally, I prefer instructions given in the short style (or rather that’s the way I started thinking about the pattern), but I know that instructions like this can confusing for others and are uncommon. That’s why there is a normal version as well.

Please note, that the scarf is not quite symmetrical.

Material
  • about 100 grams of fingering weight yarn in Color 1 (light green on the photos) 
  • about 100 grams of fingering weight yarn in a contrasting color (Color 2, purple on the photos)
    (the yarn used for this project is Malabrigo Sock - Colors 037 Lettuce and 141 Dewberry.)
  • a circular knitting needle (3mm) or a long double pointed needle 
  • a tapestry needle to weave in ends

Techniques and Abbreviations
  • Short rows with double stitches (German short rows, t+p): when you turn, bring yarn to the front and pull it back so that a sort of "double-stitch" is created, then knit back as usual - when you have to knit the double-stitch, make sure to knit it as one stitch (see also this YouTube video); this method has the advantage the no picking up of stitches is necessary. In the pattern, this stitch will be called t+p (turn and pull).

Free Knitting Pattern: Monster Tooth Scarf (http://knitting-and-so-on.blogspot.ch/)


Instructions (Telegram Style)
  • Start with 14 sts (in Color 1) and knit one wedge, slip sts to other end of needle and add 4 sts in Color 2.
  • For wedges in Color 1 always start from one end of the needle; for wedges in Color 2 always start from the opposite end of the needle, i.e. slip stitches to the other end of your needles between knitting wedges.
  • All stitches are knit stitches – except the first rows of Color 2 wedges (purl stitches).
  • For all wedges: Start with a long row (until 5 sts before end), then knit each row 2 sts shorter, until there are only 6 or 7 sts left.
  • During the first half, knit increases at the side of every 6th row (i.e. every 3rd ridge) of wedges in Color 2.
  • When your piece is about half knit a wedge in Color 2 without increases or decreases
  • Afterwards, knit decreases at the side of every 6th row (i.e. every 3rd ridge) of wedges in Color 2.
  • End with a wedge in Color 1.

Instructions (Detailed)

Wedge 1 (Color 1)
CO14
Row 0: sl1, k to end
Ridge 1: sl1, k to 2 before end, t+p, k to end
Ridge 2: sl1, k to 2 before last double stitch, t+p, k to end
Repeat Ridge 2 until the last row is only 6 sts long (i.e. 6 on RS, 5 on WS)

Wedge 2 (Color 2)
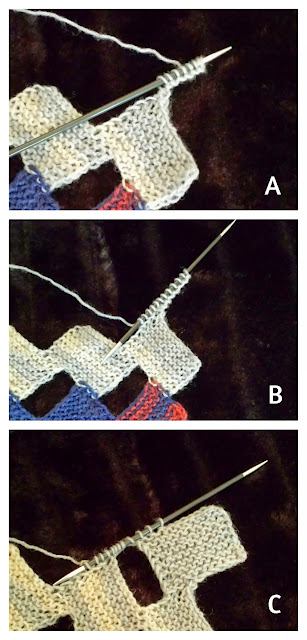
Slip all stitches to the other end of your needle (do not turn your work) and CO4 with Color2 (see picture No. 1), then turn needle
Ridge 1: sl1, p to 5 sts before end, t+p, k to end (during the first row, make sure not to knit the double-stitches as two stitches, but as one)
Ridge 2: sl1, k to 2 sts before last double stitch, t+p, k to end
(Your piece should now look similar to the one in picture No. 2.)
Ridge 3: sl1, k to 2 sts before last double stitch, t+p, k to 2 before end, kfb, k
Continue knitting ridges 1 to 3 until the last row is only 6 or 7 stitches wide, the last ridge does not have to be a ridge 3.

Wedge 3 (Color 1)
Slip all stitches to the other end of your needle (do not turn your work) – continue knitting with Color 1
Ridge 1: sl1, k to 5 sts before end, t+p, k to end (during the first row, make sure not to knit the double-stitches as two stitches, but as one)
Ridge 2: sl1, k to 2 sts before last double stitch, t+p, k to end
Repeat Ridge 2 until the last row is only 6 or 7 sts long - after a few ridges, your piece should look similar to picture No. 3

Wedge 4 (Color 2, with increases every 3rd ridge)
Slip all stitches to the other end of your needle (do not turn your work) – continue knitting with Color 2
Ridge 1: sl1, p to 5 sts before end, t+p, k to end (during the first row, make sure not to knit the double-stitches as two stitches, but as one)
Ridge 2: sl1, k to 2 sts before last double stitch, t+p, k to end
Ridge 3: sl1, k to 2 sts before last double stitch, t+p, k to 2 before end, kfb, k
Continue knitting ridges 1 to 3 until the last row is only 6 or 7 stitches wide, the last ridge does not have to be a ridge 3.

Repeat wedges 3 and 4 until the piece measures about half the desired length of your scarf. Then knit on odd-numbered wedge (i.e. in Color 1).

Picture No. 4 shows how your piece should look after knitting wegde 3 and 4 twice.

Middle Wedge (Color 2, no increases or decreases)
Slip all stitches to the other end of your needle (do not turn your work) – continue knitting with Color 2
Ridge 1: sl1, k to 5 sts before end, t+p, k to end (during the first row, make sure not to knit the double-stitches as two stitches, but as one)
Ridge 2: sl1, k to 2 sts before last double stitch, t+p, k to end
Repeat Ridge 2 until the last row is only 6 or 7 sts long


Wedge 6 (Color 1)
Slip all stitches to the other end of your needle (do not turn your work) – continue knitting with Color 1
Ridge 1: sl1, k to 5 sts before end, t+p, k to end (during the first row, make sure not to knit the double-stitches as two stitches, but as one)
Ridge 2: sl1, k to 2 sts before last double stitch, t+p, k to end
Repeat Ridge 2 until the last row is only 6 or 7 sts long

Wedge 7 (Color 2, with decreases every 3rd ridge)
Slip all stitches to the other end of your needle (do not turn your work) – continue knitting with Color 2
Ridge 1: sl1, p to 5 sts before end, t+p, k to end (during the first row, make sure not to knit the double-stitches as two stitches, but as one)
Ridge 2: sl1, k to 2 sts before last double stitch, t+p, k to end
Ridge 3: sl1, k to 2 sts before last double stitch, t+p, k to 3 before end, ssk, k
Continue knitting ridges 1 to 3 until the last row is only 6 or 7 stitches wide, the last ridge does not have to be a ridge 3.

Repeat wedges 6 and 7 until you have knitted the same number of wegdes 6 and 7 than you did of wedges 2 and 3. End with an odd-numbered wedge (i.e. in Color 1). Bind-off all Color 1 stitches in the last row, then bind off the other stitches in Color 2.
It is possible that you don't end with the number of stitches you started with - that's because the decreasing wedges have less ridges than the corresponding increasing wedges.

Free Knitting Pattern: Monster Tooth Scarf (http://knitting-and-so-on.blogspot.ch/)

Montag, 13. April 2015

Lacy E-Book or Tablet Sleeve

Free DIY Tutorial: Lacy E-Book SleeveThis e-book sleeve is easy to make and looks quite special. You can use some leftover yarn and contrast or complement it with a colored foam sheet.

The lace part is knitted at random. This means that there are no detailed knitting instructions as in a real lace patterns, but only a description how to arrive at something similar. The effect is created by randomly knitting lace stitches (yarn-over, "knit2together etc.) that make up a nice organic looking structure.


Creative Commons License
This work by Knitting and so on is licensed under a Creative Commons Attribution-NonCommercial-ShareAlike 4.0 International License.


Materials:
  • yarn (I used fingering weight yarn)
  • knitting needles the yarn calls for (I used 3mm needles)
  • a foam sheet
  • a pair of scissors
  • a tapestry needle
  • glue (I used basic universal glue)
  • a ruler and a pencil 
  • the measurements of your e-book/tablet

Free DIY Tutorial: Lacy E-Book Sleeve


Instructions:
  • Measure your ebook - and knit a piece of random lace that is 5mm wider than your ebook and 5mm longer then twice its height. Block it to size. See instructions on how to knit random lace below.

  • Using pencil and ruler, mark and cut out two pieces of foam sheet that are as big as your ebook reader or tablet - something like 1mm per side.

  • Glue the foam sheet pieces to the WS of your knitting, in a way that the edge stitches ofr your knitting still stand out a bit on each side. Apply the glue sparingly on your knitting only in places where there are no holes (see picture below). That way you will minimize the visible glue residue on the ebook sleeve.
    Press the foam sheet to the knitting for a few seconds and then let it dry completely.

  • After the glue has dried completely, fold the halves together right sides out and sew the sides together (I used the tails of my knitting) - using the "invisible stitch" (as shown from minute 3:30 to 5:15 in this YouTube video). 
Free DIY Tutorial: Lacy E-Book Sleeve


How to Knit Random Lace

It's best to use a yarn that blocks well, e.g. something that has a large percentage of wool. I used standard sock yarn and 3mm needles.

Loosely cast on the amount of stitches you think you need. For my 12.2cm wide piece I cast on 25 stitches. If in doubt, it's better to knit one stitch less - this allows you to stretch the piece while blocking it and thus bringing out the lace in a better way.

I decided to do only "knit stitches" on one side (RS) and only "purl stitches" on the other (WS). Starting with WS I knitted lace stitches in a completely random manner.
  • On WS I randomly did p2tog's, yo's, p2togtbl's, double-yo's and p3tog's.
  • On RS I randomly did k2tog's, ssk's yo's and double-yo's.
The important thing is to make sure that the number of stitches stays the same after finishing one row, e.g. if you started off with 25 stitches, you need to finish each row with 25 stitches (loops) on your needles.

If you want a neater pattern, do one increase and corresponding decrease next to each other. For a more organic look, do a few increases and only then the necessary decreases. I would advise, however, not to do this too much, since then your piece will be askew.

After a while, I only counted the increases and decreases (or stitches below and above par).

Knit until your piece is a bit less than about twice as long as your ebook is high - keep in mind that it will grow on the blocking board, both with width and length. Therefore, it's better to knit it slightly smaller and stretch it on the blocking board.

Random Lace before and after blocking. http://knitting-and-so-on.blogspot.com

Don't worry if your piece looks crumpled before blocking. Chances are that it will look nice and lacy afterwards (see picture above).

I didn't weave in the ends but left tails on both sides that were long enough to sew the sides together.

Free DIY Tutorial: Lacy E-Book Sleeve


This project was featured on the Pinbellish Link Party #35 at purfylle.com. Thank you!

Sonntag, 12. April 2015

Random Lace - E-Book Sleeve

When my Dad bought a new ebook reader, I promised to make a new sleeve for it and bought some foam sheets to knit around them. However, While I was deciding what to knit, I remembered the beautiful lace patterns at String Geekery Blog, Some of them look so nice and organic, and I wanted to do something similar.

But I'm very lazy ... too lazy in fact to decide upon a pattern, to print it out and to count stitches and rows. So I decided to knit a completely random pattern, with yarn-overs, k2togs, double yarn-overs, p2togs, ssks etc.. I just had to make sure, that the number of stitches stayed the same.
Here's how it looked after a few centimeters. But even "real" lace patterns look a bit crumpled before blocking, so I persevered :)


After I blocked it and glued it around the foam sheet, it looked much better.


I started a second one that I even like better.


Moreover, I really think the random approach has potential and I like the organic look. Plus, it's really fun to knit. I'm trying to do a scarf or stole next.

I later googled at bit and found some resources on random lace knitting - a tutorial (also linked on Ravelry) and a book (that I haven't read, but according to the description at amazon it seems to pursue a similar approach).

Freitag, 10. April 2015

Kleine Rechtecke Schal

Endlich wird es Frühling - daher möchte man auch buntere Kleidung anziehen und vielleicht diesen hübschen, leichten Schal aus Sockengarn stricken.

Gratis-Strickanleitung: Kleine Rechtecke-Schal (knitting-and-so-on.blogspot.com)

Dieser Schal ist modular gestrickt, d.h. es werden einzelne kleine Teile (hier kleine Rechtecke) gestrickt, die während des Strickens verbunden werden. Er besteht aus kleinen krausrechts gestrickten Rechtecken, die nur 12 Maschen breit sind.

Diese Anleitung ist die deutsche Version meiner Anleitung "Little Rectangle Summer Scarf".

The original english version of this pattern is available here: Little Rectangles Summer Scarf.


Creative Commons Lizenzvertrag
Dieses Werk von Knitting and so on ist lizenziert unter einer Creative Commons Namensnennung - Nicht-kommerziell - Weitergabe unter gleichen Bedingungen 4.0 International Lizenz.


Benötigtes Material
  • ca, 150 Gramm 4-fädiges Garn (ich habe Sockenwolle genommen)
  • 3.25mm Stricknadeln (ganz kurze Nadeln reichen, denn man hat jeweils nur 12 Maschen auf den Nadeln)
  • Nähnadel, um am Ende die Fäden zu vernähen

Techniken


Konstruktion des Schals

Der Schal wird in Schichten gestrickt. Jede Schicht besteht aus fünf Rechtecken - jedes ist 12 Maschen breit und 8 Rippen hoch (d.h. 16 kraus rechts gestrickte Reihen).

Gratis-Strickanleitung: Kleine Rechtecke-Schal


Mit Ausnahme der allerersten Schicht, werden die Rechtecke 1 bis 4 durch 8 abgekettete Maschen beendet. Die erste Reihe des nächsten Rechtecks bildet sich aus den überbleibenden 4 Maschen zusammen mit 4 neu angeschlagenen Maschen (Schlingenanschlag) und 4 Maschen, die am Rand des darunterliegenden Rechtecks aufgenommen werden. Am Ende des letzten Rechtecks jeder Schicht werden bis auf die letzte Schlinge alle Maschen abgekettet. Aus diesem letzten Stich wird dann der Anschlag für das erste Rechteck der nächsten Schicht herausgestrickt (getrickter Maschenanschlag).

Strickanleitung

Erste Schicht

Rechteck 1:
Mit gestricktem Maschenanschlag 12 Maschen aufnehmen
Reihe 1: rechte Maschen
Reihen 2-14: erste Masche wie zum linksstricken abheben, rechte Maschen bis ans Ende der Reihe
Reihe 15: 8 Maschen abketten, es sollten noch 4 Maschen auf der Nadel sein

Rechtecke 2 bis 4:
Reihe 1: die vom letzten Rechteck übriggebliebenen 4 Maschen rechts stricken, mit gestricktem Maschenanschlag 8 Maschen aufnehmen
Reihe 2: rechte Maschen
Reihen 3-15: erste Masche wie zum linksstricken abheben, rechte Maschen bis ans Ende der Reihe
Reihe 16: 8 Maschen abketten, es sind noch 4 Maschen auf der Nadel

Rechteck 5:
Reihe 1: die vom letzten Rechteck übriggebliebenen 4 Maschen rechts stricken, mit gestricktem Maschenanschlag 8 Maschen aufnehmen
Reihe 2: rechte Maschen
Reihen 3-14: erste Masche wie zum linksstricken abheben, rechte Maschen bis ans Ende der Reihe
Reihe 15: 11 Maschen abketten, es bleibt nur eine Masche auf der Nadel übrig

Zweite Schicht und weitere Schichten

Rechteck 1:
Die Masche zur anderen Seite der Nadel schieben, d.h. das Strickstück nicht wenden, sondern den Maschenanschlag auf dieser Seite starten.
Mit dem gestrickten Maschenanschlag 7 Maschen anschlagen, d,h. jetzt sind 8 Maschen auf der Nadel (siehe Bild A)
Reihe 1: 7 rechte Maschen, 1 Masche rechts verschränkt stricken, 4 Maschen aus der Seite des letzten Rechtecks aufnehmen (siehe Bild B)
Reihen 2-15: erste Masche wie zum linksstricken abheben, rechte Maschen bis ans Ende der Reihe
Reihe 16: 8 Maschen abketten, es sind noch 4 Maschen auf der Nadel

Rechtecke 2 bis 4:
Reihe 1: die vom letzten Rechteck übriggebliebenen 4 Maschen rechts stricken, mit Schlingenanschlag 4 Maschen aufnehmen und 4 Maschen von der Seite des darunterliegenden Rechtecks aufnehmen (dies ist für Rechteck 2 das Rechteck 4 der darunterliegenden Reihe, für Rechteck 3 ist es Rechteck 3 der darunterliegenden Reihe usw. - siehe auch das Bild im Abschitt "Konstruktion des Schals"). Die Reihe sollte nun so aussehen wie in Bild C.
Reihe 2: erste Masche wie zum linksstricken abheben, 2 rechte Maschen, 1 rechte Masche verschränkt, 4 rechte Maschen, 1 rechte Masche verschränkt, rechte Maschen bis zum Ende der Reihe.
Reihen 3-15: erste Masche wie zum linksstricken abheben, rechte Maschen bis ans Ende der Reihe
Reihe 16:  8 Maschen abketten, es sind noch 4 Maschen auf der Nadel

Rechteck 5:
Reihe 1: die vom letzten Rechteck übriggebliebenen 4 Maschen rechts stricken, mit Schlingenanschlag 4 Maschen aufnehmen und 4 Maschen von der Seite des darunterliegenden Rechtecks aufnehmen
Reihe 2: erste Masche wie zum linksstricken abheben, 2 rechte Maschen, 1 rechte Masche verschränkt, 4 rechte Maschen, 1 rechte Masche verschränkt, rechte Maschen bis zum Ende der Reihe.
Reihen 3-14: erste Masche wie zum linksstricken abheben, rechte Maschen bis ans Ende der Reihe
Reihe 15:  11 Maschen abketten, es bleibt nur eine Masche auf der Nadel übrig

Diese Schicht solange wiederholen bis der Schal die gewünschte Länge hat. Beim allerletzten Rechteck der allerletzten Schicht alle Maschen abketten.

Anschliessend Fäden vernähen und vorsichtig aufspannen.

Gratis-Strickanleitung: Kleine Rechtecke-Schal (knitting-and-so-on.blogspot.com)


Garn

Das hier verwendete Garn ist Lang Yarns Jawoll Color (Farbe 132.0458). Ich habe relativ lange herumprobiert, bis ich für diese Garn ein gutes Projekt gefunden habe - dies habe ich in zwei Blogposts (hier und hier) beschrieben.
Aber jetzt bin ich mit dem Ergebnis sehr zufrieden.

Gratis-Strickanleitung: Kleine Rechtecke-Schal (knitting-and-so-on.blogspot.com)

Donnerstag, 9. April 2015

Little Rectangles Summer Scarf

Here, in the middle of Europe, spring is just starting. So here's a thin and lightweight scarf that's just right for the season.

This scarf is made up of little garter stitch rectangles - that are connected as you go, making it an example of modular knitting (if you want to see my first modular pattern, it's here: Queen of Diamonds Scarf).

Little Rectangles Summer Scarf - A free knitting pattern by Knitting and so on


Creative Commons License
This work by Knitting and so on is licensed under a Creative Commons Attribution-NonCommercial-ShareAlike 4.0 International License.


A german version of this pattern is available here.

Die deutsche Version dieser Anleitung gibt es hier.

A crochet version of this pattern is available on my blog as well. It is called Rettangolini Scarf.


Materials:
  • about 150 grams fingering weight yarn
  • 3.25 mm needles (I used small dpns, because you only ever have 12 sts on your needles)
  • tapestry needle (to weave in ends)


Techniques:

General Construction:

The scarf is knitted in layers, each layer consists of 5 garter stitch rectangles that are 12 stitches wide and 8 ridges (i.e. 16 rows) high - see picture below.


With the exception of the set-up layer, at the end of rectangles 1 to 4 there are 8 bind-off stitches and 4 stitches left over. These 4 start the new rectangle, together with 4 newly cast-on stitches and 4 stitches picked up from the side of the corresponding rectangle in the layer below. At the end of rectangle 5, all but one stitch are bound-off - this leftover stitch will be the basis of the first rectangle for the next layer.

Free Knitting Pattern: Little Rectangles Summer Scarf


Instructions:

First layer (set-up layer)

Rectangle 1:
CO12 (with knitted cast-on)
Row 1: k
Rows 2-14: sl1, k to end
BO8 sts

Rectangle 2:
Row 1: Knit the 4 sts that are left over from the last rectangle, CO8 (with knitted cast-on)
Row 2: k8, ktbl, k to end
Rows 3-15: sl1, k to end
BO8 sts

Repeat rectangle 2 twice (i.e. knit it a total of three times).

Rectangle 5 (or last rectangle in one layer)
Row 1: Knit the 4 sts that are left over from the last rectangle, CO8 (with knitted cast-on)
Row 2: k8, ktbl, k to end
Rows 3-14: sl1, k to end
Row 15: BO11 sts -> you have one stitch left on your needles


Second layer (and next layers)

Rectangle 1:
Move the leftover stitch to the other end of your needle (i.e. don't turn, but start the CO on this side)
CO7 sts with knitted cast-on -> you have now 8 sts on your needles (see picture A)
Row 1: k7, ktbl, pick up and knit 4 sts from the side of the last rectangle (see picture B)
Rows 2-15: sl1, k to end
Row 16: BO8 sts

Rectangle 2 to 4:
Row 1: Knit the 4 sts that are left over from the last rectangle, CO4 (with backwards loop cast-on) and pick up 4 sts from the side of the next rectangle in the layer below (i.e. for rectangle 2 connect to rectangle 4 in the layer below, for rectangle 3 to rectangle 3 etc. - see picture in General Construction section)
Row 2: sl1, k2 ktbl, k4, ktbl, k to end
Rows 3-15: sl1, k to end
BO8 sts

Rectangle 5:
Row 1: Knit the 4 sts that are left over from the last rectangle, CO4 (with backwards loop cast-on) and pick up 4 sts from the side of the next rectangle in the layer below
Row 2: sl1, k2 ktbl, k4, ktbl, k to end
Rows 3-15: sl1, k to end
Row 15: BO11 sts -> you have one stitch left on your needles

Repeat 2nd layer until you're scarf is long enough.
In the very last rectangle of the very last layer bind off all stitches in row 15.

Weave in ends and block gently.


Yarn
The yarn that I used for this project is Jawoll Color (colorway 132.0458) by Lang Yarns. It was quite a challenge to find the right project for this yarn - as described in this blogpost and this blogpost.
I'm really pleased with how it turned out.


This post was featured at Pinbellish Pinparty 34 at purfylle.com and at the New Tuesday PINspiration Linkparty No. 6. Thanks!

   Tuesday Pin-spiration Link Party