The instructions are given in rounds or levels, i.e. layers of garter strip stitches – one layer per color. Ends of levels, i.e. the last rows of each round, are marked with stitch markers or safety pins.
First Mitt
Level 1 – Color A:
CO2
R0: k2
R1: k1 mk1 k1
R2 – R6: sl1, k to end
R7: sl1, kfb, k to end
R8 – R12: sl, k to end
Repeat R7 to R12 four more times, you should have 8 stitches on your needle. The piece should look like a triangle.
If the piece is shorter than half of the
circumference of your wrists, go on with R11 and R12 until you have reached the desired length (i.e. half the circumference of your wrist).
Mark the last row (this marker will be called: Level-1-A-Marker - see picture on the right to see how the markers are placed)
Level 1 – Color B:
With yarn B and a new needle (and as yet complete unattached to the piece you just knitted)
Knit the same piece in color B.
Mark the last row (this marker will be called: Level-1-B-Marker)
Level 2 – Color A:
Now the last stitch of a color A row is connected to the first stich of a color B row.
Standard Row 1 (SR1): sl1, k to last stitch, slip last stitch knitwise, pick up edge stitch, insert left-hand needle into both stitches and knit like an ssk.
Standard Row 2 (SR2): sl1, k to end
Repeat these standard rows at least 5 times.
Level 2 – Color B:
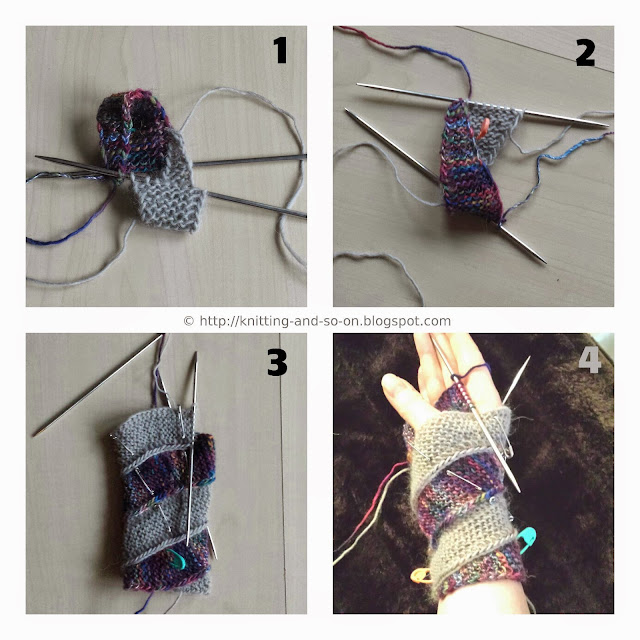
Fold the connected strip backwards (see illustration no. 1) so that you can connect the next row of the color B-triangle to the first row of the color A-triangle.
Standard Row 1 (SR1): sl1, k to last stitch, slip last stitch knitwise, pick up edge stitch, insert left-hand needle into both stitches and knit like an ssk.
Standard Row 2 (SR2): sl1, k to end
Repeat these standard rows at least 5 times.
 |
| Illustrations 1, 2, 3 and 4 |
Now finish round 2 in colors A and B – taking turns to knit. (You don't have to finish a layer of one color before switching to the other one. You can switch anytime inbetween as long as you use the markers.)
When you connect a row to a row with a marker, mark this row (the markers will be called Level-2-A-Marker and Level-2-B-Marker respectively)
Level 3 – Color A
Continue knitting SR1 and SR2 – when you reach the row marked with Level-2-B-Marker, place a marker (this will be called Level-3-A-Marker)
Level 3 – Color B
Continue knitting SR1 and SR2 – when you reach the row marked with Level-2-A-Marker, place a marker (this will be called Level-3-B-Marker)
Level 4 – Color A
The following short row sequence serves to wide the mitts and to create a thumb gusset. (One garter stitch ridge equals two rows).
Ridge 1 = SR1, SR2
Ridge 2: sl1, k6, t+p, k to end
Ridge 3 = SR1, SR2
Ridge 4 = SR1, SR2
Ridge 5: sl1, k5, t+p, k to end
Ridge 6 = SR1, SR2
Ridge 7 = SR1, SR2
Ridge 8: sl1, k6, t+p, k to end
Ridge 9 = SR1, SR2
Ridge 10 = SR1, SR2
Place a marker (this will be called Thumb-End-Marker-A)
Continue knitting SR1 and SR2 – when you reach the row marked with Level-3-B-Marker, place a marker (this will be called Level-4-A-Marker)
Level 4 – Color B
Continue knitting SR1 and SR2 – when you reach the row marked with Level-3-A-Marker, place a marker (this will be called Level-4-B-Marker)
Level 5 – Color A
Continue knitting SR1 and SR2 – when you reach the row marked with Level-4-B-Marker, place a marker (this will be called Level-5-A-Marker)
Level 5 – Color B
Now the thumb gusset will be widened a bit more with some short rows.
Ridge 1 = SR1, SR2
Ridge 2 = SR1, SR2
Ridge 3: sl1, k6, t+p, k to end
Ridge 4 = SR1, SR2
Ridge 5 = SR1, SR2
Ridge 6: sl1, k5, t+p, k to end
Ridge 7 = SR1, SR2
Ridge 8 = SR1, SR2
Ridge 9: sl1, k5, t+p, k to end
Ridge 10 = SR1, SR2
Ridge 11 = SR1, SR2
Ridge 12: sl1, k6, t+p, k to end
Ridge 13 = SR1, SR2
Ridge 14 = SR1, SR2
Place a marker (this will be called Thumb-End-Marker-B) - illustration no. 3 shows how the piece should look now.
Continue knitting SR1 and SR2 – when you reach the row marked with Level-4-A-Marker, place a marker (this will be called Level-5-B-Marker)
Level 6 – Color A
R1: sl1, k to end (do NOT attach the last stitch to the level below)
R2: sl1, k to end
Repeat R1 and R2 five more times.
Try it on and see if the unattached strip fits over your thumb to reach Thumb-End-Marker-B (see illustration no. 4). If it’s too short repeat R1 and R2 once more.
Knit SR1, but attach the last stitch to the first stitch of the row marked with Thumb-End-Marker-B.
Knit SR2.
Continue knitting SR1 and SR2 – when you reach the row marked with Level-5-B-Marker, place a marker (this will be called Level-6-A-Marker)
Level 6 – Color B
Continue knitting SR1 and SR2 – when you reach the row marked with Level-5-A-Marker, place a marker (this will be called Level-6-B-Marker)
Level 7 – Colors A and B
R1 = SR1
R2 = SR2
R3 = SR1
R4: sl1, k2tog, k to end
R5 = SR1
R6 = SR2
Repeat R1 to R6 until there are 3 sts left.
R7 = SR1
R8 = SR2
R9 = SR1
R10: sl1, k2tog, k to end
R11: SR1
R12: ssk, cut yarn and draw through loop
2nd Mitt
There are two differences that make the mitts mirror-images of one another:
a) the knitted strip is folded differently when first connecting the rows
b) the connection is done differently (i.e. standard rows 1 and 2 are different, as described below).
Knit
level 1 (colors A and B) as for 1st mitt.
Level 2 - Color A
Now the last stitch of a color A row is connected to the first stich of a color B row.
Standard Row 1 (SR1): sl1, k to last stitch, slip last stitch wyif as if to do a ptbl
Standard Row 2 (SR2): pick up edge stitch, k2tog (i.e. the last stitch of the last row and the picked up stitch), k to end
Repeat these standard rows at least 5 times.
Level 2 – Color B
Fold the connected strip forwards (i.e. in the opposite direction as for the first mitt, see illustration no. 2) so that you can connect the next row of the color B-triangle to the first row of the color A-triangle.
Standard Row 1 (SR1): sl1, k to last stitch, slip last stitch knitwise, pick up edge stitch, insert left-hand needle into both stitches and knit like an ssk.
Standard Row 2 (SR2): sl1, k to end
Repeat these standard rows at least 5 times.
Now finish round 2 in colors A and B – taking turns to knit.
When you connect a row to a row with a marker, mark this row (the markers will be called Level-2-A-Marker and Level-2-B-Marker respectively)
Knit
levels 3 to 6 (in both colors) as for 1st mitt.
Level 7 – Colors A and B
R1 = SR1
R2 = SR2
R3 = SR1
R4: pick up edge stitch, k2tog (i.e. the last stitch of the last row and the picked up stitch), k2tog, k to end
R5 = SR1
R6 = SR2
Repeat R1 to R6 until there are 3 sts left.
R7 = SR1
R8 = SR2
R9 = SR1
R10: pick up edge stitch, k2tog (i.e. the last stitch of the last row and the picked up stitch), k2tog, k to end
R11: sl1, sl1 as if to ptbl
R12: pick up edge stitch, k2tog (i.e. the last stitch of the last row and the picked up stitch), cut yarn and draw through loop
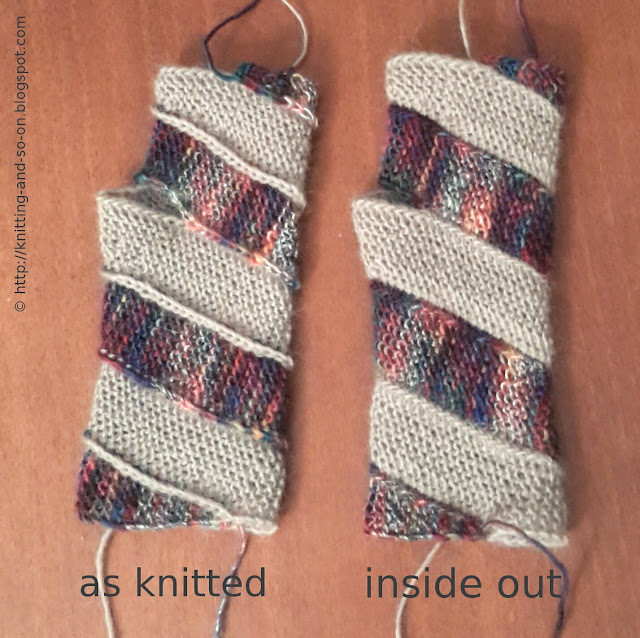
Before you weave in the ends, turn the mitts inside out and decide which side you like best. The picture on the right shows the difference - one knit has been turned inside out and you can see that the connection looks different. After you have decided, weave in ends.